|
F U L L D E S C R I P T I O N
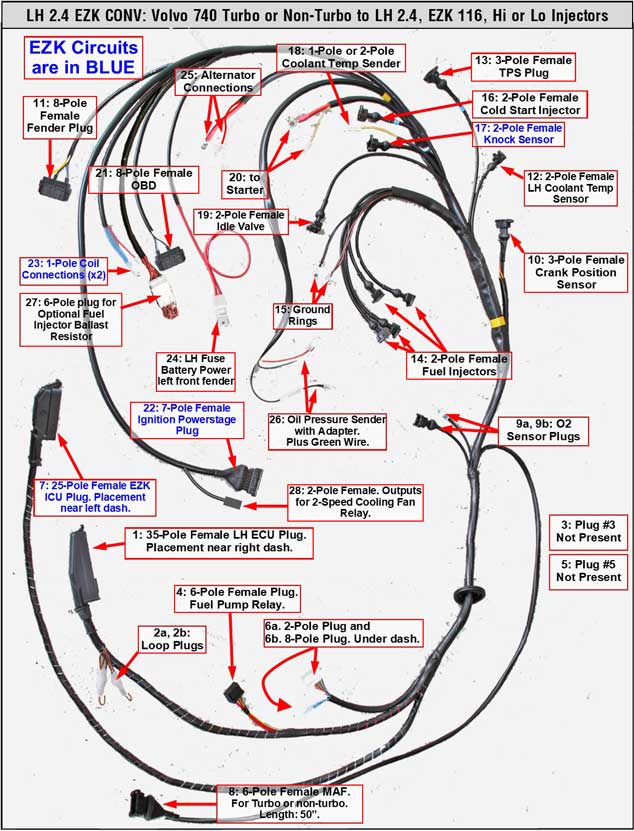
LH 2.4 plus EZ 116 K FULL
CONVERSION ENGINE HARNESS
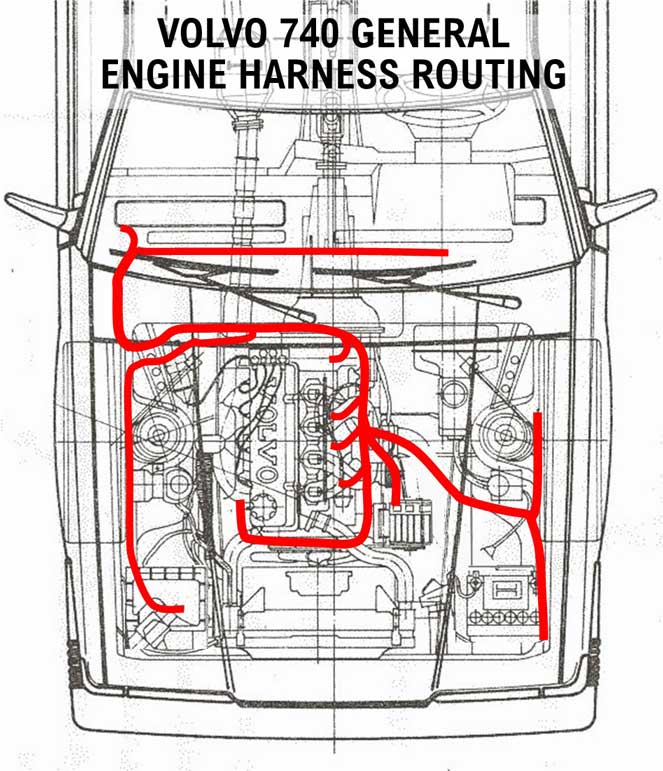
This description will explain the conversion harness to convert ANY 240 (or 740) to LH 2.4. It
connects to both the engine and ignition points under
your hood AND to the engine control modules
under your
dash. It is designed to use LH 2.4 fuel injection
and EZ116K ignition components. An EZK ignition
originally came in a later 700 series.
This is a perfect complement for someone
planning to update an early K-jet 240 or install a later turbo or non-turbo
Volvo 4 cylinder into an earlier car.
 This conversion
harness is designed to be used
with LOW or HIGH IMPEDANCE fuel injectors. This conversion
harness is designed to be used
with LOW or HIGH IMPEDANCE fuel injectors.
1. For Low Impedance
Injectors (AKA: low-Z or peak and hold type): This type was original in the Volvo 700/900 TURBO. This harness has a plug where you can
plug in a Ballast Resistor Pack if needed. Any
standard Volvo 700/900 type resistor pack
will be fine. This way you may use standard fuel
injectors from a 700/900 TURBO or any other low-Z injectors.
2. For High Impedance Injectors (AKA:
high-Z or saturated
type): This type was originally used in
Volvo
non-turbos, such as your original injectors
found in a Volvo non-turbo. This harness will work with these injectors as
is
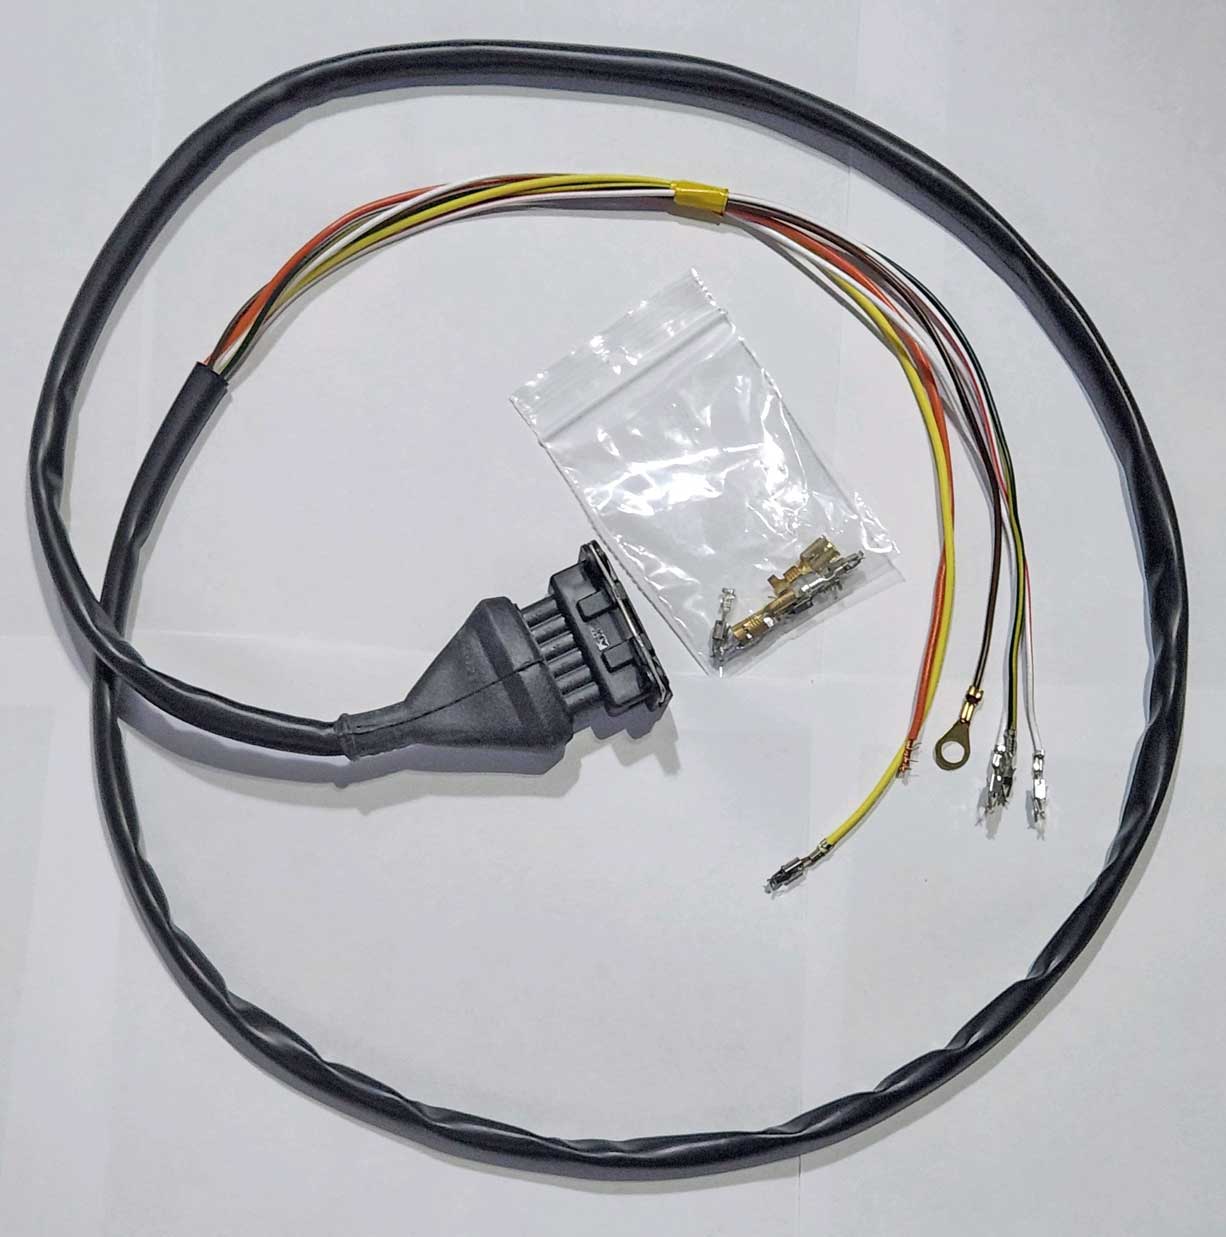
with the pictured by-pass plug shown at left IN PLACE. Impedance testing methods for injectors found HERE.
|
This harness
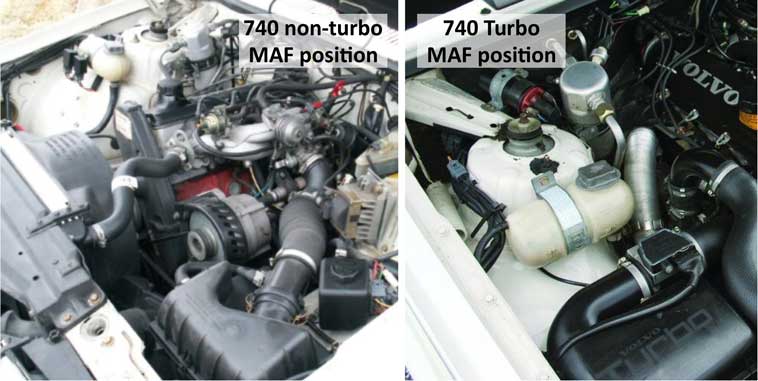
is designed to allow the use of a MAF Sensor on
EITHER side of the engine bay. The MAF wire leads on this harness are designed to be long enough
to reach either location. It may be placed on
the left side for non-turbo or the right side for a turbo. Up to 10 wires are connected for full installation.
|
| The conversion harness may be
used to convert any 240 (or any 740) to LH 2.4 plus EZK ignition, including any early 240 models with
K-Jetronic, Turbo or "+T" conversions, as well as any
other 240 made from 1975 or later. |
Everything
under
the hood is a direct PLUG and PLAY.
(Except for 1993 240, which does not have the 8-pole firewall plug)
There are a few wires under the dash
that will need to be connected. That number
depends on how old your 240 is. Up to 10 wires are connected for full installation.
|
UNDER-DASH WIRING SUMMARY
This info is also found in detail in the installation guides above.
|
WIRE
|
ORIGIN
|
CONNECTION UNDER DASH
|
A1. Red/Gray
|
From LH ECU
|
This
wire brings input to your ECU from the AC relay pin D+/61 or AC control
switch (Red/Gray wire). It allows the ECU to compensate the idle speed
when AC is activated.
|
A2. Green
|
From LH ECU
|
This
wire brings input to your ECU from the AC compressor. It tells the ECU
that your AC compressor is engaged. Its used to keep the idle speed
stable when compressor starts.
|
B1. Blue
|
From LH ECU, EZK ICU
|
This
wire gets connected to switched power from ignition switch Terminal
15 (or any 12v circuit "ON" when Ignition Switch in the RUN position). For a 240, this
power source may usually be tapped from the back input side of fuse 11, 12 or
13 (or fuse 3, 4 or 5 for 1978 and older 240). This circuit may be
combined with wire B3 (blue fat).
If you have questions about what the "back side" or "input side" for the 240 FUSE PANEL looks like, click here for more information and images of 240 fuse panels in my 240 FUSE PANEL PAGE.
|
B2. Red/Yellow (fat)
|
From Fuel Relay
|
This
is the output from the Fuel Pump Relay to supply power to the fuel
pumps. For a 240, this wire should be connected at the fuse panel to the INPUT
side of the fuse for the in-tank fuel pump or fuel pumps. You can
choose this
fuse as follows: 1979 -84: Fuse 5. 1985 and later: Fuse 4. For pre-1979,
you can choose any fuse that is not currently being used, such as fuse
10, or install an in-line fuse and then connect to pump.
Click here for the Fuel Pump Relay Page to see useful 240 Fuel Pump Relay Diagrams.
If you are converting a 240 Turbo or other K-Jet 240
and you're having trouble visualizing how this circuit powers your
pumps, I have a more detailed explanation in my 240 Fuel Pump Page HERE:
https://www.240turbo.com/fuelpumprelay.html#LH2.2Fuse5
|
B3. Blue (fat)
|
From Coil+
|
This wire gets connected to switched
power from ignition switch Terminal 15 (any 12v circuit with Ignition
Switch in the RUN position). For a 240, this source may usually be tapped from
the back input side of fuse 11, 12 or 13 (or fuse 3, 4 or 5 for 1978 and older
240). This circuit may be combined with wire B1 (blue).
If you have questions about what the "back side" or "input side" for the 240 FUSE PANEL looks like, click here for more information and images of 240 fuse panels in my 240 FUSE PANEL PAGE.
|
B4. Black/Blue
|
From LH ECU
|
This
wire normally gets connected to the Speedometer Pulse Output Signal on the back
of an electric speedometer type cluster that's compatible with LH 2.4.
For a 240, this is pin 31/6 (in the round plug). This
signal is produced by an LH 2.4 compatible
speedometer when it's connected to the Vehicle Speed Sensor (VSS) in the differential. For questions about workarounds concerning this for EARLIER 240s CLICK HERE.
For a 740
this is pin E on the back of the cluster. See 740 installation guide for images of pin E.
|
B5. Violet
|
From LH ECU
|
This
wire may be connected for a Shift Light in a 240 if desired for a manual transmission
car. It goes to pin 34 of an LH 2.4 compatible instrument cluster.
|
B6. Pink/White
(2 wires)
|
From LH ECU, EZK ICU
|
Check
Engine Light (CEL).
For a 240, this wire can be connected to pin 32/3 or pin 235
of an LH 2.4
compatible instrument cluster to provide the circuit for the CEL. It has been found that some early 240 LH 2.4 instrument
clusters used pin 32/3 for the CEL (for USA and Canada) and pin 235 for
Non-USA. Some early USA/CAN 240 LH 2.4 clusters had pin 235 deleted. Later
240 clusters changed pin 32/3 to an ABS lamp, so in those clusters the CEL
was connected through pin 235. If you're using an earlier (pre-1989)
240 instrument cluster, you can connect this circuit to any unused warning
lamp you wish, such as the Lambda Sond lamp, EGR lamp or Choke lamp. For
detailed information about 240 instrument cluster pinouts I have
created a 240 Gauge Electrical Page at: https://www.240turbo.com/240gaugewiring.html.
For a 740, this wire can be connected to pin C/7. See 740 installation guide for images of pin C/7.
|
B7. Pink
|
From LH ECU
|
This
wire supplies the ECU with momentary power when the starter is
engaged. If used, connect this wire to the starter solenoid
circuit. The starter solenoid circuit is the Blue/Yellow wire in the
8-pole firewall plug. It may also be traced to a convenient location under the dash.
|
B8. Red/White
|
From Ignition Powerstage
|
Output
to tachometer lead if needed. If a tach signal is needed for your
tach, you may connect this wire to your 240 tach input spade on the back of your instrument cluster.
For a 740, the tach input is pin G. See 740 installation guide for images of of pin G.
|
If you have questions about what the "back side" or "input side" for the 240 FUSE PANEL looks like,
click here for more information and images of 240 fuse panels in my 240 Fuse Panel Page. |
LHD or RHD?:
This default harness is made for LHD (left hand drive)
cars, however a RHD (right hand drive) harness may be made by special order if needed.
What is the difference between LH 2.2 and LH 2.4?
1. Bosch LH-Jetronic 2.2 was first introduced in the
Volvo 240 (B230F) and in the 1985 740 (B230F and B230FT) for the 1985
model year as a replacement for the previous LH 2.0.
Bosch LH-Jetronic 2.4 was then introduced in 1989 for the 240 and 740
(with B230F non-turbo). The 740 Turbo (B230FT) received LH 2.4 the
following year in 1990. LH 2.4 was the first version to be equipped with
an On Board Diagnostic (OBD) system, which used flashing light codes to
identify faults. Also be aware that some later manual transmission 240s
received LH 3.1 instead. More about that is BELOW.
2. The timing maps for LH 2.4 (with EZ 116K
ignition)
are more advanced than LH 2.2 (using EZ 117K ignition). LH 2.4
(EZ 116K) has a potential ignition timing range from approximately 55Ί BTDC to approximately 5Ί ATDC.
3. LH 2.2 (with EZ 117K) allows for a maximum knock controlled retard of 13Ί (for B230F non-turbo EZK) or 9.8Ί (for B230FT turbo EZK). Retard steps are set at 2.8Ί and re-advance steps are 0.37Ί.
LH 2.4 (with EZ 116K) allows for a maximum knock controlled retard of 14Ί for both turbo or non-turbo variants. Retard steps are set at 2.6Ί up to 4895 RPM and 2.3Ί above 4895 RPM. The re-advance steps are 0.375Ί.
4. For LH 2.2 (with EZ 117K), with certain Turbo models only, factory
ignition
control units can detect an over-heating condition (12v signal sent from
a thermostat switch to EZK ICU pin 9). A safety measure is then applied
by advancing the
ignition timing 13Ί
when the throttle is closed (at IDLE). This feature is not used for the LH 2.2 EZK conversion harnesses offered in this page.
5. LH 2.2 (with EZ 117K) (TURBO variants ONLY) offers Knock-Controlled FUEL Enrichment.
When at least 6Ί of knock retard occurs in all cylinders, fuel is enriched by extending injector opening periods.
6. LH 2.4 (with EZ 116K) ALL variants also offer Knock-Controlled Fuel Enrichment.
Fuel is enriched when at least 3Ί to 4Ί
of retard occurs in all cylinders at engine speeds above 3800 RPM and
above a certain minimum engine load (regulated by the MAF).
7. LH 2.4 will allow for up to 100%
fuel injector duty cycle. LH 2.2 will not reach 100%.
8. LH 2.4 (with EZ 116K) has built in OBD (On Board Diagnostic. LH 2.2 does not have such a system. The LH
2.4 (with EZ 116K) OBD functions will store fault codes in
its memory. Control unit memory can store up to three different fault
codes, although the LED on the OBD unit can display up to seven 3-digit
fault codes. NOTE: Memory is erased and fault codes are deleted when the
battery is disconnected.
9. LH 2.2 uses a MAF with an external CO adjustment screw for fine tuning. The MAF for LH 2.4 has no external adjustment.
10. LH 2.2 has a throttle body with an
externally adjustable idle speed. LH 2.4
idle speed is not normally externally adjustable.
11. LH 2.2 (with EZ 117K) has externally adjustable ignition timing.
LH 2.4 (with EZ 116K) ignition timing is not externally adjustable (with some exceptions HERE).
12. While both LH 2.2 and LH 2.4 will increase idle speed when an AC
compressor is engaged, LH 2.4 also offers an idle increase when an
automatic transmission selector is moved from 'P' or 'N' to 'R', '1', '2', '3' or 'D'.
13. Both systems use an ignition distributor.
LH 2.2 (with EK 117K ignition) uses a distributor with a Hall sensor to read
engine speed and send that signal to the EZK control unit and LH control unit.
LH 2.4 (with EZ 116K ignition) uses a distributor without a Hall sensor
(no internal electrical device at all). Instead, LH 2.4 uses a Crank Position Sensor (CPS) mounted on the back of the
engine block above the flywheel (or above the flex-plate for an auto
transmission car) CLICK HERE for more info.
The CPS reads engine speed and sends that signal to the EZK control
unit and LH control unit. A CPS is considered to be more accurate than
the earlier distributor Hall sensor. Adding a CPS mounting bracket and a compatible
flywheel (or flex-plate) is usually required if you're fitting LH 2.4 to an earlier 240 that did not originally have it. MORE INFO HERE
14. LH 2.4 is designed to receive an input signal from an LH 2.4 compatible
electric speedometer (1989-93 240). This signal tells the ECU if the car is in motion and helps the fuel system
regulate fuel-cut during deceleration (or engine braking) and engine idle
(when stopped). This LH 2.4 compatible speedometer would normally be receiving an
input signal from a Vehicle Speed Sensor (VSS)
in the differential, since all 1986 and later 240s came with a VSS
equipped differential, however
two different types of VSS systems were made; non-ABS brake type and
ABS brake type. The early non-ABS type came in 1986 and later 240s
(without ABS of course). ABS began appearing as an option in 1991 and
became standard in US 240 models in 1992. More info and photos of these
VSS sensors
and differentials can be found in the Volvo Rear End Page: https://www.240turbo.com/volvorearends.html.
There are some WORK-AROUNDS for those installing LH 2.4 into an earlier 240 that does not have
the typical VSS signals - CLICK HERE for more info on this.
LH 2.2 has no specific need or provision to receive a VSS signal, making it a
more simple option for an early 240 without a VSS equipped rear
differential.
15. If the car is to be turbocharged and an overboost fuel cut is needed, LH 2.2 uses an external overboost switch, which gets a boost signal from a hose going to the intake
manifold. This ON/OFF boost-cut switch reads boost pressure in the same manner the 240 Turbo switch did.
The overboost switch will cut power to the fuel pump relay when it
reaches its set maximum boost point.
LH 2.4 doesn't use any external overboost switch. LH 2.4 can regulate an
overboost fuel cut function using an engine load signal from the MAF sensor. The MAF
generates a
voltage signal based on air flow. When it reaches a programmed
threshold, it will introduce fuel cut protection. The factory threshold
is believed to be about 5.1v. with a boost limit of around 12-13
psi. Workarounds are reportedly possible for higher boost options. One involves
using a diode across two of the MAF
terminal wires. Or an option can be switching to a larger (3 inch) MAF from a Volvo 960. Plus
some LH 2.4 ECUs can be
reprogrammed or "chipped" to modify this and other functions. More on chipping below or CLICK HERE.
16. The parts needed for your
240 will also be different between your choice of an LH 2.2 or LH 2.4 conversion,
depending on what year or model 240 you have. Here are some examples.
Early K-Jet 240 or 240 Turbo:
Installing an LH 2.2 conversion into an early 240 that originally had
mechanical fuel injection (K-Jet) will
be less work than installing an LH 2.4 conversion, but either can be
done. LH 2.4
will
require a Crank Position Sensor (CPS) on the engine, which is not found
on an
early 240. LH 2.2 does not use this sensor, so it's not needed for LH
2.2. There is more information about adding a CPS to an older engine below for an LH 2.4
installation. That can be found HERE.
Early K-Jet 240 or 240 Turbo: If you're installing a later engine,
which previously used LH 2.4 (B230F 1989 or later. B230FT 1990 or
later), it would have come with a Crank Position Sensor and that sensor may be used.
Early K-Jet 240 or 240 Turbo: LH
2.4 also should have a signal from a Vehicle Speed Sensor (VSS) in the
rear differential. Early 240s (before 1986) will not have a VSS. LH 2.2
has no need for a VSS signal, so that makes LH 2.2 a less complicated installation. More information about work-arounds for LH 2.4 and a VSS can be found HERE.
Early K-Jet 240 or 240 Turbo: If you're using a B21 engine block that did not originally have a drilled hole for a Knock Sensor,
that hole will need to be drilled and tapped for any LH 2.2 or LH 2.4
conversion. This hole was done at the
factory for all 1983 and later B23F and B23FT blocks and all 1985 and
later B230F and B230FT blocks. B21 blocks (B21A, E, F, or FT) did not
have this hole drilled and tapped from the factory and very early B21
blocks will not even have a cast-in boss that can be drilled. More information about adding or drilling this hole can be found HERE.
Early K-Jet 240 or 240 Turbo FUEL PUMPS:
If you're wondering if you need to change your K-Jetronic fuel pumps to
something different, you do not. The original K-Jet in-tank pump and
main pump are 100% compatible with an any EFI system installation. You may
want to consider changing to higher capacity pumps if you're increasing
power to the point that the stock pumps may not supply enough fuel.
Otherwise, no change is required.
1985-88 240: A 240 from these
years would have come with LH 2.2, so this of course would make installation
of an LH 2.2 +EZK conversion pretty simple. Upgrading to an LH 2.4 +EZK
conversion in a 1985-88 240 means you
will usually need to add a Crank Position Sensor (CPS) to the engine or use a
later engine that comes with a CPS. More info can be found HERE about that.
LH 2.4 also needs a speed signal (VSS), which normally comes from an LH
2.4 type speedometer. There are other potential solutions. A discussion about that is HERE.
More information about PARTS needed for an LH 2.2 installation can be found HERE.
More information about PARTS needed for an LH 2.4 installation can be found HERE.
|
|
What will I need to change to put a 4 cylinder from a 740 or 940 into my 240?
What will I need to change to put a 4 cylinder from a 740/940 into my 240?
First let's discuss some mechanical changes that will be to be made to an engine from a 740 or 940.
The 740 has an ignition distributor on the back of the cylinder head. That won't fit in a 240. The correct change will be to install a normal 240 distributor into the front of the block.
To do this you first need to change the intermediate shaft in the
engine. This
is the shaft behind the intermediate timing sprocket. This shaft drives
the
oil pump and the 240 distributor. The shaft in a 740/940 doesn't have
the gear to drive a distributor, so the correct shaft from a 240 engine
needs to be installed
there. There are some discussion threads on this: turbobricks.com/swapping-a-b230ft-engine-into-a-240.42051
or try a Google search using this: b230ft swap; site:turbobricks.com
The next thing to discuss is related to what EFI and ignition you want to use.
If you have an early 240 (pre-1985) and you plan to install a later 740/940 engine (1989 and later),
then you have some choices to make. If you plan to use the later EFI
and ignition from a 1989 or later 740/940 (LH 2.4 and EZ116K), then a
few other things are needed.
1. A Crank Position Sensor (CPS): This sensor may come with the later
engine. It's needed to tell the ignition system about the engine speed.
To go along with this sensor, you'll need a transmission bell housing
that has the cut-out for that sensor to fit. And you'll need the correct
flywheel or flexplate to allow the sensor to read revolutions. Lots more info can be found HERE.
2. The LH 2.4 systems is designed to get a signal from an LH 2.4
compatible speedometer, which gets a Vehicle Speed Sensor (VSS) signal
from the rear differential. The pre-1985 240 does not have a rear
differential with a VSS or an electric speedo. There's a discussion of potential work-arounds HERE.
If you're
planning to use LH 2.2 and EZ117K for your pre-1985 240, there will be
no need for a CPS or VSS or speedometer change, so the LH 2.2
installation may be a better fit.
If you have a 1985-88 240 and you plan to install a later 740/940 engine (1989 and later), then
you still have some choices to make. If you plan to use the later LH 2.4 EFI and
ignition from a 1989 or later 740/940 (LH 2.4 and EZ116K), here's what's needed.
1. A Crank Position Sensor (CPS): This
sensor may come with the later engine. It's needed to tell the ignition
system about the engine speed. To go along with this sensor, you'll
need a transmission bell housing that has the cut-out for that sensor to
fit. And you'll need the correct flywheel or flexplate to allow the
sensor to read revolutions. Lots more info can be found HERE.
2. The LH 2.4
systems are designed to
get a signal from the speedometer, so that speedometer needs to
have an output signal. An LH 2.4 compatible speedometer has that. It
gets a Vehicle
Speed Sensor (VSS) signal from the rear differential just like the
earlier car. The 1985-88 240 has a rear differential with a VSS and that
VSS does not need to be changed. And a 1985-88 has an electronic
speedometer, however an LH 2.2 speedo does not have the output signal
for LH 2.4. You could
change the speedo to a 1989 240 type (non-ABS). The reason for such a
change is so the speedometer can supply an output signal for the LH 2.4
ECU. This signal comes from pin 31/6 (in the round plug) on the back of the instrument cluster. If you're looking for alternatives, there's a
discussion of potential work-arounds HERE.
If you were
planning to use LH 2.2 and EZ117K for your 1985-88 240, there
would be no need to add a CPS or make a speedometer change.
|
How do I know if my later 240 has LH 2.4 or LH 3.1?
Bosch LH 2.4 (with EK-116K ignition) began being installed in 240s beginning in 1989 and continued through 1993.
Beginning in 1990, some 240s got Bosch LH 3.1 EFI
instead. These were manual transmission cars. LH 3.1 cars also came
with the EZ-116K ignition (exact same ignition as in LH 2.4 cars).
LH 3.1 was only installed in certain MANUAL TRANSMISSION 240s beginning
in 1990, which were sold in USA, except for those sold in California, which still got LH 2.4. LH 3.1 cars did
not get EGR.
CALIFORNIA EXCEPTION: All 1989 and later
240s with MANUAL TRANSMISSIONS (and automatic transmissions) sold in
CALIFORNIA came with LH 2.4. Beginning in 1990 all California 240s with LH 2.4 also
came with EGR.
Some later year 240s (some 1993 models for sure) got Pulsair air injection as well.
All 1989 and later 240s with AUTOMATIC TRANSMISSIONS sold
in USA (except for California) and all sold in Canada came with LH 2.4.
Many of these non-California models came without EGR.
There are a few ways to visually tell if a later 240 has LH 3.1. If the car is in front of you, you can look under the hood. Find the MAF sensor. If the MAF sensor has a 6-pole connector, then it has LH 2.4. If the MAF sensor has a smaller 4-pole connector, then it has LH 3.1. The two styles of MAF sensors look different (below images). Another difference is LH 3.1 cars have a different Throttle Position Sensor and a different LH ECU.
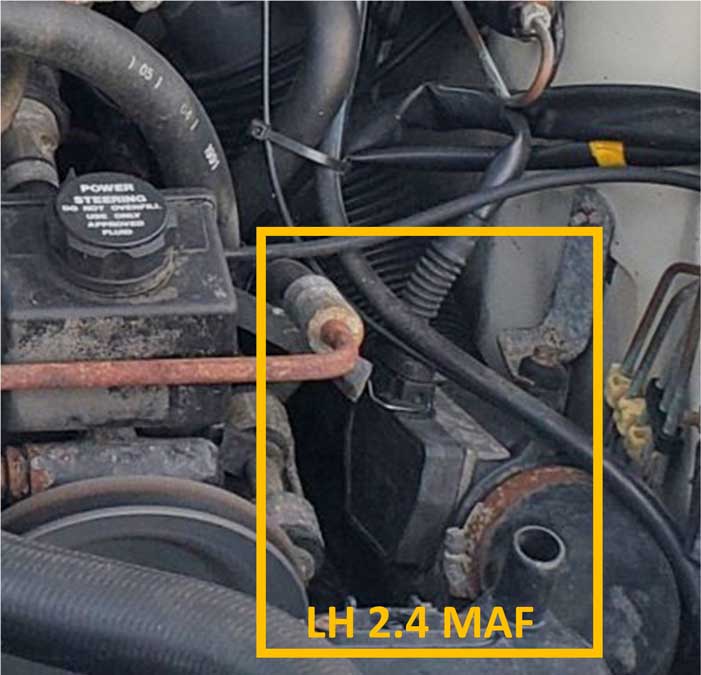 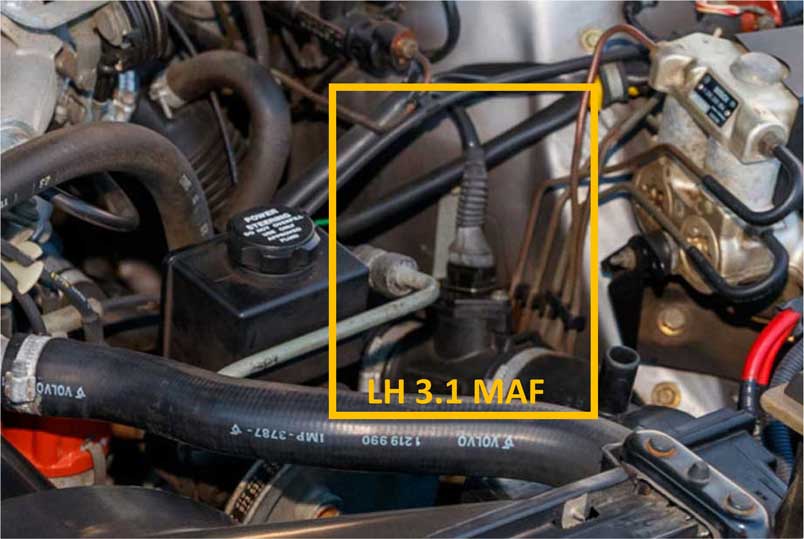
| You can also tell by looking at the VIN in you have LH 3.1 or LH 2.4. |

|
<< CODE 88 = LH 2.4
<<< This VIN plate is from a 1993 245 with a manual transmission. It has ENGINE CODE 88, which indicates it was equipped with LH 2.4. |

|
<< CODE 82 = LH 3.1
<<< This VIN plate is from a 1992 245 with a manual transmission. It has ENGINE CODE 82, which indicates it was equipped with LH 3.1. |
|
Where should I place the LH 2.4 ECU and EZK ICU in my 240 conversion project?
 The
best place to mount the control units is where the factory placed them
for later 240s. Under
the right side dash. If you have access to used parts or salvage yards,
the original mounting brackets would be a good thing to get. The LH ECU
bracket from any 1985-93 240 will work. The EZK ICU bracket is found
in 1989-93 240s. The
best place to mount the control units is where the factory placed them
for later 240s. Under
the right side dash. If you have access to used parts or salvage yards,
the original mounting brackets would be a good thing to get. The LH ECU
bracket from any 1985-93 240 will work. The EZK ICU bracket is found
in 1989-93 240s.
Also, if you're pulling an EZK unit from a 740, you'll find it located under the steering column just to the right of the brake pedal bracket.
|
Where can I find PIN-OUT Function Diagrams for LH 2.4 and EZK 116 control units?
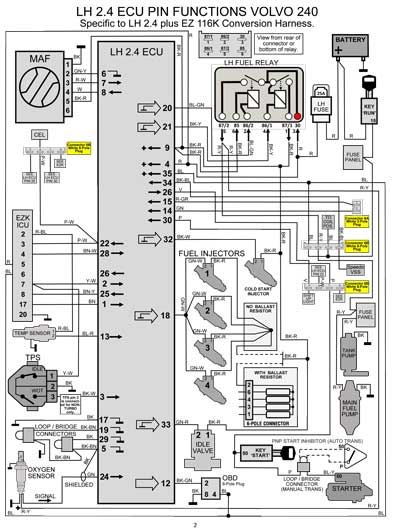 <<< CLICK THIS IMAGE for a detailed PDF document: This is the Pin Function Diagrams specific to THIS LH 2.4 CONVERSION HARNESS. <<< CLICK THIS IMAGE for a detailed PDF document: This is the Pin Function Diagrams specific to THIS LH 2.4 CONVERSION HARNESS.
And I have many MORE Pin Function Diagrams for other systems, including K-Jetronic, LH 2.0, LH 2.2 and LH 2.4 systems in the MAIN HARNESS PAGE here:
https://www.prancingmoose.com/volvoharnesses.html#pinfunctions
|
How can I have my LH 2.4 ECU Chipped?
Having
an ECU chipped is optional. Altering the programming is not
required to install LH 2.4 in a 240. But you can if you need
to.
There are some resources if you want to pursue this. Here's one place to start. CHIPPING FAQ: https://turbobricks.com/index.php?threads/chipping-faq.84817/
Here is a source in the USA: https://www.redblockpowered.com
Also there is a source in Sweden here: https://www.stonis-world.com/chipsfrb.html
and you can try a search: source for chips; site:turbobricks.com
Or you can check out how to program your own LH 2.4 ECU using THE OSTRICH EMULATOR.
|
How can I alter the static ignition timing in my EZK 116 system?
Aside from having a custom tuned chip made (above), normally EZK ignition does not have adjustable base timing, but there are
some small tricks to make small changes. The ignition system has built-in
programming OPTIONS that allows
for certain changes when certain terminal pins or combinations of pins are grounded. This
refers to EZK pins 18, 19, 21 and 25, which otherwise are not used for any function.
Depending on which pins or which combinations are grounded, you can
advance or retard the base timing map in a few different ways.
This discussion thread has more detail: turbobricks.com/advance-retard-timing-on-ez116k.75838
|
How do I know if my FUEL INJECTORS are low
impedance or high impedance?
If you know
they are from a non-turbo Volvo 240 or 740, then they are
high impedance. Stock 740 Turbo (B230FT) injectors, known as "Greentops", are low impedance types.
You can measure the
resistance across the two electrical terminals
of the injector. If the resistance is between
1.5 and 4.0 Ohms you have low impedance
injectors. If the resistance is between 8
and 16 Ohms you have high impedance injectors. YouTube Video Here.
For best results, a set of injectors should be
fairly close to each other in a resistance Ohms test.
|
Some great fuel injector info
compilation here: turbobricks.com/fuel-system-upgrades-faq.26083
Here are some sites that offers reconditioned
injectors and they have a large listing of part
numbers to look at: www.fuelinjector.citymaker.com,
http://injector-rehab.com/shop/Flow_Rates.
And here is an extensive table listing from Stan Weiss for Bosch (and other) fuel
injector PN's with flow rates: http://users.erols.com/srweiss/tableifc.htm.
|
How can I find an alternate fuel injector
that will work?
So for example, suppose you currently have
"Greentops" (stock low impedance B230FT injectors, PN 0-280-150-357). You may use those
injectors (or any low impedance injector) for
this conversion without any issues as long as
you are using a fuel injector ballast resistor.
On the other hand, suppose you want to use a high impedance
alternative for this conversion harness. That's also possible with this
harness by using the ballast resistor BYPASS PLUG.
COMPARABLE ALTERNATIVES:
Checking some fuel injector tables (listed above), you'll find that the stock
"Greentops" have a flow of about 28.6 lbs/hour
(300 cc/min).
So if you want something close to that, a comparable alternate can
be any of these:
PN
0-280-150-785 "Orangetops"
from a Volvo 5 cylinder 850 turbo (29 lbs./hour).
PN
0-280-150-737/738 from an
Audi/VW turbo (29 lbs/hour).
PN
0-280-150-218 from a
Buick GN V6 Turbo (29.7 lbs/hour).
Lots of alternatives can be found.
|
 BOSCH EV1 PLUG: This EFI electrical connector
plug is used for fuel injectors on all factory Volvo
240/700/900 harnesses and on THIS
conversion harness. It's known as a Bosch EV1
plug. Volvo
changed to a later style Bosch EV6 plug
for fuel injectors in the late 1990's or early 2000's. BOSCH EV1 PLUG: This EFI electrical connector
plug is used for fuel injectors on all factory Volvo
240/700/900 harnesses and on THIS
conversion harness. It's known as a Bosch EV1
plug. Volvo
changed to a later style Bosch EV6 plug
for fuel injectors in the late 1990's or early 2000's.
When
searching for fuel injector part numbers you should
know that part numbers for fuel injectors
appearing as X-XXX-150-XXX will all use
Bosch EV1 plugs.
Later style Bosch EV6 plugs are found on part
numbers appearing as X-XXX-155-XXX.
Here's a
comparison page of different injector connector
plugs used: https://www.injectorrx.com/bosch-fuel-injectors. |
|
So why would I buy this
new conversion harness when I can pull harness parts from a
salvaged 240 or 740 for less money
and make my own harness?
 SHORT ANSWER: Because 30 plus year old used and heat-soaked
harnesses have issues like this pic.
Click here to see more in the FAQs. SHORT ANSWER: Because 30 plus year old used and heat-soaked
harnesses have issues like this pic.
Click here to see more in the FAQs. |
|
Do I need to use a
Later Type LH 2.4 Compatible
Speedo or Later Instrument Cluster
and a Vehicle Speed Sensor (VSS)
in the REAR DIFFERENTIAL?
This section concerns the need (or preference) to connect the B4 Black/Blue wire in the LH 2.4 conversion harness (CLICK HERE to see this wire)
to an LH 2.4 compatible speedometer (a speedo with a VSS Pulse Output Signal).
For this VSS signal to be valid, it would mean that the speedo is also connected
to a
Vehicle Speed Sensor (VSS) in the rear differential.
The speedo pulse signal
tells
the ECU whether the car is moving or not and it informs the fuel module
when it should cut fuel during deceleration (or engine braking) and how the
idle
should be maintained when stopping and when stopped. If this speed
signal is missing from the ECU, you can
probably expect to experience some unstable idle behavior.
This LH 2.4 conversion harness is designed to
accept this Speedometer Pulse Output Signal from your car if it has one. The problem is if you have an early 240 made before
electronic speedometers were introduced in 1986, then you don't have a rear
differential with a VSS. In this case I have begun compiling some choices to solve this below.
I'll also be adding info for 240s which have a VSS in the rear
differential, but they don't have an LH 2.4 speedometer with the typical
LH 2.4 output for a signal to the ECU (typically 1986-1988 240). This is below in Option #6.
And also I have begin compiling even MORE VSS/Speedo conversion ideas in my 240 Gauge Electrical Page:
240turbo.com/240gaugewiring#speedoadapters
To begin below, it is NOT required to have a rear differential with a VSS.
| If you have done this or can help add to this info, please EMAIL ME. I would like to here about it. |
|
|
As mentioned above in OPTION 3, here is info for a WORK-AROUND that can be used to create a suitable VSS signal that can be read by the LH 2.4 ECU.
The below information is specifically for a car with a CABLE type speedometer. This info is derived and expanded from bobxyz's discussion entries in the Turbobricks thread found at turbobricks.com/lh-2-4-swap-idle-issue.342812.
Generating an LH 2.4 VSS signal from a Cable Speedometer Cruise Sensor
This would come in handy for a car that DOES NOT have a VVS type rear differential.
bobxyz:
On LH 2.4 cars, the VR (variable reluctance) sensor on the rear differential feeds a signal to the
speedometer. On the speedo is a circuit board, which both drives the
speedo needle and generates the VSS signal used by the LH 2.4 ECU.
See http://cleanflametrap.com/speedo.html. (Image below)
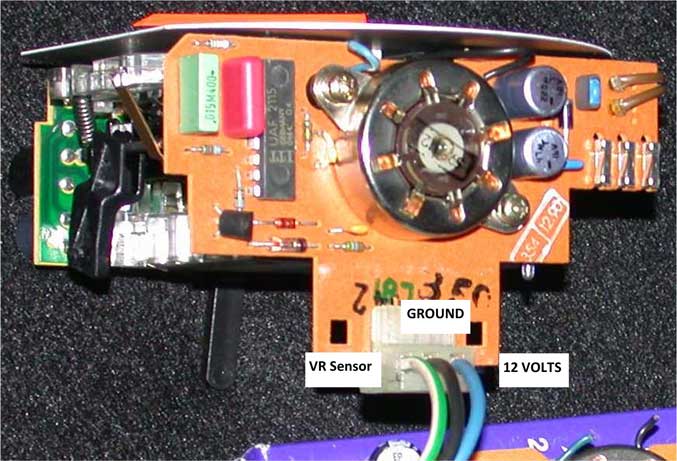
bobxyz:
The 3-pin connector above is Ground, +12volts, and VR sensor input. The VSS OUTPUT
to the ECU is the outer-most one of the three silver female pin
connectors on the RIGHT side of the picture. A close up of those three pin connectors is below.
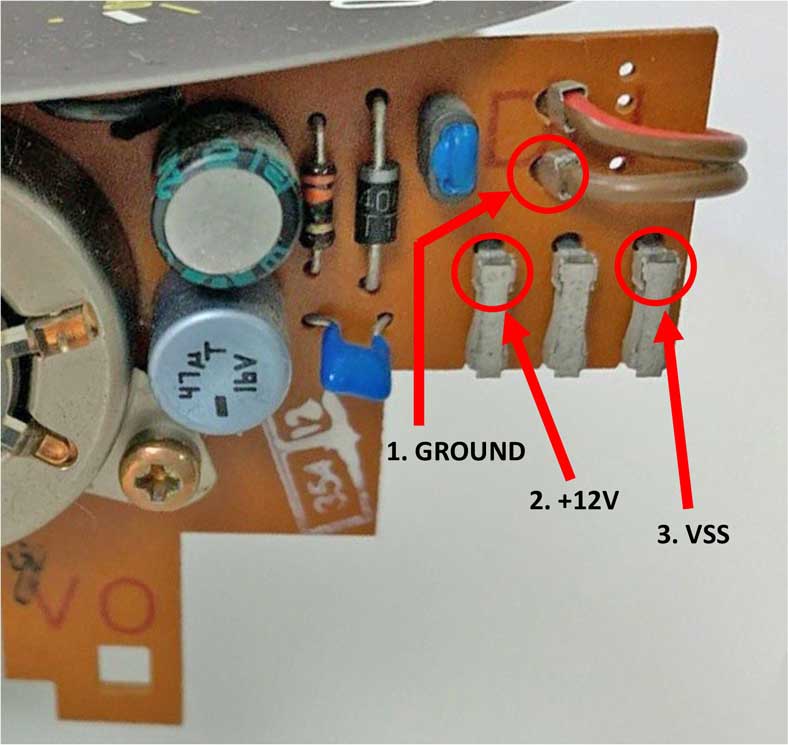
bobxyz:
On cars with
early cable-driven speedos, which were equipped with CRUISE CONTROL,
there is a VR sensor for the cruise control on the back of the speedo
(not present if no cruise control was optioned).
This VR sensor generates a signal that is about half the voltage and
half the rate of the normal rear differential VR sensor used on LH 2.4
cars.
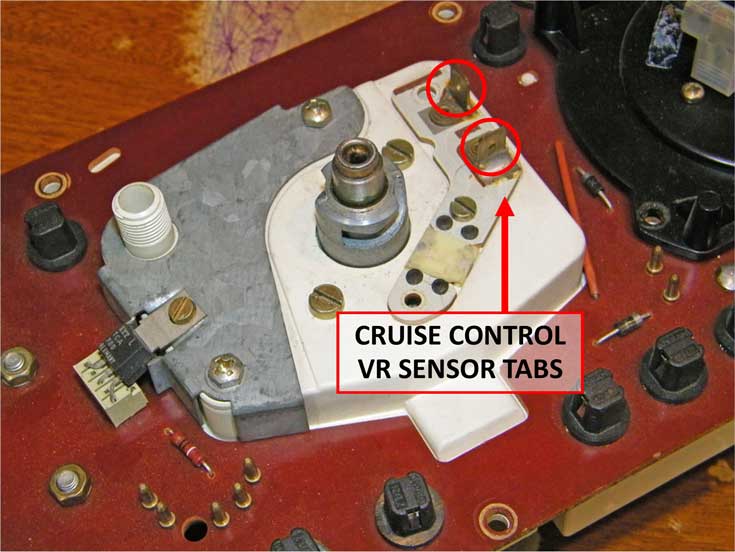
bobxyz:
I've been curious
what would happen if you wired the early speedo cruise VR sensor into a
scrap circuit board (PCB) from a later electric speedo (pre-ABS), and
then used the VSS output from the circuit board to drive the LH 2.4 ECU.
It might work OK, or the voltage might not be enough, or the pulse rate
might not be enough. I had the parts to try part of this experiment.
Otherwise, you
can use a front wheel ABS hub and sensor with an ABS speedometer circuit
board to generate the VSS signal for the ECU, or swap to a later
differential with a VR sensor and use the matching speedo circuit board.
bobxyz:
The later 240s use an electronic speedometer with a VR sensor in the
rear differential. The electronic speedos also supply the VSS vehicle
speed signal to the LH 2.4 ECU. It's possible to use the circuit board
from an electronic speedo with the cruise control VR sensor on the early
cable speedo to generate a VSS signal for the LH 2.4 ECU.
Here's another picture of the circuit board for an electronic
speedometer (a 1991 in this case), showing the main 3-pin connector in
the main center (bottom) and the 3 single-pin connector sleeves on the
right. +12v power comes in
through the main connector and goes directly to the leftmost single pin
connector. This then needs to be jumpered to the center single pin
connector (or you can just wire +12v directly to the center single pin
connector).
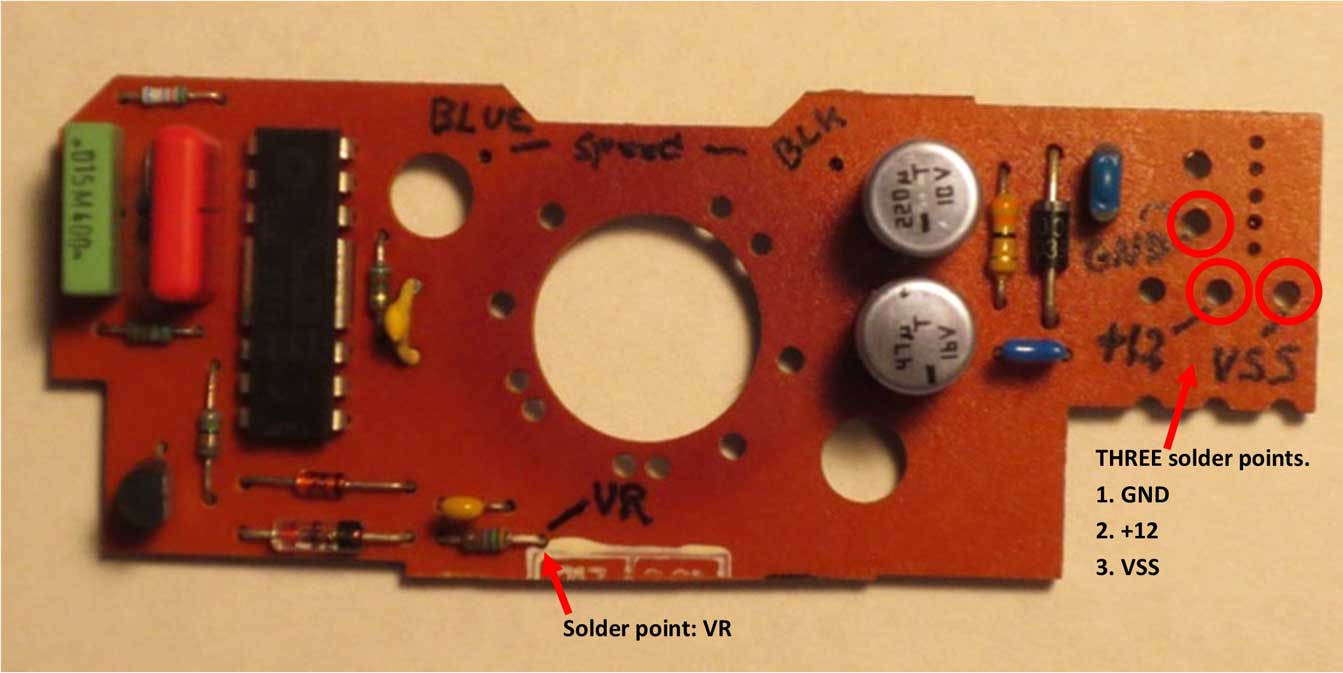
One side of the above VR sensor (back of the speedo) goes to ground, the
other side will be connected to the leftmost pin (labelled VR Sensor)
on the below main center 3-pin connector. Polarity of the speedo VR
sensor doesn't matter.
The VSS signal OUTPUT to the LH 2.4 ECU is labelled below.
In the center of the circuit board is the stepper motor, which drives the odometer gears. The blue and brown wires at the top of the board go to the speedometer needle galvanometer.
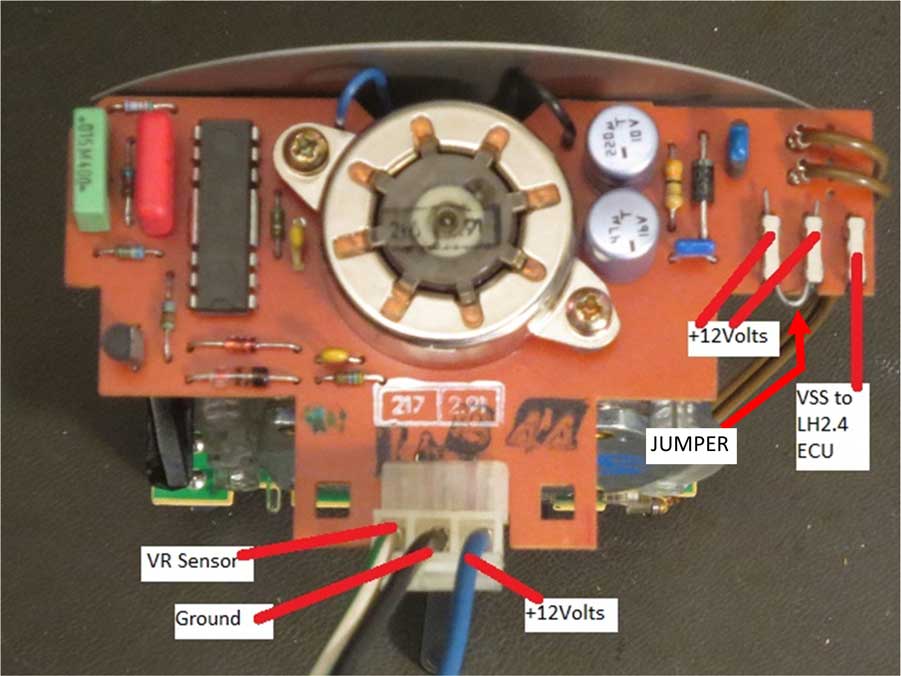
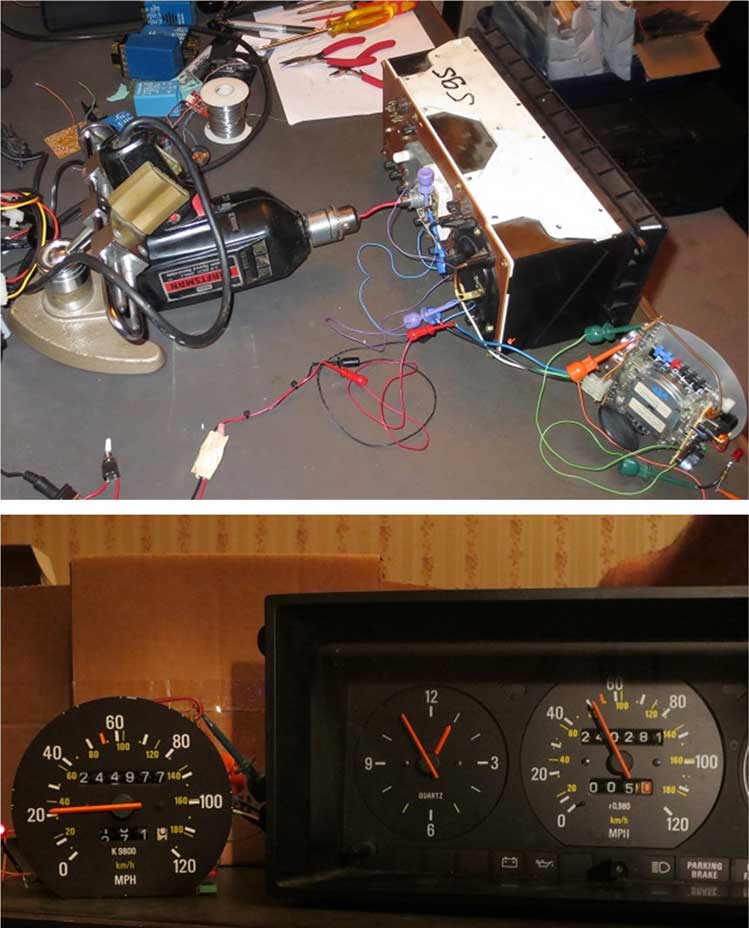
EXPERIMENT TIME:
bobxyz:
Here
are pictures showing a hand drill driving a CABLE speedo, with the
cruise control VR sensor output connected to an electronic speedo.
It was noted that the electronic speedo reads ~2.5x low. I didn't know
if this would work OK with the LH 2.4 ECU for idle control, or if it
needed to have a higher rate. (The electronic speedos use either 12
tooth differential sensors, or 48 tooth sensors in the later ABS
240s). If this doesn't work, it should be possible to use an ABS
front wheel hub sensor (48 tooth) with the speedo circuit board (PCB)
from a 240 ABS speedo.
bobxyz: There
are 2 screws holding the circuit board to the speedometer, and a couple
pairs of wires. I unsoldered them but you could just clip them off. The
rotor for the odometer stepper motor just falls out.
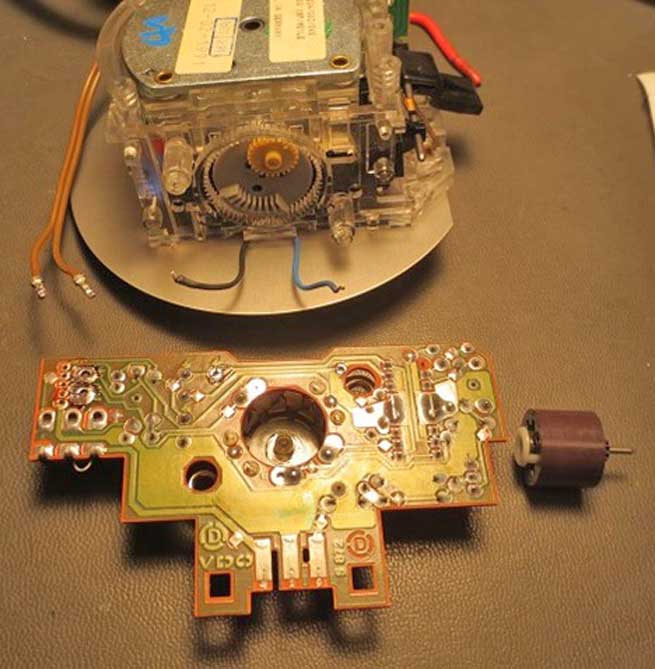
bobxyz: By
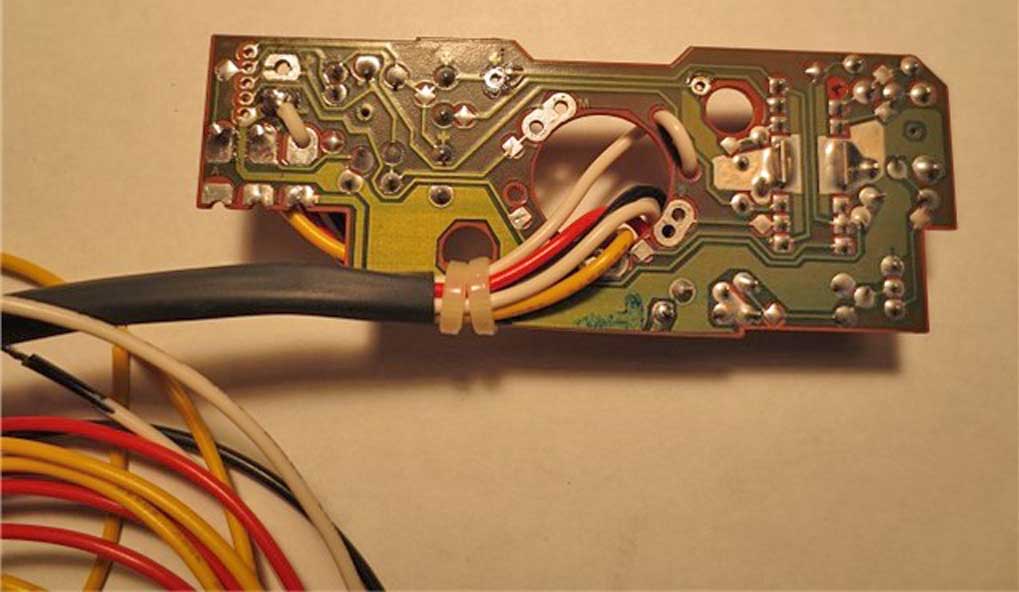
itself, the circuit board draws ~1.4 watts of power. Most of this goes
into the odometer stator coils. I think that you'd be fine wiring up the
circuit board as shown above and wrapping it in electrical tape. The
stator housing does get hot from the power (~115 °F after an hour on the
benchtop at 60 MPH).
I went further on mine and removed the stator. Clip the 4 plastic heat
stake pins flush and unsolder the 3 winding pins. Without the stator,
power draw was only ~0.4 watts. I also had a scrap of big heat shrink tubing
but it wasn't quite big enough so I trimmed off the bottom edge
connector and wired directly to the circuit board points.

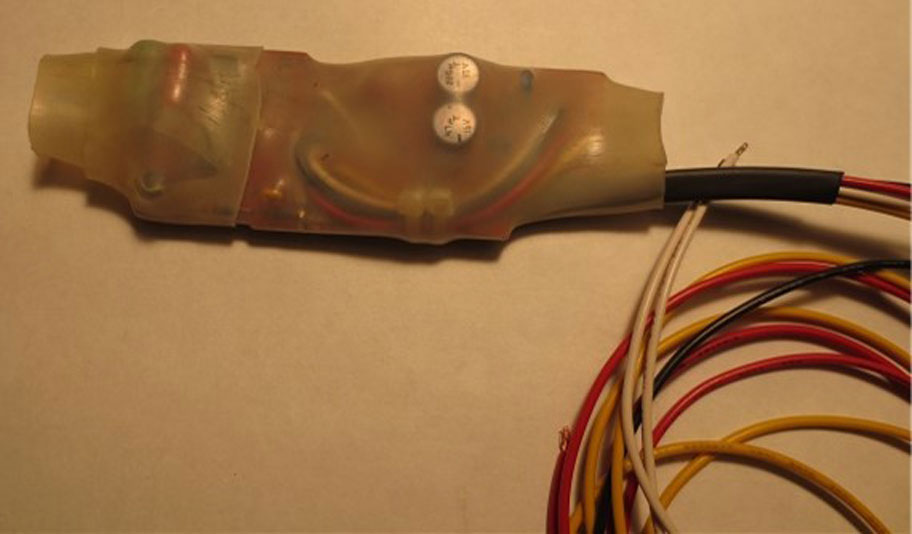
bobxyz: If
anyone tries this, please post an update on how the LH2.4 behaves. Does it have good idle even though the VSS rate is ~2.5x slower than
standard? Does the Shift light (if equipped) do anything weird, or does
it just not work?
FOLLOW-UP:
bobxyz: I've
been running my LH2.4 swapped '85 GLT AW-71 K-Jet for a while now with
no weird idle issues. Generating the LH 2.4 VSS signal from the Cable
Speedometer Cruise Sensor seems to work just fine.
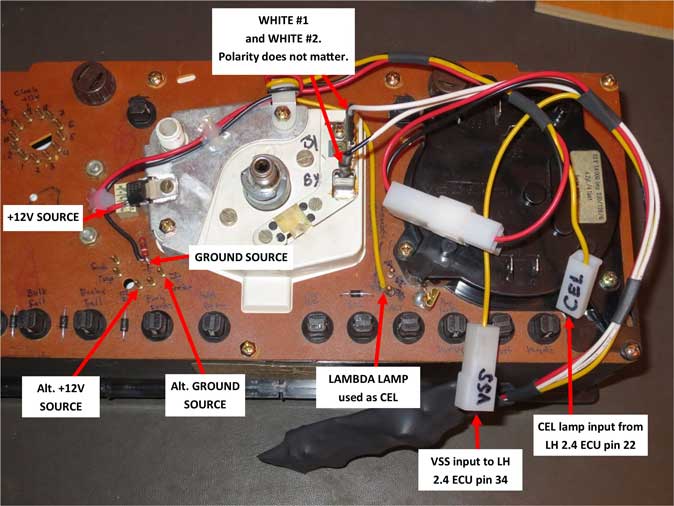
Here's a picture of the early cluster with the electric speedo VSS PCB
hidden in black heat-shrink. A mod was done to use the Lambda Sond Service
light as a Check Engine Light (CEL).
Mod Description: The Lambda
Service Counter box was removed so the Lamba light in the gauge cluster
could be used for a CEL. To do this, you should clip out the diode on
the Lambda light so that the light will be illuminated only by the EZK
or ECU CEL signal and not by the alternator. With the key in the "ON"
position, the EZK/ECU turns on the CEL as a bulb check. Both CEL wires
(ECU+EZK) are bridged in the harness, so either one can ground the check
engine light to turn it on.
bobxyz: After some side discussions, and more reading (reference to: turbobricks.com/2-4lh-swap-idle-problem.191366) . . .
. . . my curiosity won out and I tried unplugging the VSS wire from the LH 2.4.
Then I went for a leisurely 20 minute neighborhood and highway drive.
Surprisingly, I didn't notice any idle issues. I checked for
codes (OBD hole #2), and there were none (1-1-1). Remember, this is a
AW71 automatic, not a manual. If it matters, I'm running a stock '937
ECU and a stock '148 EZK.
Then I went for a slightly more spirited drive (I still have less than
500 miles on the rebuilt engine, so when I say spirited, think granny's a
little late to church and may not get her favorite pew spirited). I
also clicked off the overdrive when on the highway for a few minutes --
cruise RPMs went up from ~2K to ~3K. With this, I did notice a high idle that wouldn't go away until the
engine was turned off. The idle was ~1000 to ~1100 RPM in Drive, and
went up to ~1400 RPM in Neutral. Normally, it idles a bit under 800rpm.
This time, I got the expected 3-1-1 diagnostic code due to a missing VSS
signal. I was also watching the WBO2 gauge to see if deceleration fuel
cut changed at all, but didn't notice anything obvious.
I'm assuming the automatic tranny masks the high idle as compared to a
manual tranny, and that you need higher RPMs plus some load to trigger
the issue in the first place.
Earlier this week, during our late season snow storm, I put together another VSS board for smoothdurban. It will be interesting to see if it works for him, and if he sees the same issues.
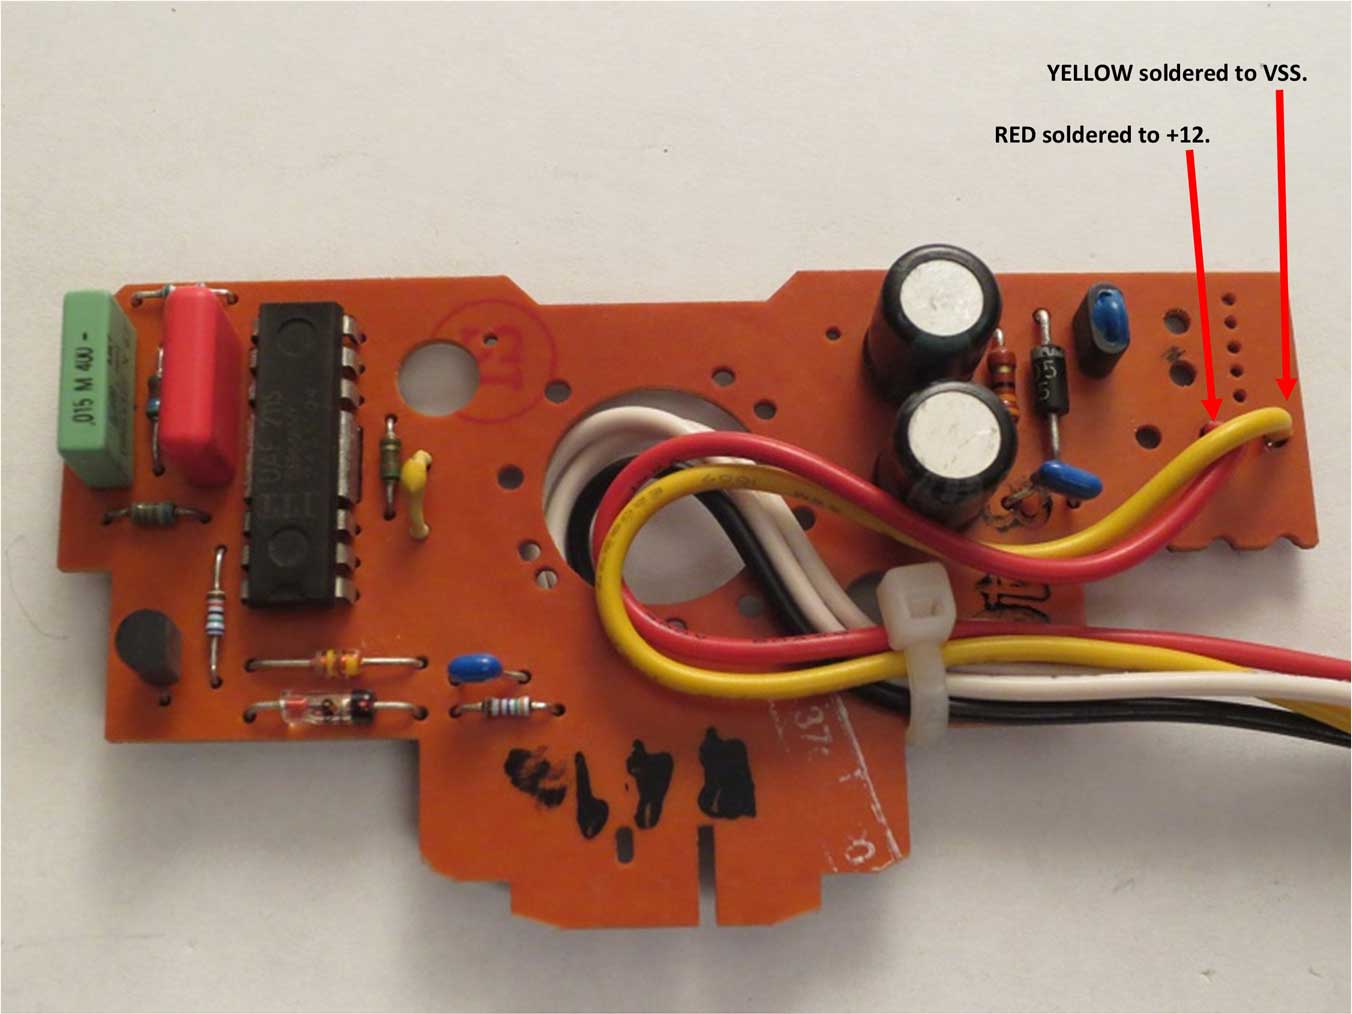
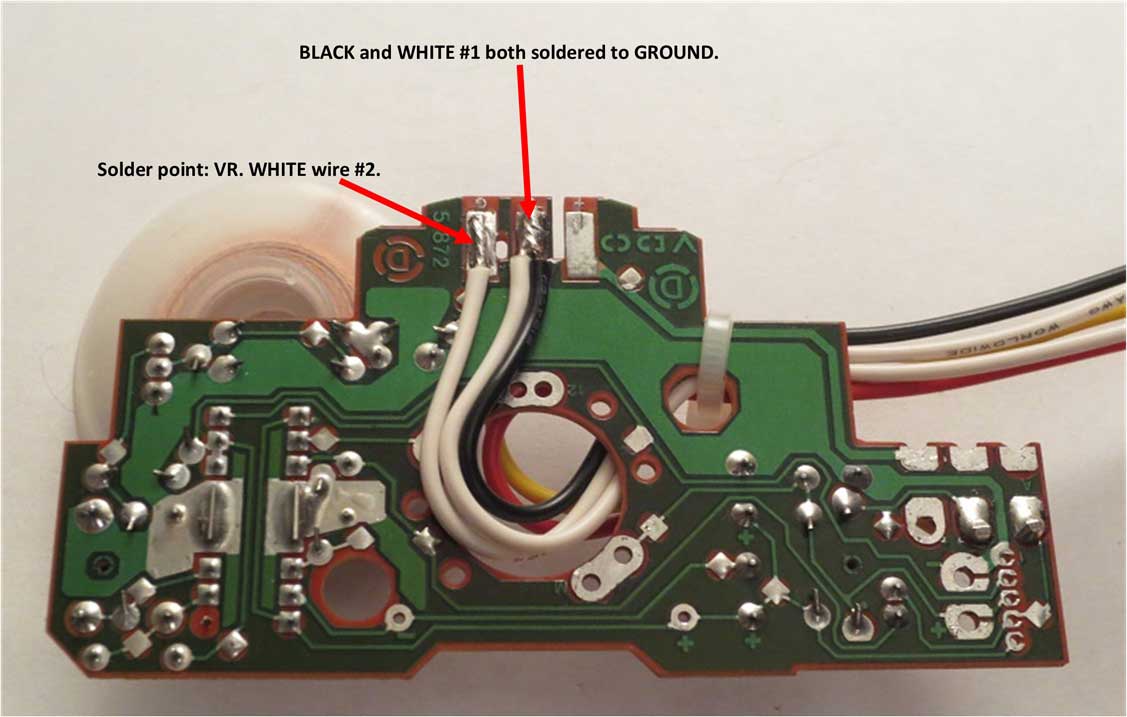
Response: smoothdurban
I am hoping to install the board on Monday.
My engine runs and idles flawlessly without the VSS. Again less then 200
miles on a rebuilt engine so I am not running any long highway runs or
12+ psi of boost. Mine is a MANual!
-
Ok I couldn't wait so I installed it an it definitely has an effect on
idle. First off my throttle body has an Idle adjustment screw.
Originally I had this screw adjusted such that it was completely closed
and without this hack installed it seemed to idle fine in all
conditions.
After installing the board provided to my by bob right off the bat the
idle was low, almost to the point of stall. I adjusted the idle screw
open a few turns and it runs like a champ. By far more adaptive then it
was before.
What was the correct procedure to set idle again? Disconnect the IAC and the set base to 500?
Perhaps this is just me but it seems to accelerate a little better too.
Bob, I did verify that the light you sent with my board is flashing and you're instructions were superb!
I cannot check for codes as my code reader has a couple breaks in that
jumper wire. Perhaps I can rig something up tomorrow or put in a request
for a good used one in the wanted section or borrow the one from my
245!!
Its late here so I haven't had a chance to go to the highway yet but I plan on trying it tomorrow.
-
Just another update posted later.
I got this dialed in and it works flawlessly.
Thanks again Bob for your help. I highly recommend this is the way to go if you want to supply VSS to your ECU.
Cheers! Now make some more!
OPTIONAL CIRCUIT BOARD INSTEAD OF A VOLVO SPEEDOMETER PCB.
Finding a 30 year old Volvo electric speedometer so you can scavenge the PCB (printed circuit board) is getting harder and more
expensive. So I have outlined an option below of using a
different PCB to translate the VSS signal needed for LH 2.4.
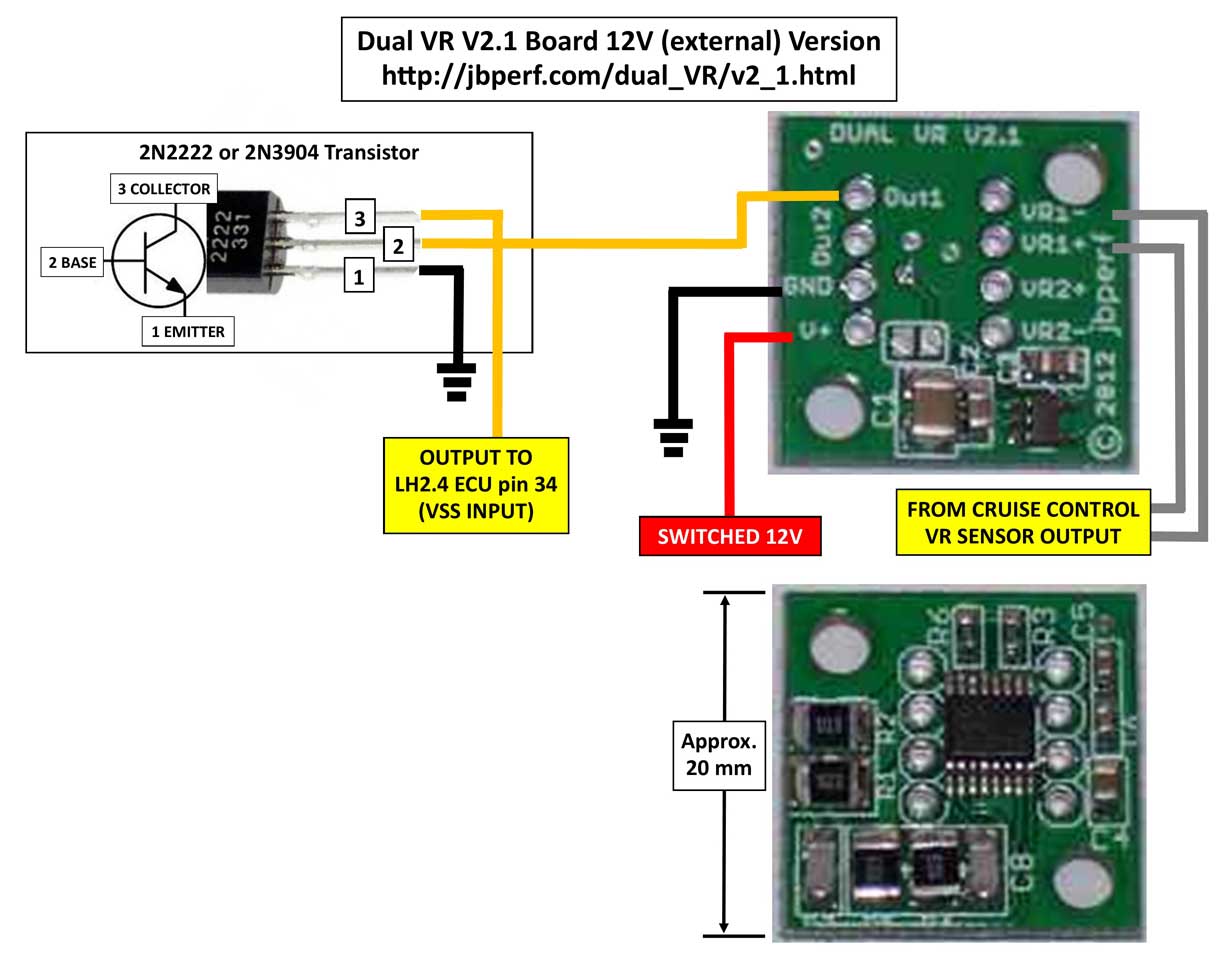
This is a Microsquirt/Speeduino style VR Conditioner Board, originally created for use with Microsquirt fuel injection. It's available for purchase from http://jbperf.com/dual_VR/v2_1.html.
If you purchase one for use as shown here, you should buy the 12V EXTERNAL version.
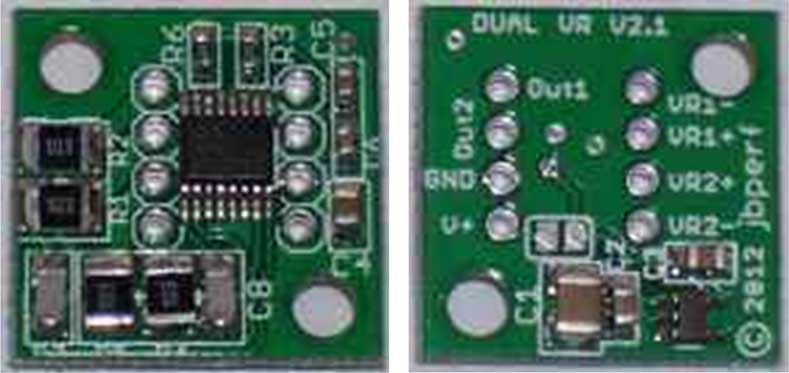
The diagram below will offer guidance on connecting this board to your
speedometer cruise control VR sensor and to the LH 2.4 ECU.
A transistor needs to be added to the PCB output.
When adding devices, such as a transistor, it's advisable to
build them on a small piece of circuit perf board, so that wires are
more resistant to damage if they get tugged. The board assembly should
then be placed in a housing or at least inside heat-shrink tubing for protection.
Thank you to Bob (bobxyz) for his help in this.
Your feedback or comments are welcome: CONTACT
Here's a source for some other varieties of PCBs and speed converters for converting VR signals to Hall signals.
https://sirhclabs.com/store
If you are interested in learning more about VR (variable reluctance) or Hall Effect sensors, or the difference between them, here you go:
VR Sensor: A variable
reluctance sensor is also known as a magnetic sensor. It will read
teeth on a (ferrous) toothed wheel as they pass the sensor head. This
sensor will normally have 2 wire leads
(signal and ground). It does not require external power (making it a
passive sensor). There are some VR sensors with three wire leads. One is
the LH 2.4 Crank Position Sensor. With this sensor there are two
VR leads, which are shielded. The third wire is a ground which is
attached to the Ignition Control Unit internal ground.
Hall Effect Sensor: This sensor will also read teeth on a (ferrous) toothed wheel. This sensor requires power and will have 3 wire leads
(power, ground and signal). The power required will generally be
between 5 and 24 volts. A Hall effect sensor is
more sensitive to electrical interference (EMI) than a VR sensor, so the sensor and signal
lead is best kept away from high current devices, such as alternators or
heavy power cables. To combat EMI, this signal lead is normally shielded
or treated as a twisted pair with the ground lead.
More info: https://fullfunctioneng.com/info/Hall%20vs%20VR.pdf
|
|
Using PIN 228/200 on your gauge cluster for a VSS signal.
If you have a 1986-88 240, which already uses an electronic speedometer, there's a potential solution to use PIN 228/200 on the back of your gauge cluster to send the VSS signal to your LH 2.4 ECU.
This image below is the back of a 1987 cluster. Pin 228/200 is ONE pin. It just has two spades.

The reason this pin is there is to feed a speed signal to an optional Gear Shift Indicator Lamp, which was available on some manual transmission cars. It's also used for a signal to an optional cruise control ECU.
This pin stayed on all 240 gauge cluster through 1993. Volvo Greenbook diagrams for LH 2.4 gauge clusters suggest that this signal is the same feed in THOSE cars
that sends the VSS signal to the LH 2.4 ECU. So it was an
educated guess that this pin would also work the same in the above LH
2.2 cluster or any LH 2.2 cluster from 1986-88.
This subject was also discussed in the below link and testing has suggested it works as expected.
turbobricks.com/lh-2-4-swap-idle-issue.342812/page-2#post-6446889
|
|
PARTS NEEDED to Complete a Conversion.
What PARTS
will I need for an LH 2.4 plus EZK conversion using this
harness?
|
If you already have a 240 with LH 2.4 (any
1989-93 240), then you can use your existing
parts. You should also change your fuel injection ECU to a
TURBO ECU if you will be building a TURBO car.
If you have a 1988 or earlier 240, you'll need to acquire the
below LH 2.4 specific parts. Parts are listed below.
NOTE Regarding LH 3.1 and Regina EFI parts:
Some late 240s with manual transmissions came with LH 3.1 EFI.
Most LH 3.1 related parts are not compatible with this conversion.
And some late 740/940 non-turbo cars came with
Regina EFI and Renix ignitions. Fuel and ignition ECUs from Regina cars are definitely not compatible.
|
|
 |
EZ
116K
ICU (Ignition Control Unit).
EZ 116K was used in all LH 2.4 equipped 240s and
most 700/900 models.
<< This one
pictured is PN 0 227 400 146. Volvo PN 3517402. More part numbers are listed below.
While it may bot be required, it's
recommended that you choose a turbo
or non-turbo type EZK box as appropriate
for your car.
If you're pulling an EZK box from a 740, you'll find it located under the steering column just to the right of the brake pedal bracket.
NOTE: Be sure to use an EZ 116K ICU. Sometimes people get confused. An earlier EZ 117K ICU (made for LH 2.2 only) is NOT compatible with LH 2.4. |
|
EZ 116K ICU
PART NUMBERS
|
NON-TURBO EZK ICU (Bosch part Numbers)
NOTE: Non-turbo models began using LH 2.4 and EZ116K for the 1989 model year.
0 227 400
119 - 740, 940. Volvo PN 1357940.
0 227 400
140 - 240. EGR. B230F designated California. Volvo PN 3501688.
0 227 400
146 - 240. B230F designated USA, Fed. Volvo PN 3517402.
0 227 400
147 - "GOLD box," (may be silver or bronze color). Considered to be Chippable. Came in 740 16V B234F/G. Volvo PN 9135816.
0 227 400 152 - 740, 940. Volvo PN 3507646, 3517609.
0 227 400
162 - 240. EGR. Volvo PN 3517855.
0 227 400 169 - 240. B200E, B200F, B230E, B230F, B230G, B230K. Volvo PN 3531325.
0 227 400 176 - 240, 740, B200F, B200G. Volvo PN 3531830.
0 227 400 196 - 740 1992. Volvo PN 3507348.
0 227 400 209 - "GOLD box," (may be silver or bronze color). Considered to be Chippable. Came in 240 with EGR. Volvo PN 6842495.
Larger LH and EZK
Part Number listings here (Chipping FAQ): https://turbobricks.com/index.php?threads/chipping-faq.84817/
|
TURBO EZK ICU (Bosch Part Numbers)
NOTE: Turbo models began using LH 2.4 and EZ116K for the 1990 model year.
0 227 400
117 - 940 Turbo
0 227 400 148 - 940 Turbo (1998 B230FT). Volvo PN 3517369.
0 227 400
149 - 740, 760, 780 Turbo. EGR. Volvo PN 3517360.
0 227 400
159 - 740, 760, 940, 960 - 16V Turbo B204FT/GT. Volvo PN 3717719.
0 227 400 177 - 940 Turbo (possibly 2.0 liter in the U.K. 1991-95). Volvo PN 3531722.
0 227 400
207 - "GOLD box," (may be silver or bronze color). Considered to be Chippable. 940 95-96 automatic, with EGR on some models. Volvo PN 6842449.
0 227 400
208 - "GOLD box," (may be silver or bronze color). Considered to be Chippable. 740, 760, 940, 960 - 16V Turbo B204FT, B204GT.
0 227 400 214 - "GOLD box," (may be silver or bronze color). Considered to be Chippable. 760, 940 Turbo 1992-93, EGR. Volvo PN 9135869.
0
227 400 219 - "GOLD box," (may be silver or bronze color). Considered to be Chippable. 940 95-96 manual transmission, EGR. Volvo PN 9135590.
Example of a "Gold" or reported Chippable EZK box below.

|
Larger LH and EZK
Part Number listings here (Chipping FAQ): https://turbobricks.com/index.php?threads/chipping-faq.84817/
|
|
 |
LH 2.4 ECU
(it is recommended to choose turbo or non-turbo as
appropriate for this EFI ECU).
TURBO NOTE:
A TURBO
LH 2.4 ECU will work in a NON-TURBO
car, however a NON-TURBO LH 2.4 ECU should NOT
be used in a TURBO car.
This
ECU pictured is PN 0 280 000 951
from a 1989 740 GLE (non-turbo).
EGR NOTE:
An ECU from an LH 2.4 EGR car
will work on a non-EGR car. A Non-EGR ECU may not work in a car needing EGR.
More info on the subject of matching an ECU to an appropriate EZK box:
turbobricks.com/ezk-interchangeability.234705
turbobricks.com/lh2-4-turbo-ecu-ezk-compatibility.295363
|
|
LH 2.4
Fuel ECU PART NUMBERS
Larger LH and EZK
Part Number listings here (Chipping FAQ): https://turbobricks.com/index.php?threads/chipping-faq.84817/
|
LH 2.4 NON-TURBO
FUEL ECU (Bosch Part Numbers)
NOTE: Non-turbo models began using LH 2.4 for the 1989 model year.
0 280 000 549 - 740 1989 B234F, B230G 16V (LH 2.4.0) with manual transmission only (MAF 0 280 213 010). ECU Volvo PN 1367065.
0 280 000 556 - 240 1989 EGR, 740 1989-92 EGR, B230FD (LH 2.4.1). Suitable substitute: -937, -967, -954. Volvo PN 3501687.
0 280 000 559 - 740, 940 1991 B204E 16V (LH 2.4.0) (MAF 0 280 212 007). ECU Volvo PN 1367066.
0 280 000 561 - 240 or 740 1989-91 B230F (LH 2.4.1). A -561
with a PINK label is reportedly problematic. A -561 with a WHITE label is preferred. Suitable
substitute: -933, -935, -951. Volvo PN 3517407, 9146578.
0 280 000 562 - 740, 940 1991 B234F 16V, with
EGR (LH 2.4.0). Suitable substitute: -928. Volvo PN 3507605, 3517372.
0 280 000 571 - 740, 940 B234F, B234G 16V (LH
2.4.0). Suitable substitute: -928. Volvo PN 3507604, 3517608.
0 280 000 572 - 240, 740 B230F 1990-92.
0 280 000 590 - 740 B200F (LH 2.4.1). Volvo PN 3531206.
0 280 000 594 - 740 1991 B200F (LH 2.4.1). Volvo PN 3531831.
0 280 000 595 - 740, 940 1989-91 B230F, B230FB (LH 2.4.1). Volvo PN 3531657.
0 280 000 900 - 740, 940 1992-95 B200G (LH 2.4.4). Volvo PN 3507259.
0 280 000 911 - 740, 940 1991 16V B234F, B234G 16V (LH 2.4.2) (MAF 0 280 212 021). Volvo PN 3547262.
0 280 000 928 - 740, 940 1991-92 B234F 16V (LH 2.4.3). Volvo PN 3547788.
0 280 000 928 - 740, 940 1992 B234G 16V (LH 2.4.3). (MAF 0 280 212 021). ECU Volvo PN 3547790, 9146217.
0 280 000 933 - 240 1992-93, with EGR (California) (LH 2.4.4). No cold start injector. Volvo PN 3547773, 9146222.
0 280 000 934 - 940 1992-95 B230FB (LH 2.4.4). Volvo PN 6842288.
0 280 000 935 - 940 1992-95 B230F, B230FB (LH 2.4.4). Volvo PN 3547777.
0 280 000 936 - 940 1992-95 B200F (LH 2.4.4). Volvo PN 3547779.
0 280 000 943 - 240 1993 EGR B230FD, 940
1993-94 EGR B230FD (LH 2.4.4). Suitable substitute: -946. Volvo PN
9146794.
0 280 000 946 - 240 1993 EGR B230FD, 940
1993-95 EGR B230FD (LH 2.4.4). Volvo PN 1275762, 3507179, 9146221,
9146847.
0 280 000 949 - 240 1992-93 B200F, 940 1992-95 B200F (LH 2.4.4). Volvo PN 6842289.
0 280 000 951 - 240 1989-1993 B230F, B230FX,
740, 940 1989-93 B230F, B230FX (LH 2.4.2). No cold start injector. Volvo
PN 9146223, 6842115.
0 280 000 968 - 940 1995 B230FB (LH 2.4.4). Volvo PN 1271788.
0 986 261 104 - 740 (reconditioned).
0 986 261 738 - 740, 940 16V B234F/G (reconditioned).
0 986 261 746 - 740, 940 16V B234F/G (reconditioned). EGR
0 986 261 751 - 740, 940 16V B234F/G (reconditioned).
0 986 261 758 - 740 (reconditioned).
0 986 261 760 - 740 (reconditioned).
0 986 261 805 - 740, 940 16V B234F/G (reconditioned).
0 986 261 807 - 740, 940 16V B234F/G (reconditioned).
0 986 261 811 - 740, 940 (reconditioned).
0 986 261 812 - 940 (reconditioned).
0 986 261 817 - 740 (reconditioned).
0 986 262 700 - 740, 940 16V B234F/G (reconditioned).
0 986 262 704 - 940 (reconditioned).
0 986 262 712 - 940 (reconditioned).
0 986 262 713 - 740 (reconditioned).
|
Larger LH and EZK
Part Number listings here (Chipping FAQ): https://turbobricks.com/index.php?threads/chipping-faq.84817/
LH 2.4 TURBO ECU (Bosch Part Numbers)
NOTE: Turbo models began using LH 2.4 for the 1990 model year.
0 280 000 560 - 760 Turbo B230FT 1990-91 with EGR (LH 2.4.1). Suitable substitute: -563. Volvo PN 3517368.
0 280 000 563 - 760 Turbo B230FT 1991-92 (LH 2.4.1). Volvo PN 3517370.
0 280 000 578 - 740, 940 B204FT/GT 16V Turbo (LH 2.4.1) (MAF 0 280 213 012). ECU Volvo PN 5003775.
0 280 000 596 - 940 Turbo 1991 B200FT (LH 2.4.1). Volvo PN 3531721.
0 280 000 597 - 740, 940 1991-92 B204FT 16V
Turbo (LH 2.4.1) (MAF 0 280 213 012). ECU Volvo PN 3531519, 5003776.
0 280 000 926 - 740, 760, 940, 960 16V Turbo B204FT/GT. Volvo PN 3547059, 3507258.
0 280 000 927 - 740, 940 1991 B230GT (LH 2.4.1) (MAF 0 280 212 021). ECU Volvo PN 3647400.
0 280 000 932 - 940 Turbo 1991-95 B200FT (LH 2.2.4). Volvo PN 3547772.
0 280 000 937 - 940 Turbo 1992-95 B230FT (LH 2.4.4). Without EGR. Volvo PN 3547781.
0 280 000 938 - 940 Turbo 1995- B200GK, B200GT, 1992-95 B230GT (LH 2.4.4) (MAF 0 280 212 021). ECU Volvo PN 3547782.
0 280 000 939 - 940 Turbo 1992-93 B230FT with EGR (LH 2.4.4). Volvo PN 3547783, 9146219.
0 280 000 950 - 740, 940 B204FT 16V Turbo (LH 2.4.1) (MAF 0 280 213 012). ECU Volvo PN 3547059.
0 280 000 954 - 940 Turbo 1995-96 B230FK, 1994-96 B230FT (LH 2.4.4). With EGR. Volvo PN 6842448.
0 280 000 962 - 940 Turbo 1995-98 B230FK, 1994-96 B230FT (LH 2.4.4). Volvo PN 1270516, 9135591.
0 280 000 967 - 940 Turbo 1994-95 B230FT (LH 2.4.4). Without EGR. Volvo PN 9146220.
0 280 000 975 - 940 Turbo 1995-96 B230FT/FK (LH 2.4.4). With EGR, Japan, Auto transmission. Volvo PN 1275184, 1275203.
0 280 000 976 - 940 Turbo 1996 B230FT/FK (LH 2.4.4). Volvo PN 1275112.
0 280 000 977 - 940 Turbo 1996 B230FT/FK (LH 2.4.4). Volvo PN 1270539, 1275111. NOTE: This -977 ECU is known as an "immobiliser"
ECU. It normally requires the correct matching key to start the car.
You will have difficulty otherwise. This ECU
can work if the chip is replaced with an
aftermarket tuned chip.
0 280 000 979 - 940 Turbo 1996-98 B200FT (LH 2.4.4). Volvo PN 1275202.
0 280 000 980 - 940 Turbo. NOTE: This -980 ECU is known as an "immobiliser"
ECU. It normally requires the correct matching key to start the car.
You will have difficulty otherwise. This ECU
can work if the chip is replaced with an
aftermarket tuned chip.
0 280 000 981 - 940 Turbo. NOTE: This -981 ECU is known as an "immobiliser"
ECU. It normally requires the correct matching key to start the car.
You will have difficulty otherwise. This ECU
can work if the chip is replaced with an
aftermarket tuned chip.
0 280 000 982 - 940 Turbo 1996 B230GK (LH 2.4.4) (MAF 0 280 212 021). ECU Volvo PN 1275716.
0 280 000 983 - 940 Turbo 1997-98 B230FK (LH 2.4.4). Volvo PN 9179342.
0 280 000 984 - 940 Turbo 1997-98 B230 FT/FK
(LH 2.4.4). Found in EU only. Reported to be highly desirable for
tuning. Volvo PN 9125465, 9179343. NOTE: This -984 ECU is known as an "immobiliser"
ECU. It normally requires
the correct matching key to start the car.
You will have difficulty otherwise. This ECU
can work if the chip is replaced with an
aftermarket tuned chip.
0 280 000 985 - 940 Turbo 1997-98 B230FK (LH 2.4.4). Japan, auto transmission. Volvo PN 9179350.
0 986 261 744 - 760 Turbo (reconditioned). EGR.
0 986 261 754 - 740, 940 Turbo (reconditioned).
0 986 261 762 - 940 Turbo (reconditioned).
0 986 261 763 - 740, 760, 940, 960 16V Turbo B204FT/GT (reconditioned).
0 986 261 809 - 940 Turbo (reconditioned).
0 986 261 813 - 940 Turbo (reconditioned).
0 986 261 814 - 940 Turbo (reconditioned).
0 986 262 702 - 740, 760, 940, 960 16V Turbo B204FT/GT (reconditioned).
0 986 262 705 - 940 Turbo (reconditioned).
0 986 262 706 - 940 Turbo (reconditioned).
0 986 262 707 - 940 Turbo (reconditioned).
0 986 262 708 - 940 Turbo (reconditioned).
0 986 262 709 - 940 Turbo (reconditioned).
0 986 262 711 - 740, 760, 940, 960 16V Turbo B204FT/GT (reconditioned).
|
|
 240 Distributor
(any LH 2.4 compatible type from a 1989-93
240). Compatible Part Numbers: BOSCH 0237523003. 240 Distributor
(any LH 2.4 compatible type from a 1989-93
240). Compatible Part Numbers: BOSCH 0237523003.
Additionally
it's possible to use a 240 distributor from an LH 2.2 240 if you simply remove the
Hall generator. This is considered to be a "gutted" distributor:
An LH 2.2 distributor will be BOSCH PN 0237520001 or 0237520004.

|
|
 Ignition Coil. While
there has been very little information published that suggests a
specific coil is required for LH 2.4 (with EZ 116K), this information is
offered as the standard Volvo specifications that may come in handy. Ignition Coil. While
there has been very little information published that suggests a
specific coil is required for LH 2.4 (with EZ 116K), this information is
offered as the standard Volvo specifications that may come in handy.
Coil Specification:
Volvo PN 9438228 (1317810, 1317815). Bosch PN 0 221 122 334.
Primary winding.
Resistance measured between Terminals 1 (Neg) and 15 (Pos): 0.6 to 0.9 Ohms
Secondary winding.
Resistance measured between Terminal 1 (Neg) and High-Tension Terminal: 6.5 to 9.0 kOhms.
|
|
 Bosch
MAF
sensor (AMM). LH 2.4 uses BOSCH PN 0280212016,
which will be compatible for turbo or
non-turbo. This MAF is found
on any 1989 and later 240 (with LH 2.4) or
any 1990 and later 740 Turbo or any 1989 or
later 740/940 non-turbo (with LH 2.4 of
course). Bosch
MAF
sensor (AMM). LH 2.4 uses BOSCH PN 0280212016,
which will be compatible for turbo or
non-turbo. This MAF is found
on any 1989 and later 240 (with LH 2.4) or
any 1990 and later 740 Turbo or any 1989 or
later 740/940 non-turbo (with LH 2.4 of
course).
|
|
 Throttle Position Sensor (TPS). BOSCH PN 0280120325, VOLVO PN 1306938, 3517068. This TPS is the same as found in any LH 2.2 or LH 2.4 240, 700 or 900. Throttle Position Sensor (TPS). BOSCH PN 0280120325, VOLVO PN 1306938, 3517068. This TPS is the same as found in any LH 2.2 or LH 2.4 240, 700 or 900. |
|
 Idle Air Valve
(any LH 2.4 compatible one). Idle Air Valve
(any LH 2.4 compatible one).
This one pictured is BOSCH PN 0280140516 (or Volvo PN 1389618)
from any 1989-93 240 (with LH 2.4 or LH 3.1) or any
1989 and later 740 Turbo or and 1990 and
later 740/940 non-turbo (with LH 2.4 of
course).
NOTE:
Many 1990 and later 240s with manual transmissions were equipped with LH 3.1. These were considered to be 49 state cars. 1990 and later manual transmission 240s sold in California kept LH 2.4.
Some late 740/940 non-turbo cars came with
Regina EFI instead of LH 2.4. |
|
 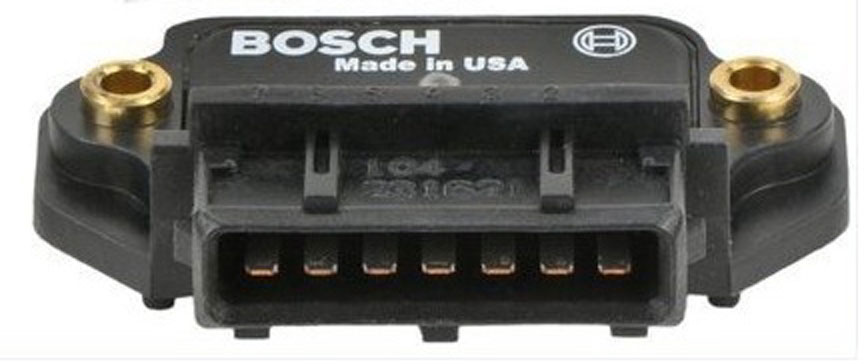
EZK Ignition
Powerstage (ignition amplifier). ANY
EZ 116 K or
EZ 117 K powerstage (from any LH 2.4 240 or any LH 2.2
or 2.4 700 or 900) is fully compatible
for this
conversion.
This
one pictured is BOSCH PN 0227100124 or VOLVO PN 3501921.
The normal (factory) mounting location for a powerstage in a 240 is on the left inner fender just forward of the battery.

|
 <<< Here is the typical place under the hood where you can find the ignition powerstage in a 740 if you're curious. <<< Here is the typical place under the hood where you can find the ignition powerstage in a 740 if you're curious.
|
|
 Fuel Injection Temp Sensor for LH 2.4 or 3.1, PN 1346030. Bosch PN 0280130032. THREADS: M12-1.5.
This is the typical Engine Coolant Temp (ECT) sensor that any Volvo LH
2.4 or 3.1 or Regina equipped car will use. Other car interchange info for this sensor: https://www.autohausaz.com/pn/UR-1346030 Fuel Injection Temp Sensor for LH 2.4 or 3.1, PN 1346030. Bosch PN 0280130032. THREADS: M12-1.5.
This is the typical Engine Coolant Temp (ECT) sensor that any Volvo LH
2.4 or 3.1 or Regina equipped car will use. Other car interchange info for this sensor: https://www.autohausaz.com/pn/UR-1346030
NOTE: It appears also that Bosch 0280130069 (also for Porsche and Saab) is commonly substituted and may be used. Source: turbobricks.com/bosch-0-280-130-069.288842/
 <<<
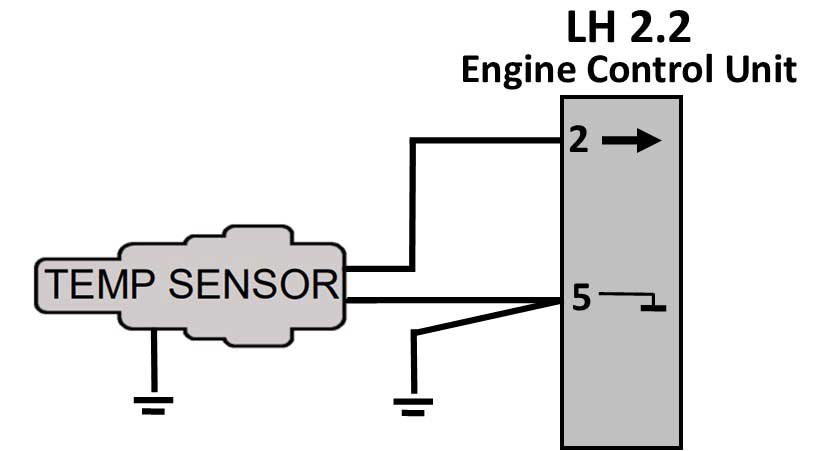
This type of temp sensor has two pins. Each pin uses an internal resistor connected to ground to vary the
resistance output. Each pin provides a separate resistance output. One output goes to the Fuel Injection ECU
and one goes to the Ignition ICU. Both pins will have identical output. <<<
This type of temp sensor has two pins. Each pin uses an internal resistor connected to ground to vary the
resistance output. Each pin provides a separate resistance output. One output goes to the Fuel Injection ECU
and one goes to the Ignition ICU. Both pins will have identical output.
|
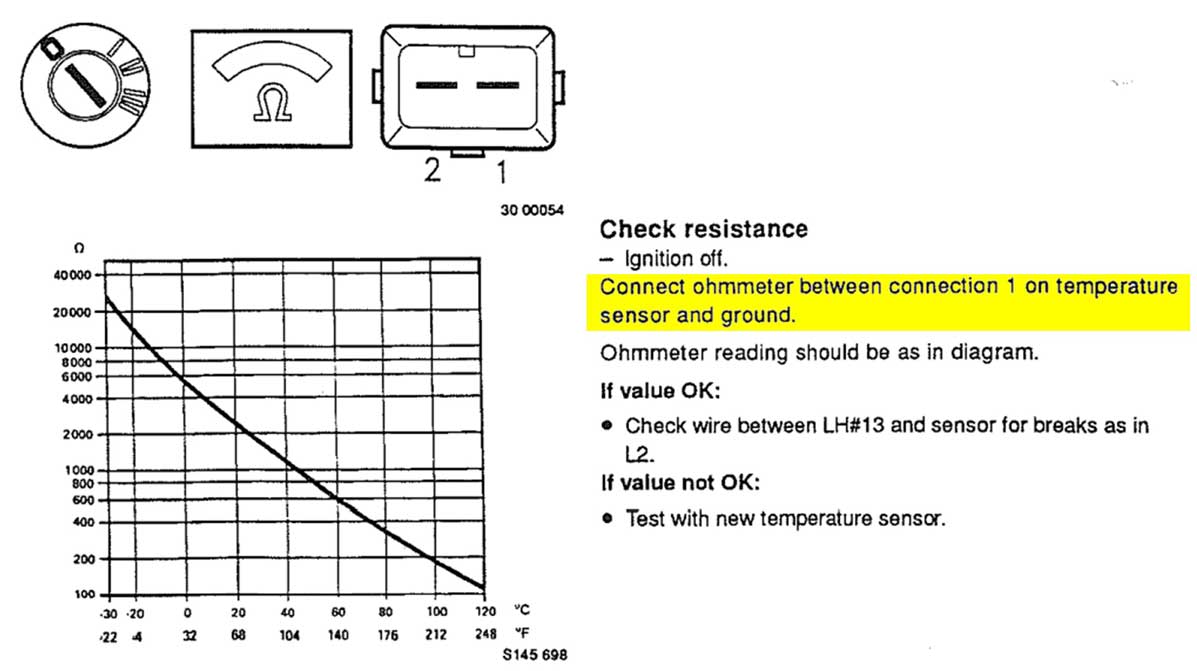 <<< Image to left is from TP32053 LH 2.4, 3.1, EZ 116K Fault Tracing, page 27. <<< Image to left is from TP32053 LH 2.4, 3.1, EZ 116K Fault Tracing, page 27.
If
you're curious about appropriate RESISTANCE TEST MEASUREMENTS for this sensor,
here it is.
Resistance readings should be taken between PIN 1 and Sensor Body or Pin 2 and sensor body (or to GROUND) for LH 2.4 sensors (Note that this is a different method than for LH 2.2 sensors):
SOURCE; TB Post #6: turbobricks.com/easy-therm-values-for-lh2-4-sensor.228130
Temp - Resistance
-10 C (14 F) - 8260-10560 Ohms (8.26-10.56 kOhms)
+20 C (68 F) - 2280-2720 Ohms (2.28-2.72 kOhms)
+80 C (176 F) - 290-364 Ohms (0.290-0.364 kOhms)
Any OHMS test should be done at the sensor with the sensor NOT connected to the ECU or any other circuit.
|
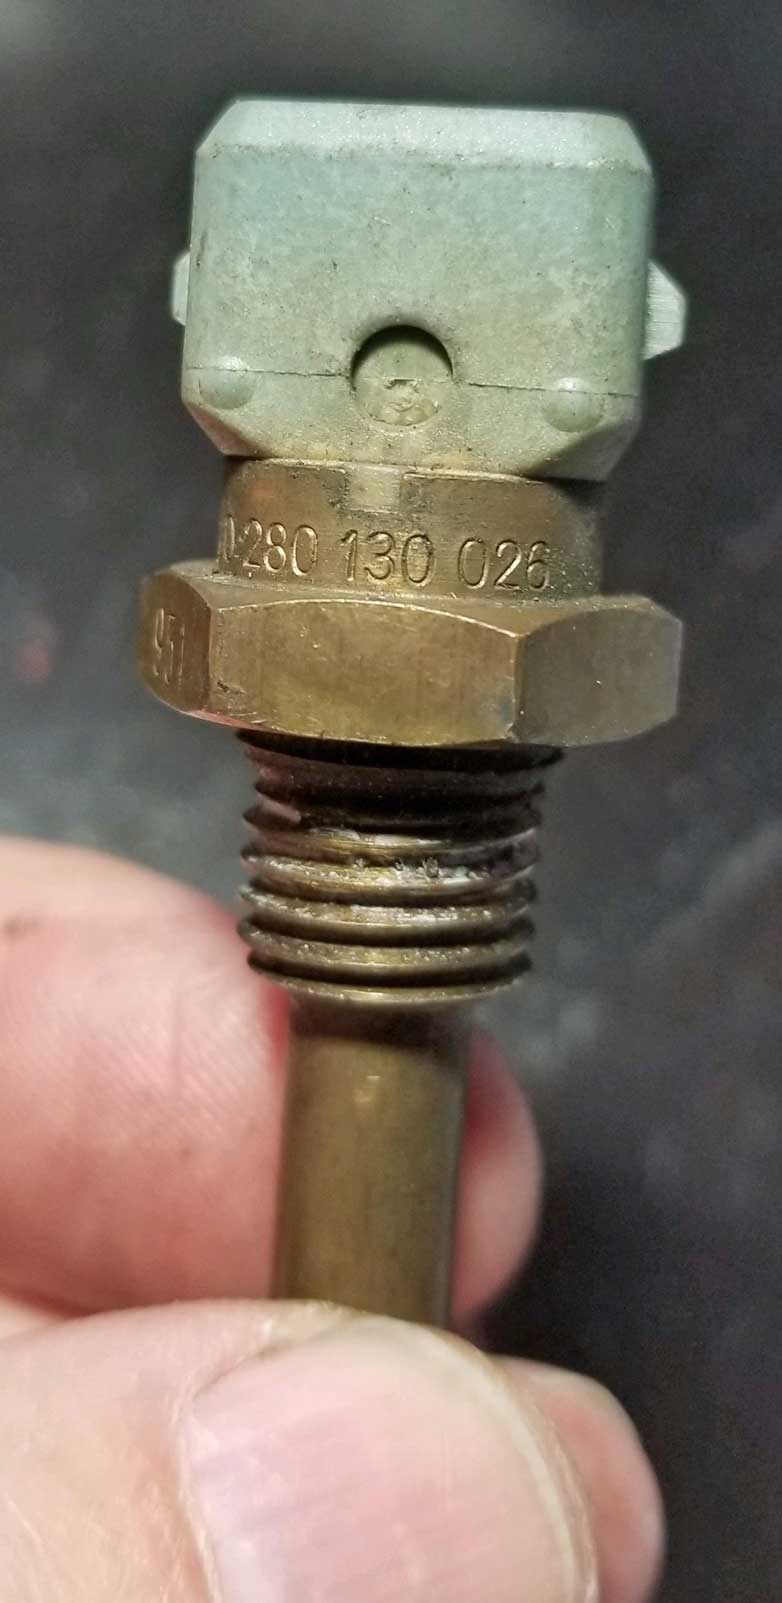
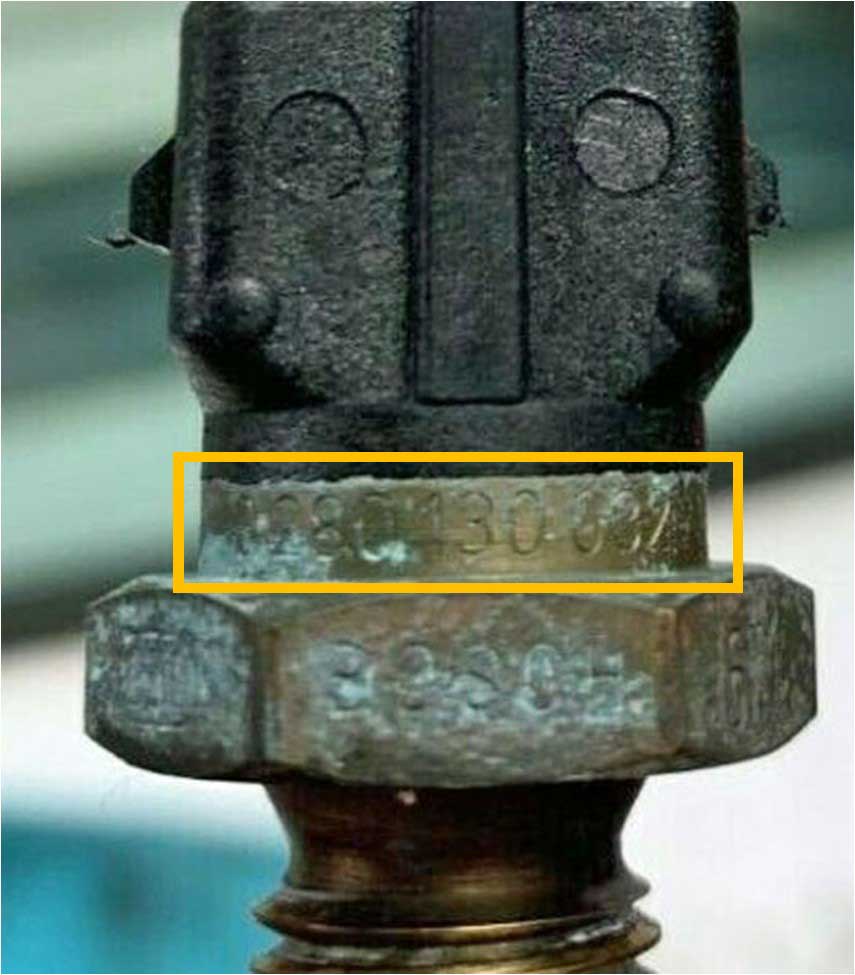 <<< The Bosch part number 0 280 130 032 can be seen engraved on the original sensor. <<< The Bosch part number 0 280 130 032 can be seen engraved on the original sensor.
AFTERMARKET SENSOR WARNING: Be aware that some aftermarket LH 2.4 temp
sensors (URO and some other no-name) have been found to be defective. If you have an
aftermarket sensor for LH 2.4 and find NO RESISTANCE READINGS between
the connector pins and sensor body (ground), the sensor will not operate properly.
Reported problems using a bad sensor can include poor cold starts and poor MPG. |
|
|
  240 (all) or 740 (1985-86) Single Wire
Coolant Temp Sender VOLVO PN 460191. THREADS: 5/8-18 UNF. This 240
harness uses a ONE WIRE coolant temp
sender (for your dash temperature gauge). This is the sender normally found on an engine in
any year 240. If you are installing an engine from a
1987 or later 700/900 model in a 240, the engine will have a 2-pole temp
sender. It should be changed to this 1-pole
type for your 240 temp gauge. 240 (all) or 740 (1985-86) Single Wire
Coolant Temp Sender VOLVO PN 460191. THREADS: 5/8-18 UNF. This 240
harness uses a ONE WIRE coolant temp
sender (for your dash temperature gauge). This is the sender normally found on an engine in
any year 240. If you are installing an engine from a
1987 or later 700/900 model in a 240, the engine will have a 2-pole temp
sender. It should be changed to this 1-pole
type for your 240 temp gauge.
|
If you're curious about resistance test measurements for this 1-POLE SENDER, here it is:
Temp - Resistance
50 C (122 F) - 282 ohms (0.282 kOhms)
100 C (212 F) - 60 ohms (0.060 kOhms)
120 C (248 F) - 40 ohms (0.040 kOhms) |
MORE NOTES for this 1-Pole Coolant Temp Senders: According to Volvo Greenbook TP30518 700-900 Specifications, the resistance values for the 1-wire sender found in a 1983-86 700 model is as follows.
Temp - Resistance
60Ί C (140Ί F) - 217 ± 35 ohms
90Ί C (194Ί F) - 87 ± 15 ohms
100Ί C (212Ί F) - 67 ± 11 ohms
When testing any sender for OHMS, the test must be done with the sender NOT connected to any circuits.
|
If you order a Conversion Harness for a 740 model, your new harness will come with a connector for the below 2-pole sender.
|
 740 (1987 and later) 2-pole
Coolant Temp Sender VOLVO PN 1362645. THREADS: 5/8-18 UNF. The 740
harness offered here uses a TWO WIRE coolant temp
sender (for your dash temperature gauge). This is the sender normally found on an engine in
a 1987 or later 740. 740 (1987 and later) 2-pole
Coolant Temp Sender VOLVO PN 1362645. THREADS: 5/8-18 UNF. The 740
harness offered here uses a TWO WIRE coolant temp
sender (for your dash temperature gauge). This is the sender normally found on an engine in
a 1987 or later 740. |
If you're curious about resistance test measurements for this 2-POLE SENDER, here it is:
Measured between the connector pins.
Temp - Resistance
0 C (32 F) - 7300 ohms
20 C (68 F) - 2800 ohms
40 C (104 F) - 1200 ohms
60 C (140 F) - 560 ohms
80 C (176 F) - 300 ohms
90 C (194 F) - 206 ohms
100 C (212 F) - 150 ohms
When testing any sender for OHMS, the test must be done with the sender NOT connected to any circuits. |
|
|
 Bosch
Knock
Sensor. You'll need one as shown here that uses a
2-pole female plug. You cannot use the single spade Chrysler type. Bosch
Knock
Sensor. You'll need one as shown here that uses a
2-pole female plug. You cannot use the single spade Chrysler type.
The newer style is VOLVO PN 1367644. It
can be found in any LH 2.2 700 or 900 or LH 2.4 240, 700 or 900 or any
Regina controlled 700. Other part numbers: 0261231006, 1326658, 80246023101, 80246023738, 9142415, 94460614500, 95160614100.
|
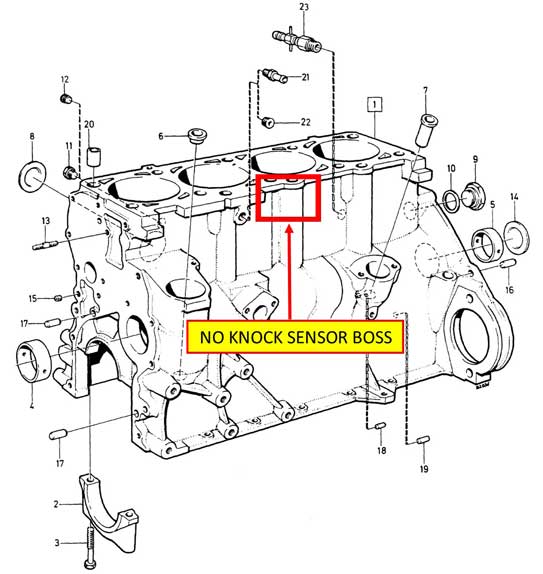
If you
have an engine from an early 240 with a B21,
first check the block for the cast-in pad for the knock sensor
mounting location. It will be on the intake side at the top between
cylinder 3 and 4. Very early B21 blocks (1976 to unknown) had no
mounting position cast into the block. Engine blocks began receiving this mounting pad sometime before 1982.
If your block has the mounting pad, but it's not yet drilled and tapped,
you'll need to drill and tap the engine block with the appropriate
thread for
the knock sensor. The Bosch knock sensor
shown above uses an M8 (M8-1.25) bolt. The
drill depth can be up to 0.86 inch, however I have found 0.5 inch deep to be
sufficient.
If you have a very early block without the mounting pad,
it may be possible to use the location to the left, which was designed
for a coolant nipple. The hole/thread size will be too large, so
the hole would need to be reduced/filled or welded and then drilled and
tapped for the M8 thread. It is not known how the change of the
mounting position will affect the knock sensor function.
|
|
 Oil Pressure Sender.
This
harness will accomodate ANY
redblock oil pressure sender, including an
early 1-wire, late 1-wire, or 2-pole sender
(such as found in a 240 Turbo). Oil Pressure Sender.
This
harness will accomodate ANY
redblock oil pressure sender, including an
early 1-wire, late 1-wire, or 2-pole sender
(such as found in a 240 Turbo). |
|
 Fuel Injector
Ballast Resistor. This will
be required only if you will be using Low
Impedance Fuel Injectors. Fuel Injector
Ballast Resistor. This will
be required only if you will be using Low
Impedance Fuel Injectors. |
|
 LH
2.4 Fuel System Relay (white Fuel
Pump Relay): VOLVO PN 3523608. LH
2.4 Fuel System Relay (white Fuel
Pump Relay): VOLVO PN 3523608.
This is the standard fuel system/fuel pump relay used in all LH
2.4 Volvos up to about 1993. Using one of these is not required, but this is what you'll
use is you want a direct plug and play relay. |
|
LH 2.4
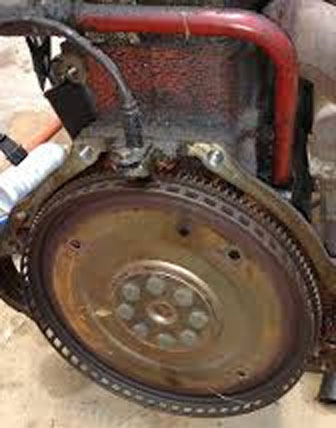
Compatible Flywheel or Flexplate and Crank Position Sensor (CPS). LH
2.4 requires the use of a CPS.
CPS VOLVO PN 271949, 3547847, 1389399.
This conversion harness is design to directly use this sensor. Normally, this means you must
have an LH 2.4 type flywheel (if using a manual
transmission), or an LH 2.4 flexplate (if using
an automatic transmission). The top-rear of your engine block (where the transmission
bell housing is mounted) should also accept a Crank Position
Sensor bracket or it should be modified to do so if not already
equipped (modification info below).
|
|
LH 2.4/EZK uses a CRANK POSITION SENSOR (CPS). If you have an engine that did not originally use a Crank Position Sensor above the flywheel, here is some information you can use if you need to add this bracket to your engine. The original CPS mounting bracket is Volvo PN 3507510 and it is reportedly NLA as a new part from Volvo. It can be found as a used part.
Update: Dec 2020: There seems to be a source here for now:
https://www.skandix.de/en/spare-parts/electrics/sender-units-sensors/bracket-sensor-crankshaft-pulse/1039189/
MODIFICATION INFO:
The CPS bracket is mounted using M6 (M6-1.0) bolts, so if your engine block does not have the holes, you will need to drill and tap them.
POSITION: The mounting holes should be centered between the top transmission mounting
holes, 40 mm apart. Depth may be up to ~0.9 inch (about 23
mm).
 
 
Here's some more info about converting an early B21 block and bell housing for use with a CPS here:
turbobricks.com/drilling-and-tapping-b21-for-lh2-4-questions.331592.
CPS bracket dimensions: turbobricks.com/cps-bracket-measurements.335265.

There are some good discussions on drilling and tapping a B21FT block for a CPS bracket. Try a search: drilling for CPS bracket; site:turbobricks.com
|
What if you want to use a custom Trigger Wheel and Crank Sensor mounted somewhere else?
I've had a few discussions with some people with early 240s who would rather NOT have to install an LH 2.4/EZK compatible flywheel or flexplate or maybe their block and bell housing is not compatible. They wanted to know if they could use a trigger wheel mounted on the front of the engine and a CPS (Volvo or aftermarket) mounted to a custom bracket.
Research certainly finds it has been done. The specific parts used is still
somewhat a mystery. It seems only a few people who have
done this are interested in sharing details so far. So finding real solutions is hard work.
So
. . . Here's some info below I've been compiling. I can't say I
have all the answers yet.
If you can help with more specific info, please EMAIL.
First, some basics.
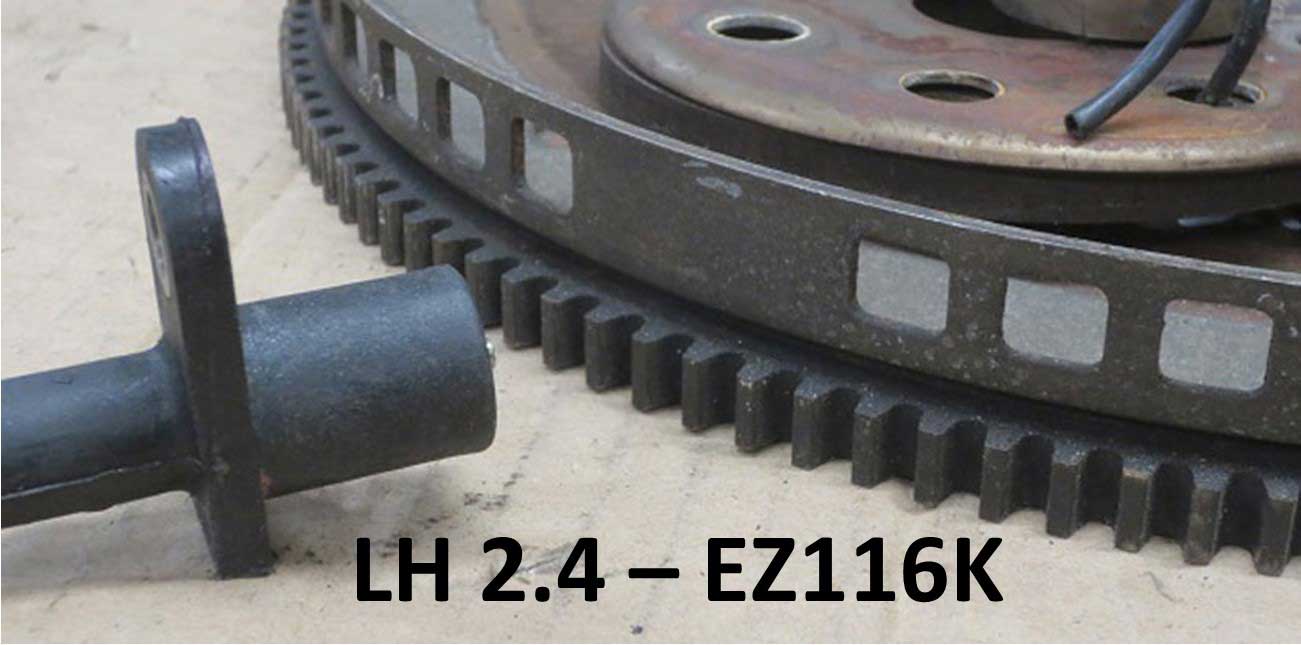
Photos below show a Volvo CPS and an LH 2.4/EZK auto trans flexplate, and an LH 2.4/EZK manual trans flywheel. Some of this came from a discussion at: turbobricks.com/lh2-4-trigger-wheel.292156.
This reluctor ring design shown below is described by Volvo as a 60/1 toothed profile (also
referred to as 60-2 profile by many people). This can be confusing, but the use of a
slash "/" creates a different meaning than a minus or dash symbol "-". In
simple terms, a 60/1 profile (with a slash "/") is a 60 tooth ring with one section that is
" different." A 60-2 profile (with a dash or minus "-") puts emphasis on the "-2" (or "minus 2"). It means the different or blank section is 2 teeth in length.
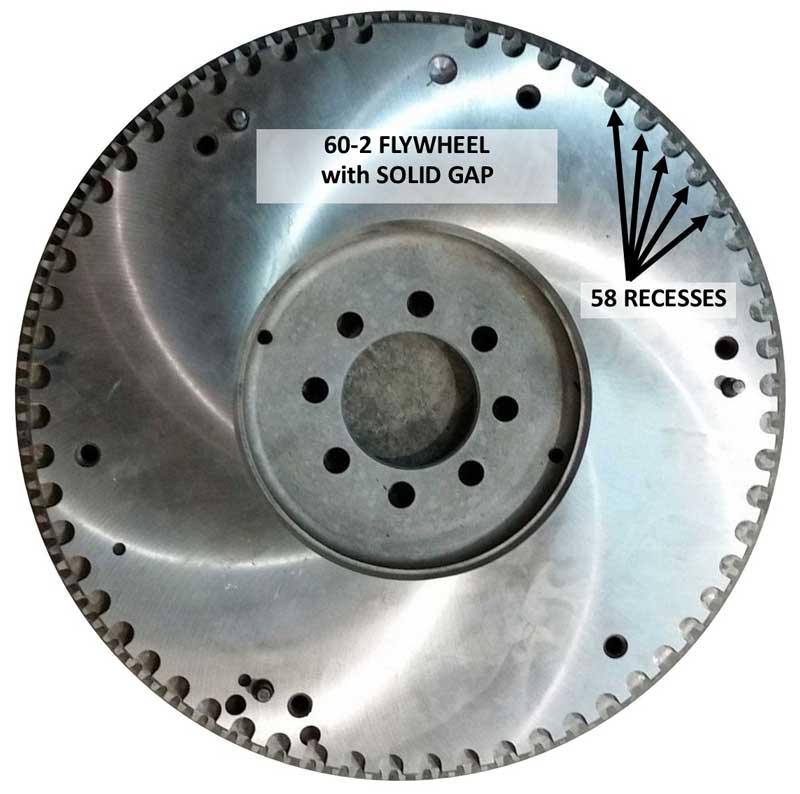
Since Volvo used HOLES in their reluctor rings or flywheels (shown below), not literal TEETH, it means there are 58 open holes and 2 closed holes (the gap pictured below is closed). So I'll call this a closed gap. A Volvo sensor is said to strictly prefer a closed gap as shown below. It needs to sense SOLID STEEL for that 2-tooth gap, not an opening as you'll see below with some other systems.
Also since the CPS uses a magnet, the reluctor ring must always be STEEL.
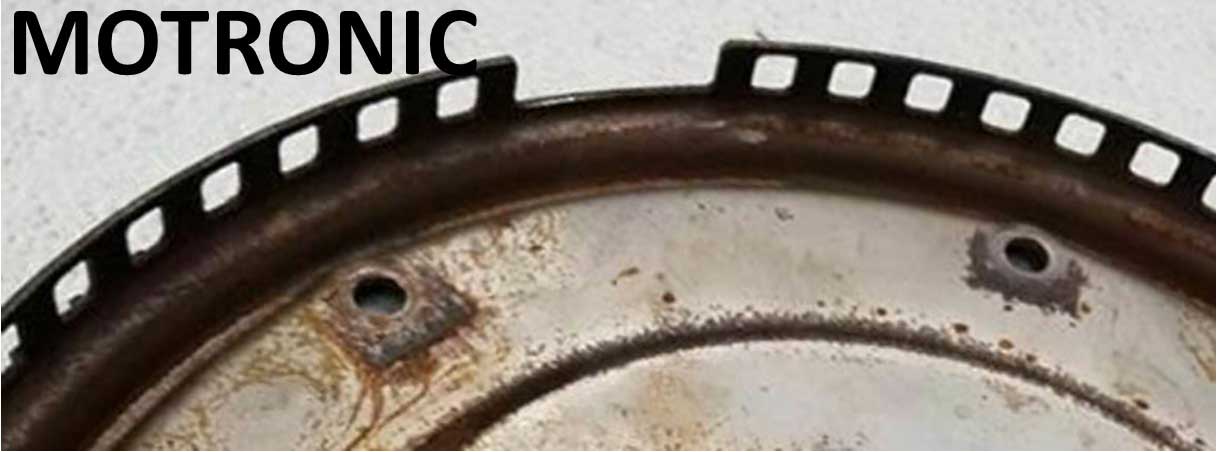
Some DIFFERENT reluctor rings like this one below will have an open area where that gap is (let's call this an open gap). This type is common in later Volvos using Motronic fuel injection. There are some differing opinions on whether you can use one like this with LH 2.4/EZK.
Some say YES (with some mods), some say NO. Some who claim it CAN
work with this type of reluctor will suggest that you can reverse the
sensor leads on the CPS. Reportedly this lead reversal will
alter the timing reference sent to the ECU by 3 degrees, although which direction
is not certain (Source: Volvo Greenbook TP31397 EZK Ignitions, pg 23). You'll see some of these references in the discussions posted below.
Referring to the below illustration of a Volvo LH 2.4 reluctor ring, the first hole after the closed
tooth section serves as a beginning reference point for the ECU to understand the crankshaft
position each time it passes the sensor. That reference point is
not TDC. TDC for Cylinder 1 is the point 90 degrees AFTER that reference
point. This view below is showing the back of the wheel.
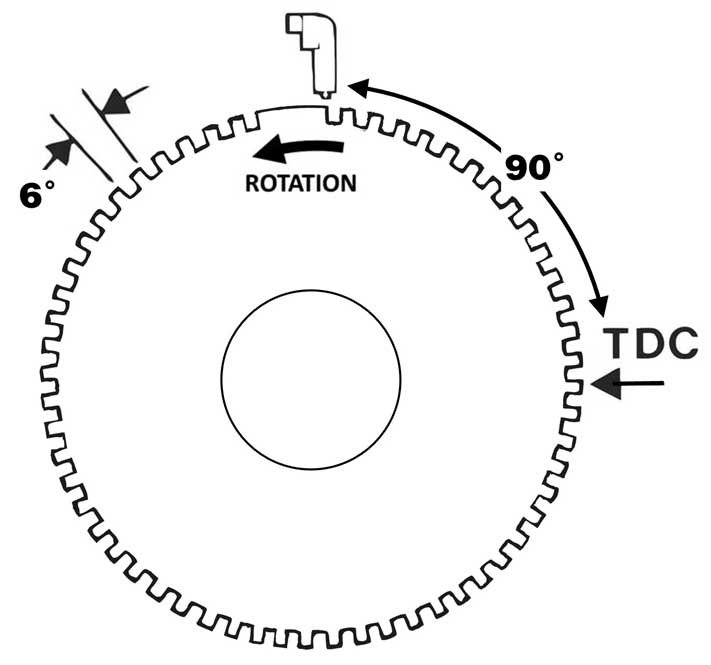
So while
staying consistent with the Volvo LH 2.4 design, when counting "teeth" on a
flywheel, reluctor ring or trigger wheel for use with LH 2.4/EZK, it
will will be better to count the HOLES (or RECESSES as seen in the below photo).
This is easy to understand when looking at one of the above factory flywheel images, but
if you see a ring with what appears to be TEETH like below, remember to just count the recesses, not the
raised teeth.
This photo below is a custom "60-2" LH 2.4/EZK flywheel for Volvo red block from STS Machining in Oregon. It has the correct 58 recesses and a gap with 2 recesses closed (the closed gap). This
means that long blank tooth would be 3 teeth wide if you're counting raised
teeth, but the CORRECT way to classify it is to say that long tooth is the WIDTH of 2 RECESSES.
NON-FACTORY TRIGGER WHEELS
So let's move to a MORE SPECIFIC discussion of a non-factory trigger wheel.
From
what I have found, very few people have tried using LH 2.4 and EZ 116K
with a non-factory trigger.
If you have done something
different or can contribute to this information, please email me.
The trigger wheel at below left is a "60-2"
that the writer (lookforjoe) of the below discussion bought for his LH 2.4/EZK conversion. It would not work as is.
The trigger wheel on the right is the same wheel, which has been modified. He converted the OPEN GAP to a CLOSED "SOLID" GAP
by filling
in the opening (using steel filler rod) and grinding one more small
recess next to it to get the correct number of 58 recesses. So the final
result is a solid gap, which is wide enough to hold 2 recesses, which is the correct configuration.
If this
is confusing, think of it this way: If you're counting raised teeth, the
solid gap is 3 teeth wide.
https://xwebforums.com/forum/index.php?threads/lh2-4-conversion.29828/
I have read of recommendations for a trigger wheel to be thicker
than most available 1/8 inch thick wheels. A thicker wheel will provide
a stronger reluctance signal for an LH 2.4 style sensor. An LH 2.4 sensor is a Variable
Reluctance Sensor, which needs to read the gaps in the ferrous steel wheel.
So a good minimum thickness is recommended as 5 mm.
1/4 inch (6.3 mm) is close to that and would work well if you find something in that thickness. Such a
trigger wheel, if available, will probably be custom and may set you back $100 or more.
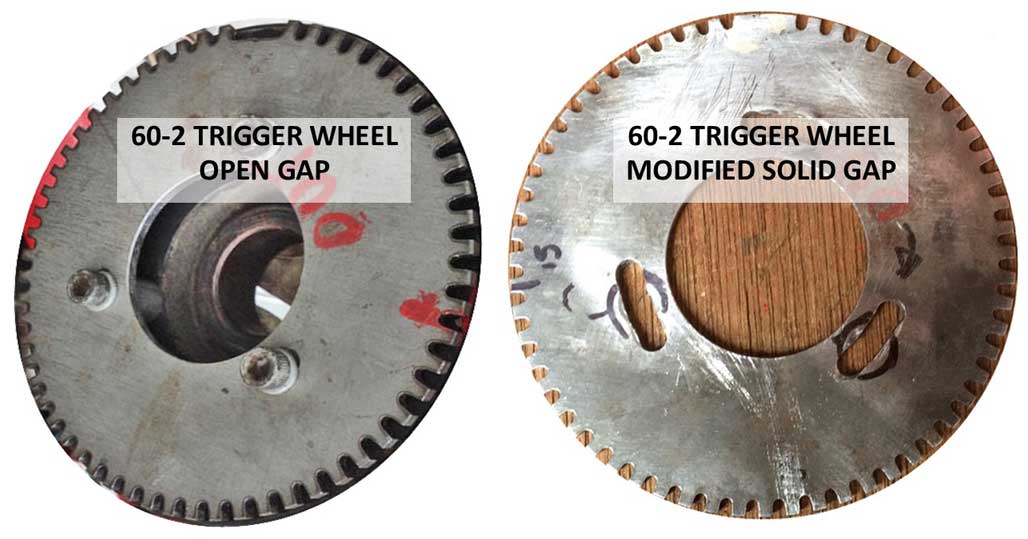

A mounting bracket of some type will be needed to mount a CPS. It should be rigid and
have some capability to adjust the CPS position. lookforjoe set his with a 1 mm air gap.
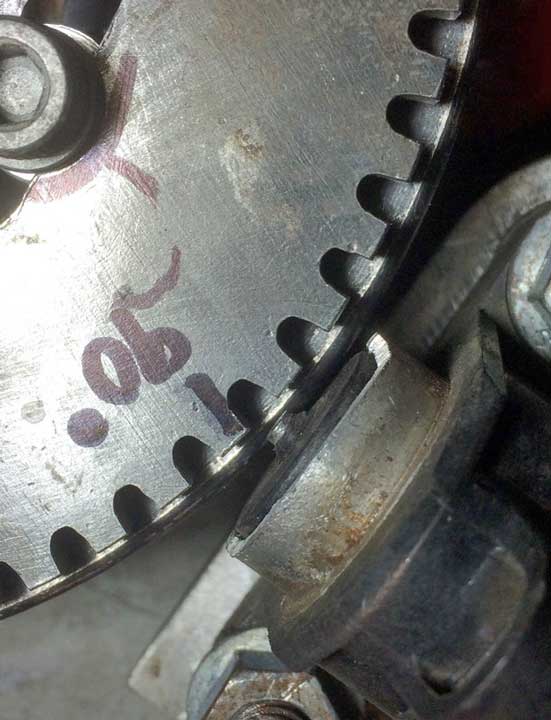
This sheet metal bracket below can be found at KL
Racing in Sweden: shop.klracing.se/motorblock-volvo-b230.html or RetroTurbo in the UK at retroturbo.com/b21-b23-b200-b230-trigger-wheel-kit. Or if you're able to fabricate a bracket, it can be done in a similar way.
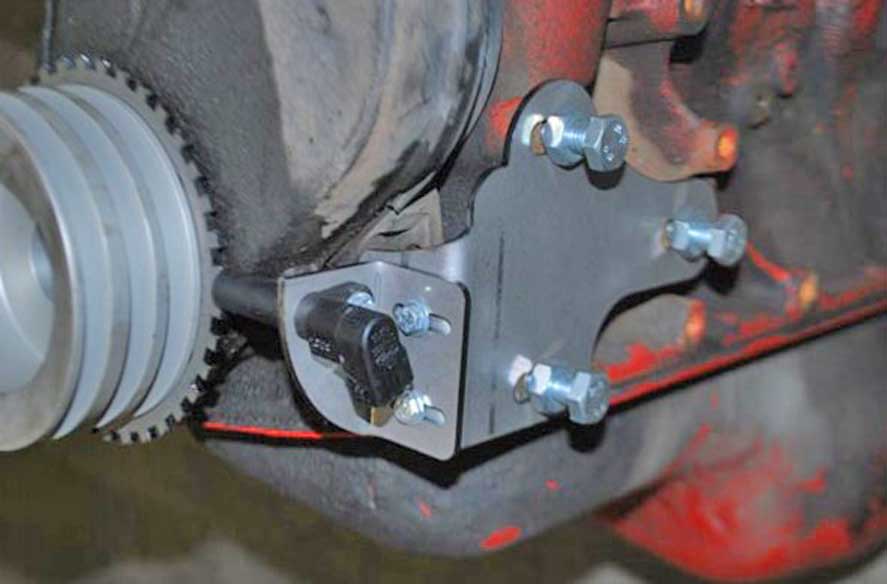
Try to place the CPS so it's less likely to be interfered with when changing belts, etc.
My preference would be a bracket under the pan like this, although this
one seems it might be little overbuilt. Nothing wrong with that.
The sensor in this photo below is a Ford PC19,
which is a VR sensor similar to the Volvo Bougicord CPS used for LH
2.4, except the Ford sensor is said to provide a stronger signal
(See
Ref: turbobricks.com/lh2-0-to-lh2-4-without-the-60-2-flywheel-and-cps.306095/page-2.
NOTE: LH 2.4 is not being used with the particular sensor in this photo below.
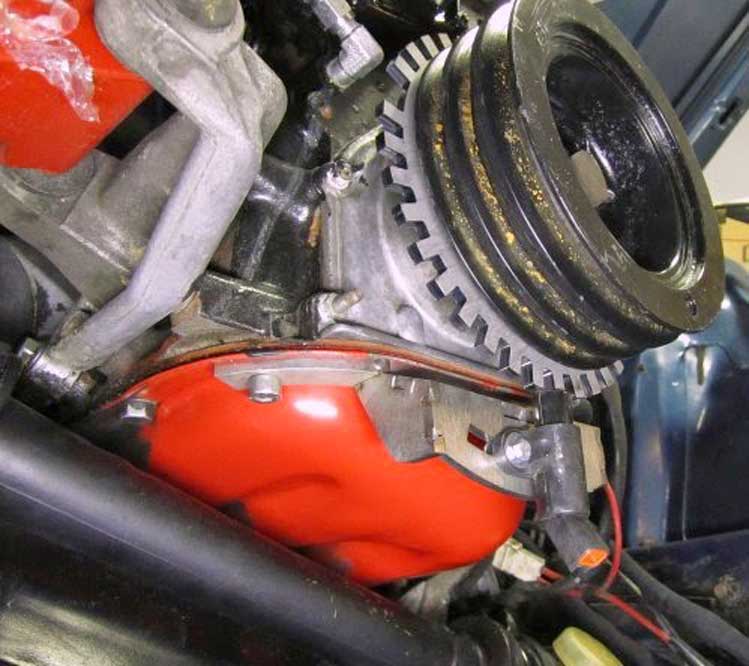
If you can help or add to this info, please email.
RELEVANT DISCUSSIONS
turbobricks.com/lh2-4-trigger-wheel.292156
turbobricks.com/lh2-4-flywheel-sensor-mounted-to-the-front-of-the-engine.253353
turbobricks.com/the-lh2-4-i-cant-find-a-flywheel-thread.216307
turbobricks.com/lh2-0-to-lh2-4-without-the-60-2-flywheel-and-cps.306095/page-2
https://xwebforums.com/forum/index.php?threads/lh2-4-conversion.29828/.
|
|
 On-Board Diagnostic (OBD) Unit. VOLVO PN 1398703. This box is found in any LH 2.4 or Regina EFI equipped 240, 700 or 900 model. On-Board Diagnostic (OBD) Unit. VOLVO PN 1398703. This box is found in any LH 2.4 or Regina EFI equipped 240, 700 or 900 model. |
|
|
OPTIONAL ITEMS TO THINK ABOUT
|
This is an Ostrich 2.0 Emulator. It can be found at: http://www.moates.net/. This device gives you the ability to DIY tune your LH 2.4 ECU.

 <<< This pic: Here's one mounted
on an LH 2.4 ECU being used with the conversion harness offer here. It's being used on a
B230FT. This customer is using this device to allow him to create
live tuning for his LH 2.4 system. He uses TunerPro RT on a laptop to emulate a tune to the Ostrich. The Ostrich
has a lead to a chip that replaces the stock chip in your LH 2.4 ECU.
After completing your tune, you then emulate it one last time and then
disconnect the laptop. <<< This pic: Here's one mounted
on an LH 2.4 ECU being used with the conversion harness offer here. It's being used on a
B230FT. This customer is using this device to allow him to create
live tuning for his LH 2.4 system. He uses TunerPro RT on a laptop to emulate a tune to the Ostrich. The Ostrich
has a lead to a chip that replaces the stock chip in your LH 2.4 ECU.
After completing your tune, you then emulate it one last time and then
disconnect the laptop.
|
 Comprehensive installation info for the OSTRICH: http://ipdown.net/jetronic.info/tiki-index.php?page=Ostrich+Install Comprehensive installation info for the OSTRICH: http://ipdown.net/jetronic.info/tiki-index.php?page=Ostrich+Install
More info can be found at: turbobricks.com/fuel-spark-tuning-for-lh-2-4-ezk-with-tunerpro.227153 (thread with some broken images). |
|


