Bosch
Alternator
-- External Fan Type
P A R T N U M B E R S
28 mm
Slip Rings
|
32 mm sling ring part numbers below (CLICK HERE)
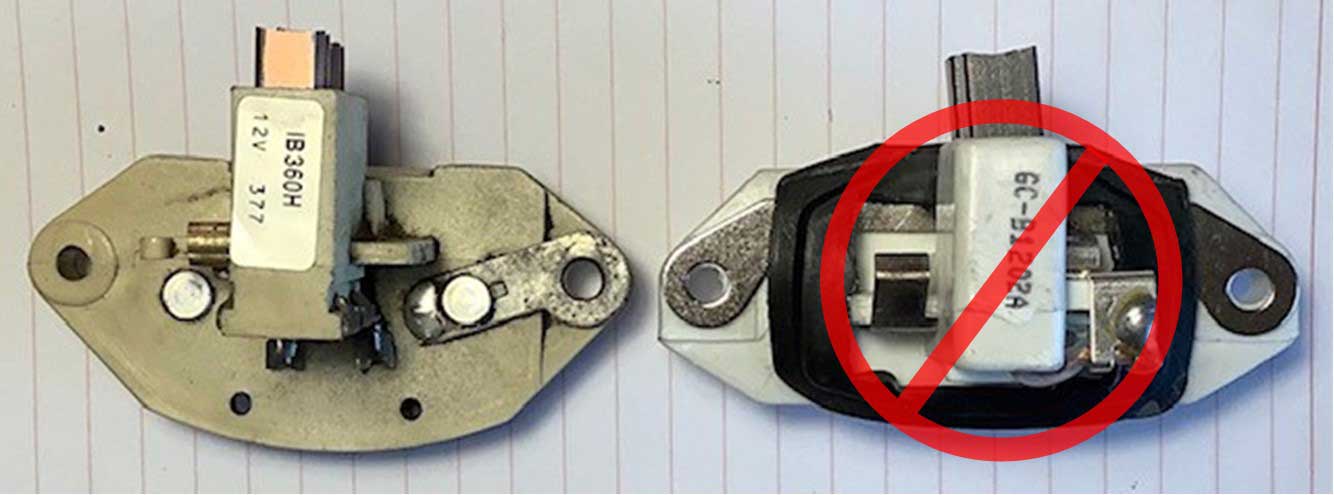
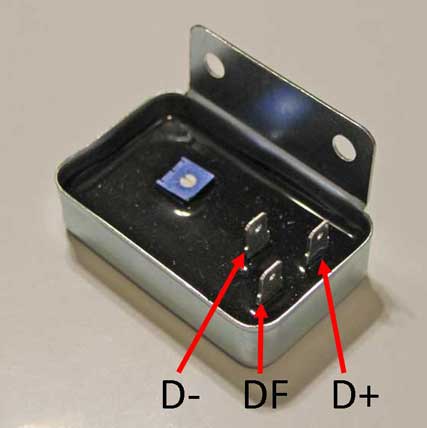
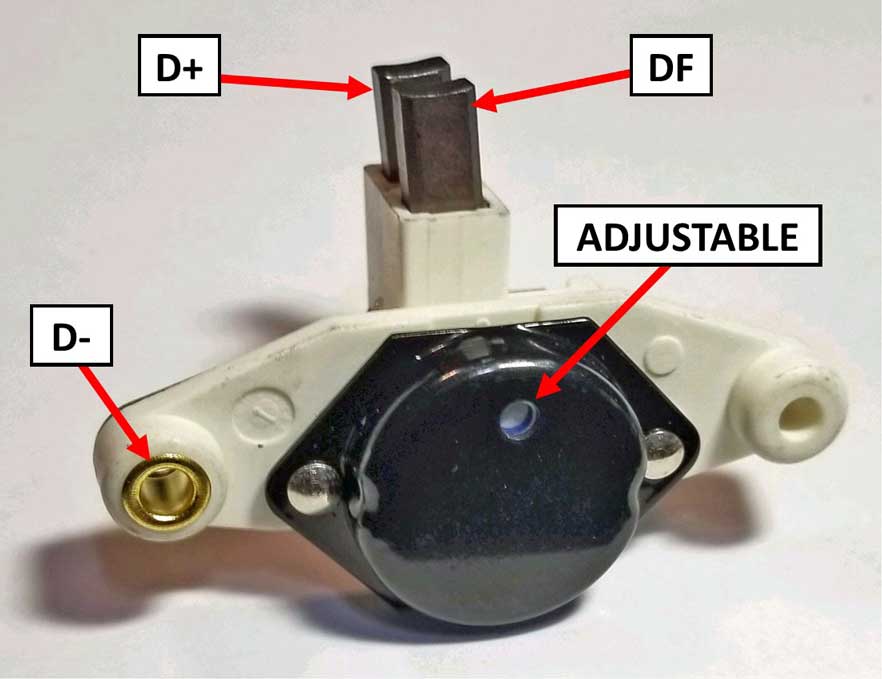
ALL 28mm External or Internal Adjustable
Regulators listed for sale above will
exchange correctly with all the Bosch-type Voltage
Regulator Part Numbers and Bosch Alternator
Part Numbers listed here.
Much
of this information was compiled with the help of
customers who have verified the correct fitment of
these regulators over more than 20 years.
If you have a regulator or alternator part number that
you think should fit, but does not match these
numbers, or one that fits and I need to add it to this
list, please email me.
Alfa-Romeo
116100506011, 119130506000,
119130506023, 119136506000, 705684800000, Alfa Romeo 164 '91-'92, Milano
'88 using Bosch 0-120-488-102 28mm alternator,
Milano '89, Spider '86 using Bosch 0-120-489-903 or 904, 'Spider '90-'94
using Bosch 0-120-488-102 or 0-120-488-103
28mm alternator. 81-86 Alfa Romeo GTV-6, 81-89 Alfa Romeo Spider,
87-89 Alfa Romeo Milano using Bosch: 0-120-489-904, 0-120-489-715,
0-120-489-716, 0-120-489-903, 0-120-489-905, 0-120-489-906.
Audi 4000 84-87
1800cc, 4000 85-87 2200cc 5 Cyl, 5000 85-86
2000cc Diesel Turbo, 5000 84-86 2200cc 5 Cyl, 5000
Turbo 86-88 2226cc 5 Cyl, 5000 Turbo 86-88 2309cc 5
Cyl, 5000 Turbo Quattro 84-88 2226cc 5 Cyl, 5000
Turbo Quattro 86-88 2309cc 5 Cyl, 80/90 88-91
2000cc, Coupe 83-87 All 5 Cyl eng., Quattro 85-88
All 5 Cyl eng.: 025 903 023E, 026 903 015B, 034 903
015D, 034 903 803, 026 903 015F, 026 903 017, 026 903
017B, 026 903 017BX, 026 903 017X, 026 903 023, 034 903
015K, 034 903 015M, 034 903 016C, 035 903 017A, 035 903 017AU, 035 903 017AV, 035
903 017AX, 035 903 023B, 035 903 023D,
049 903 023P, 049 903 027, 049 903
027A, 049 903 027X, 068 903 017B, 068 903 017BX, 068
903 017P, 068 903 017PX, 068 903 018A,
068 903 018B, 068 903 029M, 068-903-803, 068 903 803D, 069 903
017A, 069 903 017AX, 069 903 023D, 069
903 023G, 069 903 023H, 070-903-017, 070-903-023B, 070-903-023BX, 070-903-023E, 176 903 027.
BMW and Bosch PNs for BMW:
1711391, 1231-1271664, 1231-1279548, 1231-1711203, 1231-1713449,
1231-1713450,
1231-1714219, 1231-1714220, 1231-1721921, 1231-1721923, 1231-1722418,
1231-1722419, 1231-1726002, 1231-1726022, 1231-1726602,
1231-1726603, 1232-1271644, 1232-1711399.
320i '77-'83
with Bosch 0-120-489-039 and 0-120-489-040
alternator, 318i
'84-'85 and '91-'92 with Bosch
0-120-469-617, 0-120-469-913, 0-120-469-914, 0-120-469-918 and 0-120-469-919
alternator, 325iX '88-'91 with
Bosch 0-120-469-777, 0-120-469-778 and 0-120-469-779
alternator, 325e
'84-'88 with Bosch 0-120-469-617 or
0-120-469-779 alternator, 325i E30 '87-'93
with Bosch 0-120-469-779, 0-120-469-985, or
0-120-468-105 alternator (NOT '92-'95 with Bosch 0-120-465-031
or 0-120-485-048 14mm alternator), 525i '89-'91
with Bosch 0-120-468-042, 0-120-468-043,
0-120-469-869, 0-120-469-912, 0-120-468-062 (opt
115A '91-'92), 0-120-468-064 (optional 140A '91-'92)
alternator (NOT '92-'95 with
Bosch 0-120-465-031 or 0-120-485-048 14mm
alternator), 528e '82-'88
with Bosch 0-120-489-031, 0-120-469-617 and
0-120-469-778 alternator, 528i '79-'81 with Bosch
0-120-489-037 alternator, 530i '75 with Bosch 0-120-400-771
alternator, 535i
'85-'93 with Bosch 0-120-468-007,
0-120-468-008, 0-120-469-775, 0-120-469-776,
0-120-468-096, 0-120-468-098 alternator, 633 CSi '78-'81
with Bosch 0-120-489-037 alternator, 635 CSi '79-'89,
733i '78-'81
with Bosch 0-120-489-037 alternator (lacking info on later
733 and early 735), 735i '87-'92
with Bosch 0-120-468-007, 0-120-468-008,
0-120-468-013, 0-120-469-775, 0-120-469-776,
0-120-468-096 and 0-120-468-098 alternator, 750i '88-'94
with Bosch 0-120-468-030, 0-120-468-033 and
0-120-339-547 alternator, 850 Ci/CSi '93-'95 with Bosch
0-120-468-033, 0-120-339-547 alternator, M3 E30 '87-'91
with Bosch 0-120-469-804, 0-120-469-805 alternator,
M5
E28 '87-'88 (it will fit, but I'm lacking
specific PNs), M5
E34 '91-'93 with Bosch 0-120-468-073,
0-120-468-074, 0-120-468-050, 0-120-468-051 and
0-120-468-067 alternator.
BOSCH part numbers that fit or correspond
to this 28 mm slip ring regulator (Alternator and
regulator numbers below. Not a 100% complete list): AL27X,
AL29X, AL30X, AL31X, AL32X, AL33X, AL34X, AL35X,
AL36X, AL40X, AL42X, AL45X, AL46X, AL49X, AL54X,
AL57X, AL58X, AL65X, AL80X, AL117X, AL 124X, AL129X,
AL140X, AL148X, AL170X, AL173X, AL0152X,
0-120-400-756, 0-120-400-757, 0-120-400-858, 0-120-409-918,
0-120-450-001, 0-120-450-002, 0-120-468-001, 0-120-468-002,
0-120-468-003,
0-120-468-004,
0-120-468-006,
0-120-468-009,
0-120-468-010, 0-120-468-070;
0-120-469-002,
0-120-469-003,
0-120-469-012,
0-120-469-015,
0-120-469-541,
0-120-469-542,
0-120-469-545,
0-120-469-546,
0-120-469-551,
0-120-469-552,
0-120-469-553,
0-120-469-554,
0-120-469-556,
0-120-469-558,
0-120-469-559,
0-120-469-560,
0-120-469-561,
0-120-469-563,
0-120-469-564,
0-120-469-566,
0-120-469-575,
0-120-469-576,
0-120-469-577,
0-120-469-578,
0-120-469-581,
0-120-469-582,
0-120-469-586,
0-120-469-587,
0-120-469-593,
0-120-469-594,
0-120-469-595,
0-120-469-598,
0-120-469-599,
0-120-469-600,
0-120-469-602,
0-120-469-603,
0-120-469-604,
0-120-469-605,
0-120-469-606,
0-120-469-607,
0-120-469-610,
0-120-469-617,
0-120-469-618,
0-120-469-619,
0-120-469-621,
0-120-469-622,
0-120-469-623,
0-120-469-624,
0-120-469-631,
0-120-469-632,
0-120-469-633,
0-120-469-635,
0-120-469-636,
0-120-469-637,
0-120-469-638,
0-120-469-639,
0-120-469-640,
0-120-469-648,
0-120-469-649,
0-120-469-650,
0-120-469-651,
0-120-469-654,
0-120-469-666,
0-120-469-670,
0-120-469-671,
0-120-469-674,
0-120-469-675,
0-120-469-677,
0-120-469-680,
0-120-469-689,
0-120-469-690,
0-120-469-696,
0-120-469-697,
0-120-469-698,
0-120-469-699,
0-120-469-700,
0-120-469-701,
0-120-469-702,
0-120-469-703,
0-120-469-704,
0-120-469-705,
0-120-469-706,
0-120-469-707,
0-120-469-708,
0-120-469-710,
0-120-469-711,
0-120-469-712,
0-120-469-714,
0-120-469-715,
0-120-469-716,
0-120-469-717,
0-120-469-718,
0-120-469-719,
0-120-469-720,
0-120-469-721,
0-120-469-727,
0-120-469-728,
0-120-469-729,
0-120-469-732,
0-120-469-733,
0-120-469-734,
0-120-469-735,
0-120-469-737,
0-120-469-739,
0-120-469-740,
0-120-469-741,
0-120-469-742,
0-120-469-743,
0-120-469-754,
0-120-469-757,
0-120-469-758,
0-120-469-759,
0-120-469-768,
0-120-469-775,
0-120-469-776,
0-120-469-778,
0-120-469-780,
0-120-469-782,
0-120-469-783,
0-120-469-784, 0 120 469 785, 0 120 469 786, 0
120 469 787, 0-120-469-790,
0 120 469 793, 0-120-469-794,
0-120-469-795,
0-120-469-804,
0-120-469-805,
0-120-469-806,
0-120-469-816,
0-120-469-817,
0-120-469-818,
0-120-469-819,
0-120-469-820,
0-120-469-821,
0-120-469-822,
0-120-469-823,
0-120-469-828,
0-120-469-830,
0-120-469-831,
0-120-469-832,
0-120-469-834,
0-120-469-835,
0-120-469-836,
0-120-469-839,
0-120-469-845,
0-120-469-846,
0-120-469-862,
0-120-469-863,
0-120-469-864,
0-120-469-865,
0-120-469-868,
0-120-469-869,
0-120-469-876,
0-120-469-877,
0-120-469-878,
0-120-469-879,
0-120-469-885,
0-120-469-886,
0-120-469-887,
0-120-469-888,
0-120-469-901,
0-120-469-902,
0-120-469-903,
0-120-469-904,
0-120-469-906,
0-120-469-907,
0-120-469-908, 0-120-469-913, 0-120-469-914,
0-120-469-918,
0-120-469-919,
0-120-469-967,
0-120-469-971,
0-120-469-972,
0-120-469-975,
0 120 469 992, 0 120 469 993, 0
120 469 998, 0-120-484-012; 0-120-488-114, 0-120-488-126, 0-120-488-152,
0-120-488-183,
0-120-488-184,
0-120-488-219,
0-120-488-220,
0-120-488-221,
0-120-488-238,
0-120-488-245,
0-120-488-246,
0-120-488-247,
0-120-488-249,
0-120-488-254,
0-120-488-263,
0-120-488-264,
0-120-488-265,
0-120-488-279,
0-120-488-280,
0-120-488-976,
0-120-488-993;
0-120-489-002, 0-120-489-003,
0-120-489-004,
0-120-489-005,
0-120-489-006,
0-120-489-007,
0-120-489-008,
0-120-489-009,
0-120-489-010,
0-120-489-011,
0-120-489-012,
0-120-489-013,
0-120-489-014,
0-120-489-015,
0-120-489-016,
0-120-489-017,
0-120-489-028,
0-120-489-029,
0-120-489-030,
0-120-489-031,
0-120-489-036,
0-120-489-037,
0-120-489-038,
0-120-489-039,
0-120-489-040,
0-120-489-041,
0-120-489-042,
0-120-489-043,
0-120-489-044,
0-120-489-045,
0-120-489-046,
0-120-489-057,
0-120-489-058,
0-120-489-062,
0-120-489-063,
0-120-489-069, 0-120-489-070, 0-120-489-076,
0-120-489-077,
0-120-489-080,
0-120-489-081,
0-120-489-082,
0-120-489-083,
0-120-489-093,
0-120-489-094,
0-120-489-107,
0-120-489-108,
0-120-489-109,
0-120-489-110,
0-120-489-111,
0-120-489-112,
0-120-489-113,
0-120-489-114,
0-120-489-115,
0-120-489-116,
0-120-489-117,
0-120-489-120,
0-120-489-121,
0-120-489-122,
0-120-489-128,
0-120-489-129,
0-120-489-130,
0-120-489-131,
0-120-489-133,
0-120-489-134,
0-120-489-137,
0-120-489-138,
0-120-489-139,
0-120-489-141,
0-120-489-142,
0-120-489-143,
0-120-489-144,
0-120-489-152,
0-120-489-153,
0-120-489-154,
0-120-489-167,
0-120-489-170,
0-120-489-171,
0-120-489-183, 0-120-489-186,
0-120-489-191,
0-120-489-195,
0-120-489-196,
0-120-489-197,
0-120-489-198,
0-120-489-199,
0-120-489-200,
0-120-489-201,
0-120-489-202,
0-120-489-203,
0-120-489-204,
0-120-489-205,
0-120-489-206,
0-120-489-207,
0-120-489-208,
0-120-489-209,
0-120-489-210,
0-120-489-211,
0-120-489-215,
0-120-489-217, 0-120-489-218,
0-120-489-220,
0-120-489-228,
0-120-489-229,
0-120-489-235,
0-120-489-236,
0-120-489-237,
0-120-489-238,
0-120-489-239,
0-120-489-246,
0-120-489-247,
0-120-489-248,
0-120-489-249,
0-120-489-250,
0-120-489-260,
0-120-489-261,
0-120-489-262,
0-120-489-282,
0-120-489-283,
0-120-489-286, 0-120-489-296,
0-120-489-308,
0-120-489-323, 0-120-489-324,
0-120-489-325, 0-120-489-326, 0-120-489-327,
0-120-489-328, 0-120-489-329, 0-120-489-330,
0-120-489-331, 0-120-489-332, 0-120-489-333, 0-120-489-338,
0-120-489-349,
0-120-489-351,
0-120-489-352,
0-120-489-353,
0-120-489-362, 0-120-489-364,
0-120-489-365, 0-120-489-366,
0-120-489-367,
0-120-489-368,
0-120-489-369,
0-120-489-370,
0-120-489-371,
0-120-489-372,
0-120-489-373,
0-120-489-380,
0-120-489-381,
0-120-489-385,
0-120-489-386,
0-120-489-401,
0-120-489-403,
0-120-489-418,
0-120-489-419,
0-120-489-420,
0-120-489-421,
0-120-489-422,
0-120-489-423,
0-120-489-432,
0-120-489-433,
0-120-489-434,
0-120-489-436,
0-120-489-437,
0-120-489-438,
0-120-489-474,
0-120-489-486,
0-120-489-487,
0-120-489-489,
0-120-489-493,
0-120-489-494,
0-120-489-549,
0-120-489-715
0-120-489-748, 0-120-489-823, 0-120-498-826, 0-120-489-834, 0-120-489-835, 0-120-489-903,
0-120-489-904,
0-120-489-909,
0-120-489-549, 0-120-489-550, 0-120-489-910,
0-120-489-913, 0-120-489-914, 0-120-489-960,
0-120-489-961,
0-120-489-963,
0-120-489-964,
0-120-489-965,
0-120-489-966,
0-120-489-967,
0-120-489-968,
0-120-489-969,
0-120-489-976,
0-120-489-980,
0-120-489-981,
0-120-489-982,
0-120-489-983,
0-120-489-986,
0-120-489-987,
0-120-489-988,
0-120-489-990,
0-120-489-991,
0-120-489-992, 0-120-489-993;
0-886-031-501, 0 986 043 177,
1-192-052-015,
1-192-052-016, 1-192-052-020, 1-192-052-021,
1-192-052-024, 1-192-052-025, 1-192-052-027,
1-192-052-029,
1-197-311-003, 1-197-311-004, 1-197-311-005,
1-197-311-006, 1-197-311-007, 1-197-311-008,
1-197-311-009, 1-197-311-010, 1-197-311-011,
1-197-311-012, 1-197-311-013, 1-197-311-018,
1-197-311-021, 1-197-311-022, 1-197-311-023,
1-197-311-026, 1-197-311-027, 1-197-311-028,
1-197-311-035, 1-197-311-038, 1-197-311-039,
1-197-311-040, 1-197-311-050, 1-197-311-090, 1-197-311-800,
9-120-080-129, 9-120-143-036;
9-120-144-205, 9-120-144-206,
9-120-144-207,
9-120-144-216,
9-120-144-217,
9-120-144-237,
9-120-144-281,
9-120-144-282,
9-120-144-290,
9-120-144-292,
9-120-144-301,
9-120-144-305,
9-120-144-600,
9-120-144-601,
9-120-144-602,
9-120-144-603,
9-120-144-604,
9-120-144-608,
9-120-144-609,
9-120-144-612,
9-120-144-615,
9-120-144-616,
9-120-144-619,
9-120-144-620;
9-120-334-324, 9-127-041-109, 9-127 041 110,
9-127-041-200, 9-191-337-303,
Deutz-Allis
93155548
Fendt X830060022010
Ford 86GB-10316AA, 82BB-10316-AA,
E5RD-10316-BA
Fiat
60751135, 60751403, 60751439,
9938171, 9942848, 9942885, 99428884, 9950155, 9960176,
Fiat 128
'72-'74 using Bosch 0-120-300-559 or 0-120-300-568
28mm alternator, X1/9 '74 using
Bosch
0-120-300-559 or 0-120-300-568 28mm alternator, 1980
124 2000cc with fuel injection and Bosch 0-120-489-823 28mm alternator,
Bertone '83-'84
using Bosch 0-120-489-072 28mm alternator,
GM
90349704, 90349907
IHC
1530372C1
KHD
81211111
Lancia Beta '74 using
Bosch 0-120-300-559 or 0-120-300-568 28mm
alternator,
Lester 13023, 13056, 13119,
13122, 13129, 13153, 13154, 13156, 13235, 13243, 13244,
13281, 13291, 13363, 13367, 13379, 13603, 13604, 13607,
13707, 14059, 14392, 14412, 14418, 14420, 14421, 14595,
14603, 14783, 14784, 14785, 14791, 14802, 14820, 14824,
14833, 14876, 14964, 14965, 14966
Lucas 21221349, UCB403
Mercedes
Benz
002-154-4106, 002-154-5106, 002-154-7206,
002-154-7906, 007-154-48-02, 007-154-51-02, 007-154-52-02,
007-154-53-02, 007-154-54-02, 007-154-55-02,
007-154-56-02, 007-154-57-02, 007-154-58-02,
007-154-60-02, 007-154-61-02, 008-154-20-02,
008-154-87-02, Mercedes
190D
'84-'89, 240D 2.4L 1974 (early '74 55A alternator with
external reg), 240D 2.4L '74-'83 (late '74 and later 55A with internal
reg), 280 and 280C and S 2.8L
'73-'76, 280CE and E and SE 2.8L '77-'81, 300D and SD
and TD 3.0L '78-'81, 450SE and SEL '73-'80.
Opel
1204256, 1204259, 1204253, 90007041
PARIS RHONE
A13V02, A13V05, A13V07
Porsche
0 190 601 006, 0 192 052 006, 1 197 311 090 (1976-77 930 with SEV
alt - external reg fits), 944 603 14100, 944
603 14101 (1983-91
944), 928-603-142-00 (1992-95 968),
928-603-153-00, (there are lots of
other Porsche applications that are not listed for
Bosch internal regulator, external fan alternators).
Some other Porsche fitments: 1989-98 911
with Bosch alt, 1976 912 with Bosch alt -
external reg fits also, 1970-76 914 with
Bosch alt - external reg fits also, 1977-79 924 with
Bosch alt, 1986-88 924 with Bosch alt, 1983-91 944 with
Bosch alt 0-120-468-004, 1978-82 928 with Bosch
alt, 1985-95 928 with Bosch alt (NOT Paris Rhone or
Valeo alt), 1992-95 968 with Bosch alt.
Saab 8571846, 8590549, Saab 99 '73-'80 with Bosch
0-120-400-922 and 0-120-489-881 alternator (not models
with SEV alternator), 900 Turbo and non-turbo '79-'94
with Bosch 0-120-468-067, 0-120-489-881,
0-120-469-683, 0-001-311-108, 0-120-489-253,
0-120-469-611, 0-120-469-682 alternator (not '94 and later
with the newer internal fan alternator), 9000 '87-'94
with Bosch 0-120-468-035, 0-120-468-045,
0-120-469-682, 0-120-469-684, 0-120-469-881
alternator.
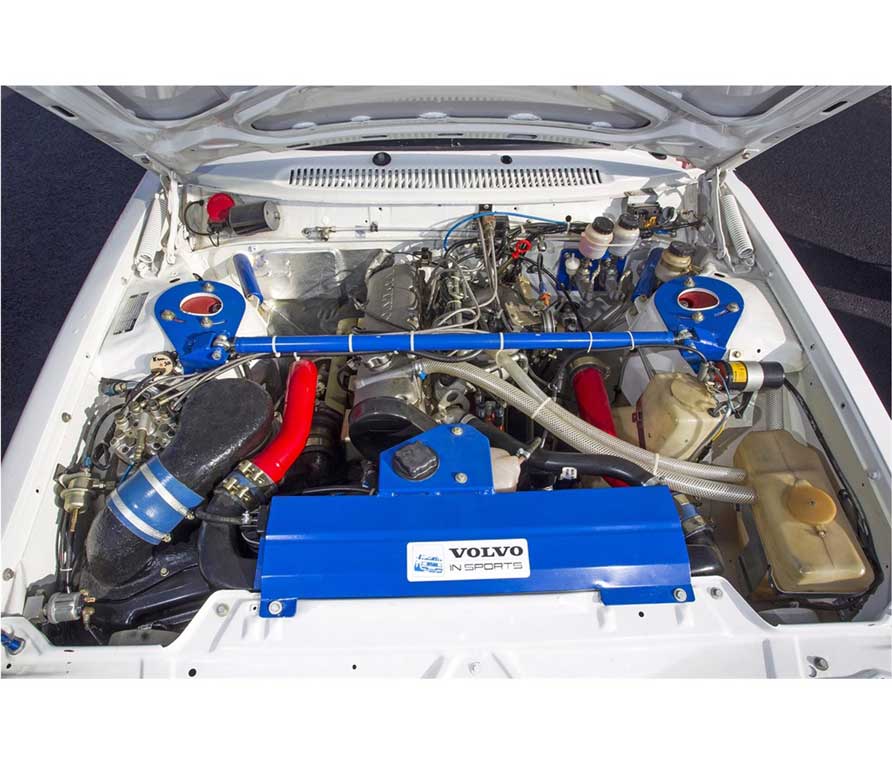
Volvo 240 ALL 1976-1993, 740 ALL 1985+ with any external fan alternator. Specific Part Numbers: 1235887 1979-84 240/260, 1257294-7, 1258994-1, 1258995 1979-84 240/260, 1269124-2, 1269702-5, 1323351-5, 1323488-5, 1323912-4, 1324142-7, 1324617, 1324957-8, 134850,
1348507-3, 1348508, 1363493 1985+ 240 55amp, 1363496-9, 1363497,
1363497-7, 1363511, 1363511-5, 1398327-5, 1416009, 241735, 244332,
269479-2, 269629-0, 3523710, 3544497, 3544497-5,
5001961-1, 5002730-9, 5003643-3, 5003644, 5003644-1,
5003665-6, 5003804, 5003804-1
Volkswagen I
get a lot of
questions about VW applications. Hopefully this
will help, but feel free to ask if you don't see yours.
The regulator here fit a LOT of Volkswagens. I don't list every AL
number. There are too many. Instead I try to show cars by year and model. If it's listed here it fits.
Cabriolet 84-93
1800cc all, Corrado 1800cc 89-92, Fox 87-93 1800cc,
Golf 85-92 1800cc, Jetta 83-84 1715cc and
1780cc, Jetta
85-92 1800cc, Golf or Jetta 1600 diesel
85-86, Jetta 1600 diesel 89-92, Passat
1800cc 91-92, Quantum 85-85 1800cc, Scirocco 83-84 1780cc, Scirocco 85-88 1800cc, Vanagon aircooled
80-82, Vanagon watercooled
83-84
1913cc, Vanagon 1913cc 89, Vanagon 86-92 2100cc**, AL30X, AL32X, AL173X, 021 903 023E, 025 903 023D, 025 903 023DX, 026 903 015, 026 903
015A, 026 903 015AX, 026 903 015D, 034 903 803, 37 903 018A, 037 903 023A, 037 903 023P, 068 903 017L, 068 903 017LX, 068 903 017N, 068 903 017NX, 068 903 017Q, 068 903 018, 068 903
018X, 068 903 029C, 068 903 029E, 068
903 029Q, 068 903 029QX, 068 903 033E, 069 903 023F, 068-903-803, 068 903 803D, 070-903-017, 070-903-023B, 070-903-023BX, 070-903-023E, 176 903
029.
 VANAGON CONCERNS:
A few years ago there
was something strange going on with Vanagons installations. Just
Vanagons. No other VWs.
I'm not that familiar with Vanagons,
but there were some issues reported with
about 6 different Vanagons over several
years (last occuring in 2017) when using adjustable regulators. SPECIFICALLY,
the symptom was that the alternator was
failing to charge above about 4000-4500
RPM (or sometimes the charge
light would come on at higher RPMs). When
this has occurred, re-installing the old
regulator seemed to correct it. VANAGON CONCERNS:
A few years ago there
was something strange going on with Vanagons installations. Just
Vanagons. No other VWs.
I'm not that familiar with Vanagons,
but there were some issues reported with
about 6 different Vanagons over several
years (last occuring in 2017) when using adjustable regulators. SPECIFICALLY,
the symptom was that the alternator was
failing to charge above about 4000-4500
RPM (or sometimes the charge
light would come on at higher RPMs). When
this has occurred, re-installing the old
regulator seemed to correct it.
Some have suggested it might have been a
vibration
issue with some engines or possibly some
weaker springs on the regulator brushes. No definite
source or better explanation for this
strange behavior was
ever found until the problems mysteriously
vanished in 2017. So
please keep this in mind if
you intend to use any of these internal
or external regulators in a
Vanagon. Strange, huh? If
you use these regulators on a Vanagon, please let me know your
experience.
No
more bad reports have been found since 2017.
CONTACT
VANAGON
SUCCESS REPORT #1:
November 2017. Michael C. from
Newington, NH. 1987 Vanagon with AL33X
alternator replaced by previous owner in
2009 (48k miles ago). External
adjustable regulator kit installed.
Michael reported he needed to FLASH THE FIELD upon installation (details about that HERE). He
has a volt gauge and has been monitoring
for 1000 plus miles with no issues.
VANAGON
SUCCESS REPORT #2:
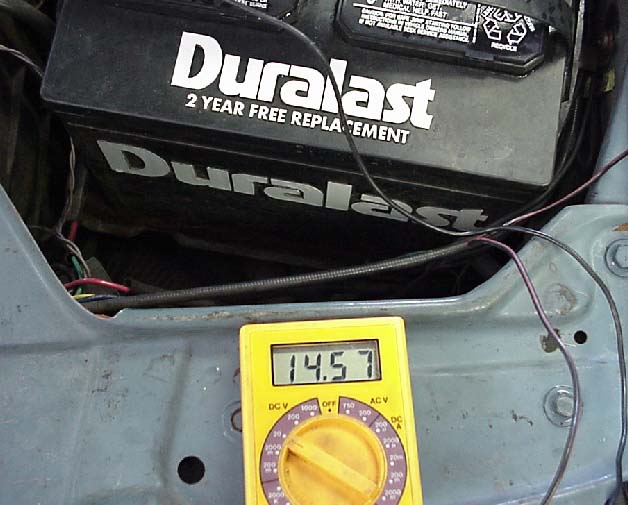
February 2018. Richie reports: "Saw your
Vanagon warning. I've been running one
in my '84 Vanagon for about 6 years now.
. . one of the first modifications I
did. Never had a problem with it
over thousands of miles and it charges
my starting and house battery no problem
at 14.5v in conjunction with my Blue Sea
Systems ACR. I wonder what's going
on with the others? Anyways,
thanks for a great product."
VANAGON
SUCCESS REPORT #3:
July 2018. Danny S. reports: "Just a
quick note that I've been using your internal adjustable voltage
regulator in my 1988 vanagon with 2.1
litre for 1 year or so with no problems.
Thanks for the great product."
VANAGON
SUCCESS REPORT #4: July 2019. Paul T. installed an external adjustable regulator
in his late-80s Vanagon and he mounted the regulator up front with a 12
foot long wire harness to the back. He reported on first start-up
his DMM read only 12 volts at the battery (not charging) and his
alternator light was on. Turning the adjustment screw wouldn't change
voltage. He turned it off and double checked that the brush
housing was seated correctly and connections were good, checking harness
continuity, etc. . Then he thought, "Hey, maybe the regulator
case needs to be grounded." (They actually don't) So he put a
jumper wire from the case to ground. Started it up and it began
working. And the voltage adjustment worked also. He set it to
about 14.5v at the battery. After he removed the jumper wire it
continued working and has since. He chalked it up to Vanagon
weirdness. He thought maybe the brushes needed more than a few
minutes to wear in. His on-board volt meter reads 14.2 volts,
dropping to 13.9 when he turns on the headlights and radio. He
says: "IDK, van seems to run really
great now. Still absolutely amazed that less than 2 volt increase
actually makes an audible and tactile difference in engine operation."
VANAGON
SUCCESS REPORT #4: May 2021 from Kelly-Shane F. "Hey, I got your adjustable regulator kit in the mail today, and was pleased at how easy that was to install!! I stuck it on the stock alternator on a 1980 Vanagon and took a chance
since you list only 83-92 (The later watercooled Vanagons) and not my
early aircooled one. Happy to say it worked! I *DID* have to flash the field to get it to
start charging, but once I did, it started charging right from idle,
where the old regulator needed some RPMs before it started to work. I was only able to get the regulator to go to
14.4 volts at full turn of the POT, but that's well up from the 13.3
the stock regulator was putting out, so I'll take it! Thanks for the awesome product!!"
VANAGON
SUCCESS REPORT #5: September 2022 from Steve O.: ."Thanks Dave. Another successful install. Yes I had to flash the field, but then it charged like a champ. Vanagoners need this upgrade!"
Flashing the field is something you should definitely consider if you're installing an external regulator for the first time.
More on FLASHING THE FIELD can be found HERE.
|
|


 alternators are known for poor voltage.")


