D A V E ' S V O L V O P A G E
|
| Return to Main Gauge Face Page Updated: June 16, 2026 VIEW CART CONTACT 
|
| Jaguar Projects |
Morgan Projects |
| Triumph Projects |
TVR Projects |
| Lotus Projects | MG Projects |
| OTHER Projects | |
| Misc. Purchase Add to Cart Menu |
|
| SHIPPING |
|
| Installation Info near the bottom |
|
| SMITHS PROJECT INFO |
| Please
understand that I am NOT a SMITHS gauge expert, and I don't disassemble or repair gauges. I do, however, have many
years of experience making custom vinyl overlays for many Volvo-VDO, Volvo-SMITHS and British SMITHS gauge
faces. In response to requests, I began this page to develop new overlays for restoring Smiths gauges for British classics. These overlays are made in the same manner as other overlays in my other gauge overlay pages. All overlays are printed on vinyl with a self-adhesive back and a matte (non-glare) UV resistant finish. Great care is taken to get an accurate, original looking overlay. In most cases, the accuracy was achieved with an example face plate that was sent by a customer. Applying a vinyl overlay can be an inexpensive way of restoring a gauge that otherwise might never be restored. Most smaller gauges below use TWO overlay pieces for each gauge. The front piece is made to cover the portion of the gauge with text, but there is a thin curved portion that will not be covered. That area will be exposed, so you will probably need to re-paint it. Large Speedometer or Tachometer faces are sometimes made as one piece or two pieces depending on the style. More faces can be added and in many cases, for a style not already made, an example face plate may be required (which of course will be returned). If you need a Smiths face not shown, or if you have any questions, please email. CONTACT INFO Overlay installation information may be found near the bottom: CLICK HERE. |
 Size: 60 x 31 mm. Matte finish. $4.00 each When done shopping, please proceed to Shipping at Bottom: CLICK HERE Shopping Cart or Check Out is found at the bottom of the page. |
| JAGUAR PROJECTS |
| Jaguar XK |
Jaguar C-Type |
|
| Jaguar E-Type 1963-64 |
Jaguar E-Type 1967 |
|
| Jaguar D-Type |
Other Jaguar Projects |
|
| Other Related Projects |
||
|
||
| JAGUAR XK Projects |
This customer supplied an original set of speedo and tach faces for an XK 140 with a request to develop some overlay faces. 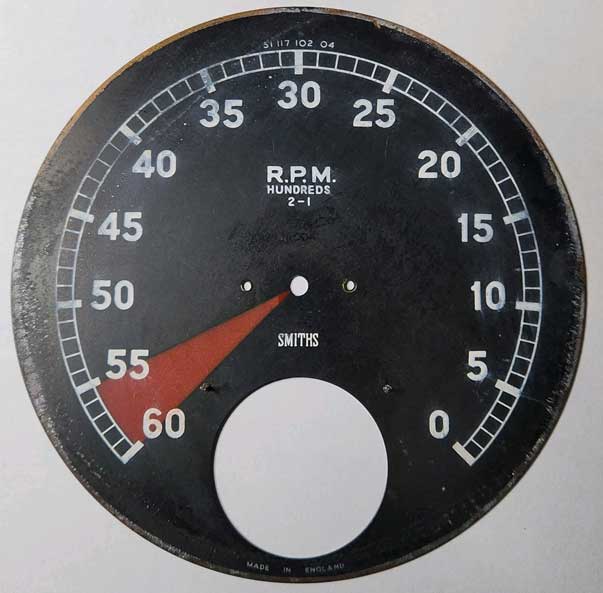 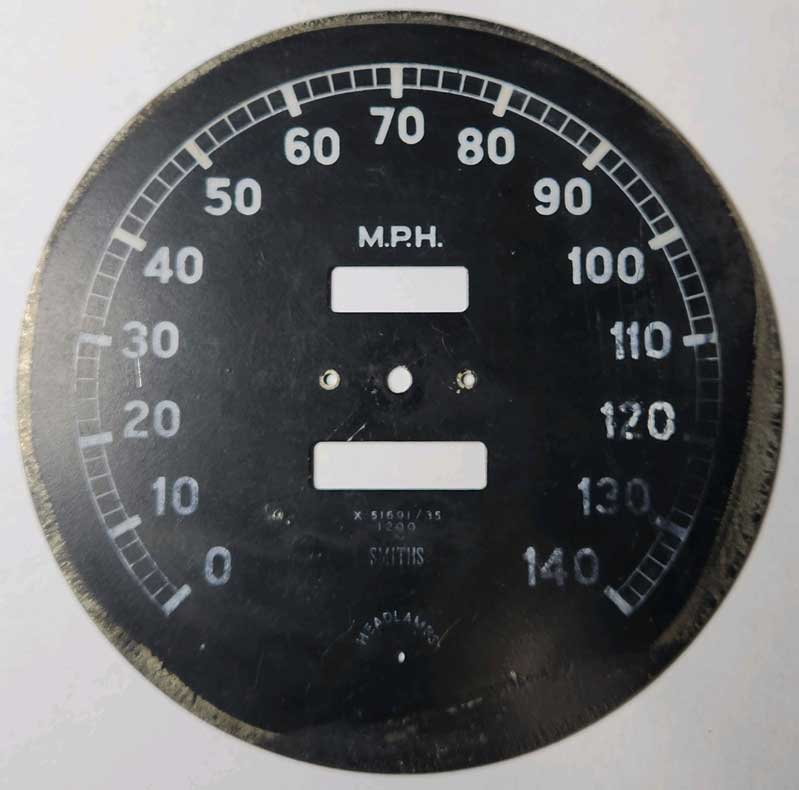 The XK 120, 140 and 150 shared some gauges, however some are certainly different from these. Overlay installation information may be found near the bottom: CLICK HERE.
|
Overlays for Smiths Jaguar XK. |
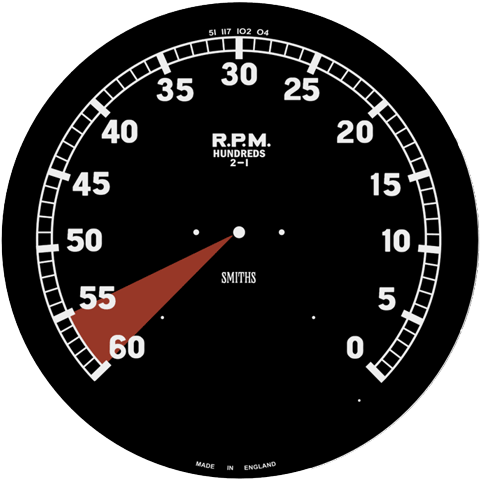 |
Smiths 6k Tach for Jag XK (51 117 102 / 04). When done shopping, please proceed to Shipping at Bottom: CLICK HERE Shopping Cart or Check Out is found at the bottom of the page. |
|
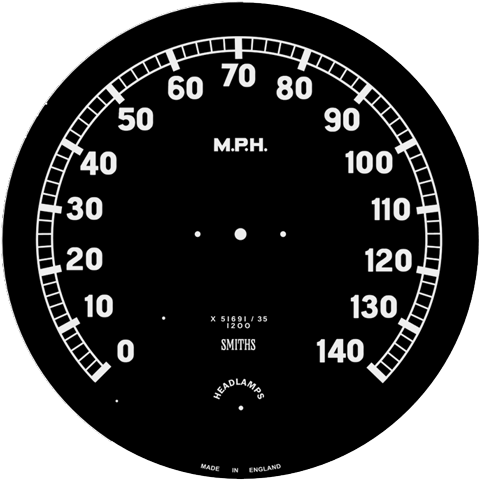 |
Smiths 140 mph Speedo for Jag XK (X 51691 / 35). When done shopping, please proceed to Shipping at Bottom: CLICK HERE Shopping Cart or Check Out is found at the bottom of the page. |
|
|
||
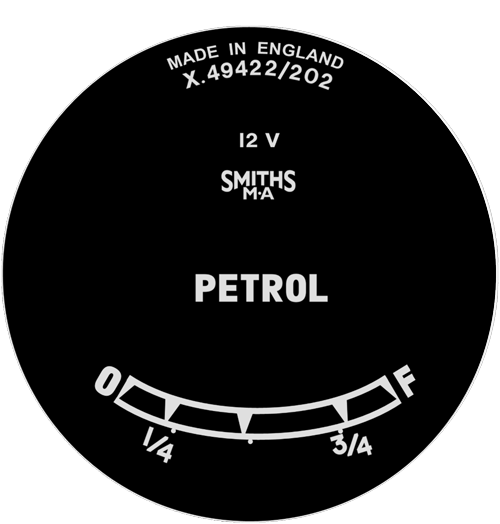  |
Smiths overlay for PETROL. For XK (X.49422/202). Created to fit the gauge face shown with a flat space diameter of 46 mm. The needle shaft opening at the top and the lamp hole at the bottom will need to be trimmed open after installation using a sharp hobby knife. Also the two limit pins will need to be poked through during installation. When done shopping, please proceed to Shipping at Bottom: CLICK HERE Shopping Cart or Check Out is found at the bottom of the page. |
|
|
||
Special C-Type Project |

Overlays for Smiths Jaguar C-Type 1952-53 |
 |
Smiths 6500k Tach for Jaguar C-Type. Overlay for XK face plate. When done shopping, please proceed to Shipping at Bottom: CLICK HERE Shopping Cart or Check Out is found at the bottom of the page. |
|
 |
Smiths 160 mph Speedo for Jaguar C-Type. Overlay for XK face plate. When done shopping, please proceed to Shipping at Bottom: CLICK HERE Shopping Cart or Check Out is found at the bottom of the page. |
|
|
||
1963-64 JAGUAR E-TYPE |
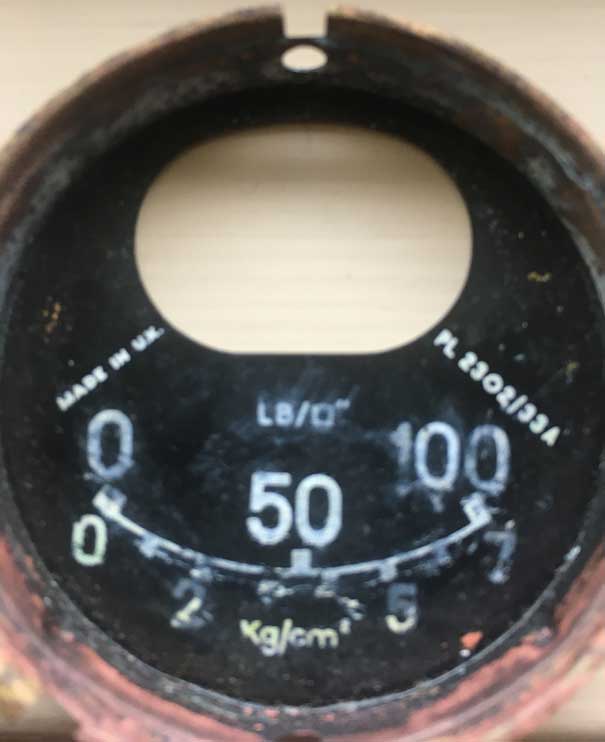
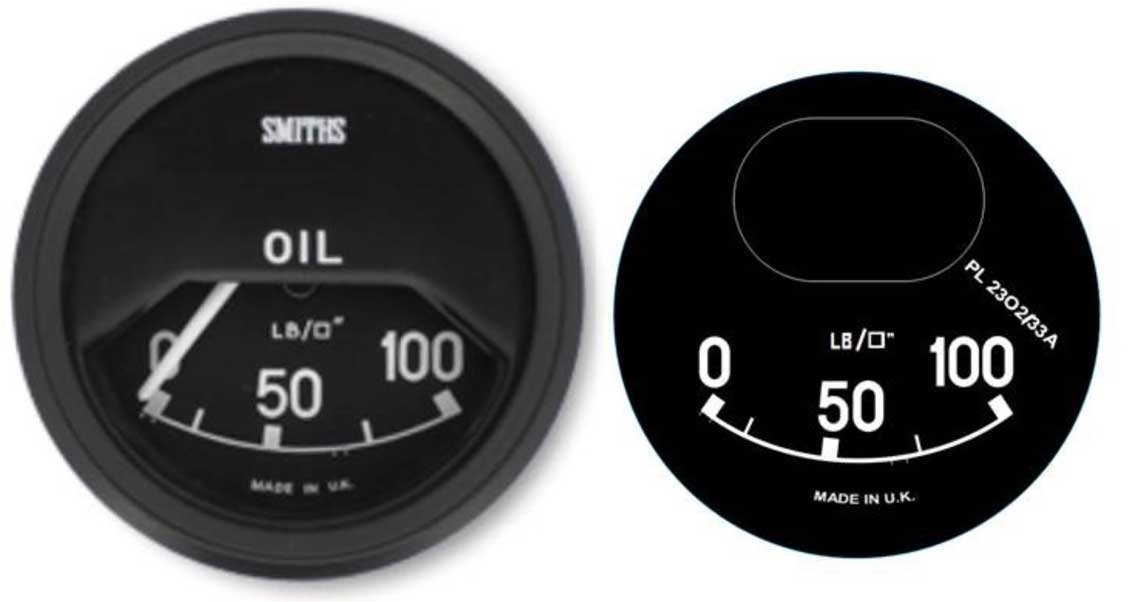
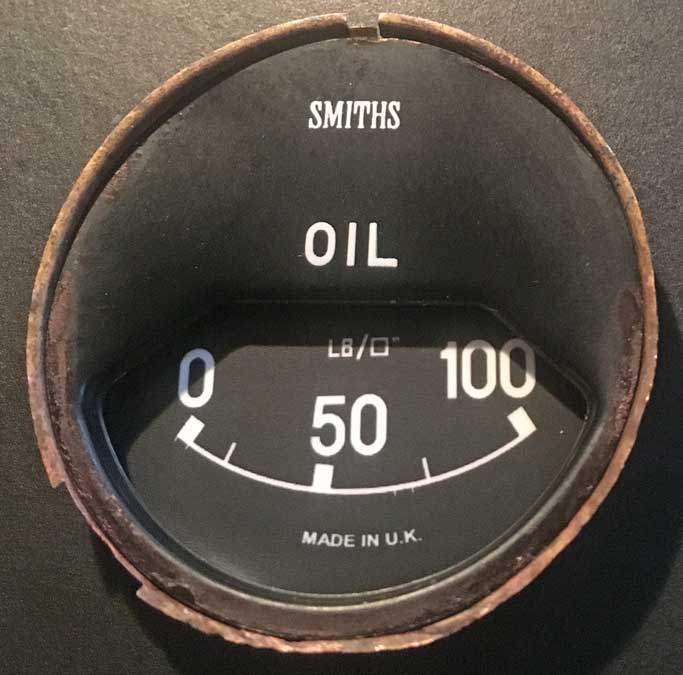
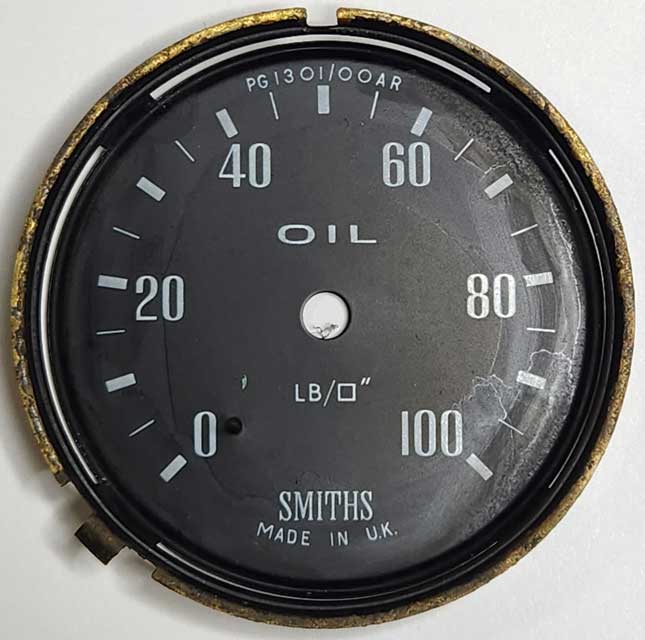
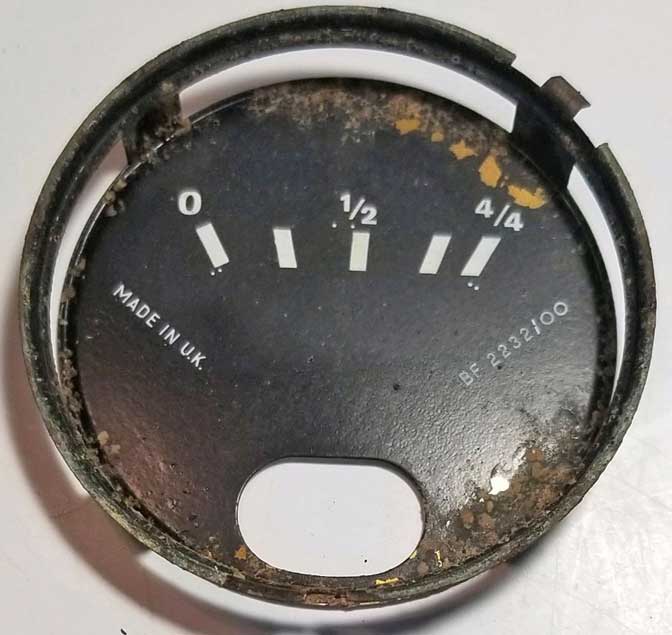
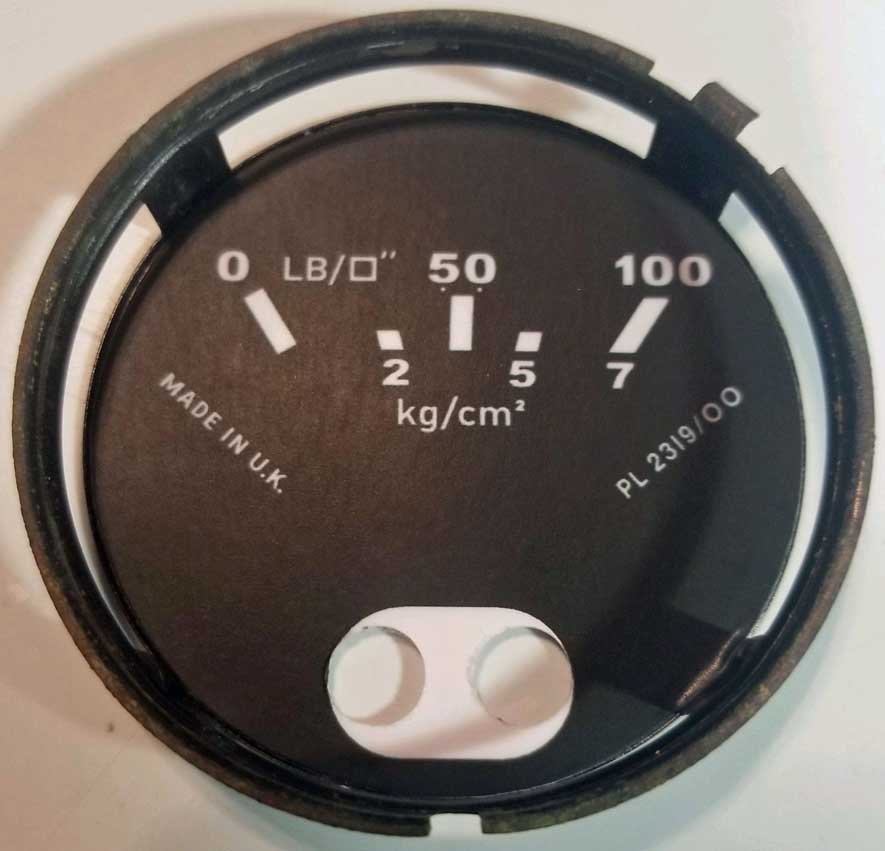
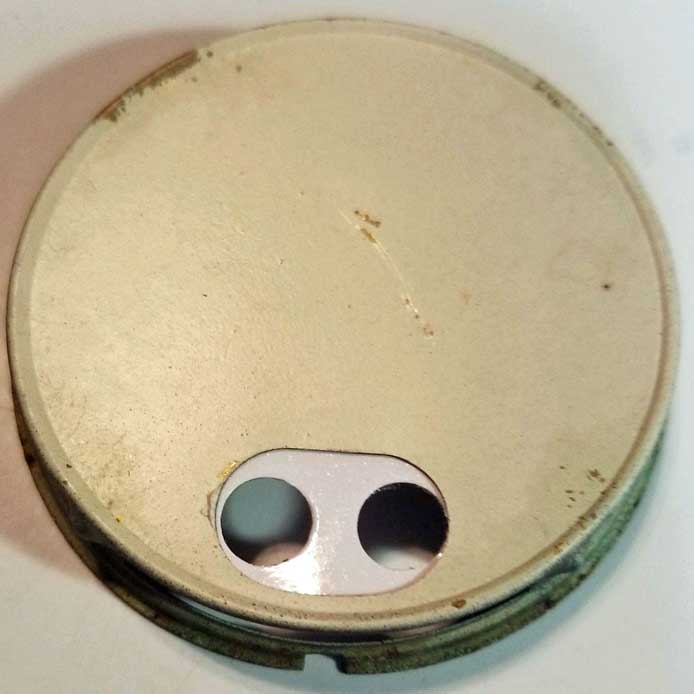
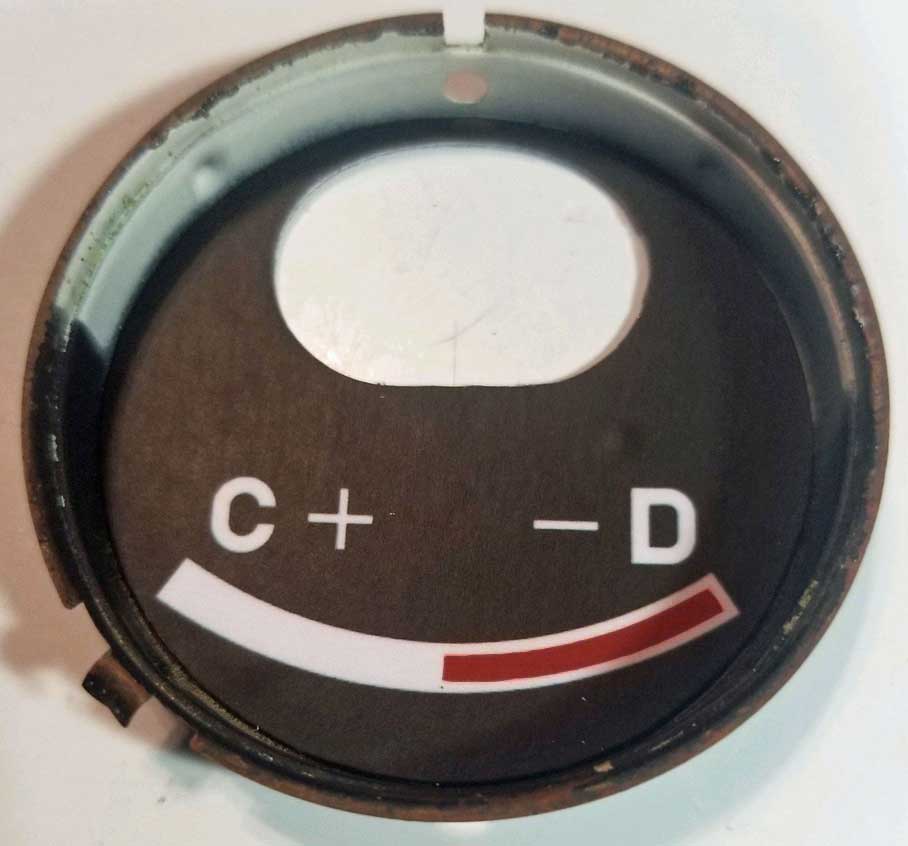
This customer needed an oil pressure gauge. He had a
Smiths donor gauge with an incorrect rear face plate, which was to be
converted (FIRST photo). I developed the overlay to match the correct gauge based on information supplied by the customer (SECOND photo below). The customer then installed the overlay on the rear face plate. The LAST photo shows this installation. The front face plate was not restored at this time, however it can now be done as well (CLICK HERE).
|
Overlays for Smiths Jaguar E 1963-64. |
|
||

|
Smiths FRONT overlay for FUEL gauge. When done shopping, please proceed to Shipping at Bottom: CLICK HERE Shopping Cart or Check Out is found at the bottom of the page. |
|
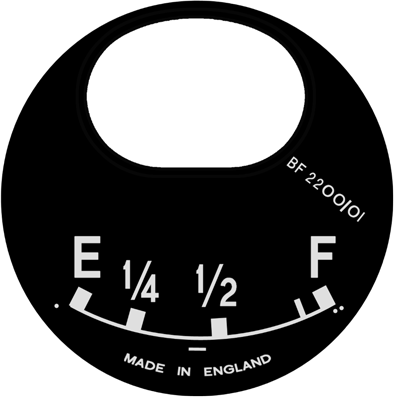 |
Smiths FRONT overlay for FUEL gauge BF2200/01. When done shopping, please proceed to Shipping at Bottom: CLICK HERE Shopping Cart or Check Out is found at the bottom of the page. |
|
 |
Smiths FRONT overlay for TANK gauge. When done shopping, please proceed to Shipping at Bottom: CLICK HERE Shopping Cart or Check Out is found at the bottom of the page. |
|
|
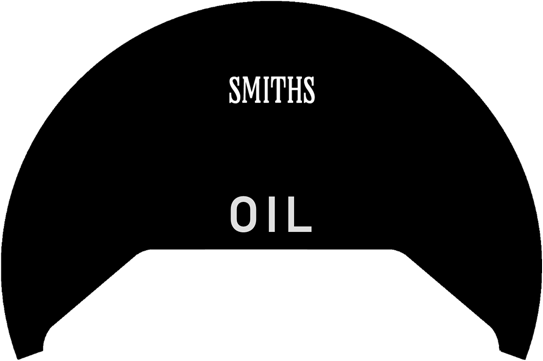
Smiths FRONT overlay for Oil Pressure gauge. When done shopping, please proceed to Shipping at Bottom: CLICK HERE Shopping Cart or Check Out is found at the bottom of the page. |
|
|
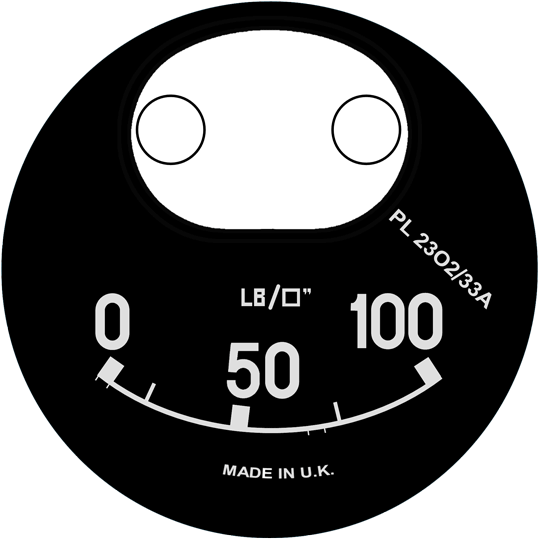
Smiths REAR overlay for 100 PSI Oil Pressure gauge PL2302/33A. When done shopping, please proceed to Shipping at Bottom: CLICK HERE Shopping Cart or Check Out is found at the bottom of the page. |
|

|
Smiths FRONT overlay for WATER gauge. When done shopping, please proceed to Shipping at Bottom: CLICK HERE Shopping Cart or Check Out is found at the bottom of the page. |
|
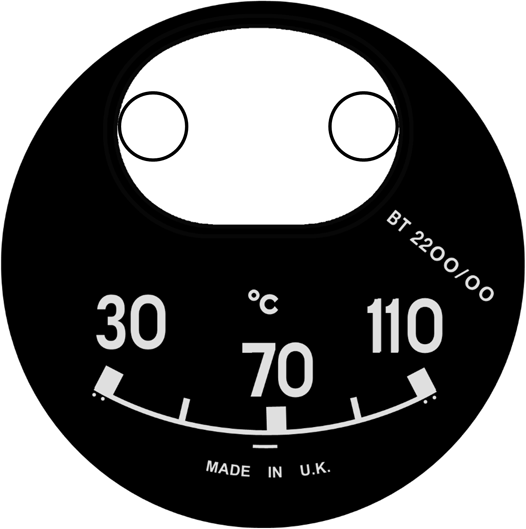 |
Smiths REAR overlay for 110 Celcius Water Temp gauge BT2200/00. When done shopping, please proceed to Shipping at Bottom: CLICK HERE Shopping Cart or Check Out is found at the bottom of the page. |
|

|
Smiths (LUCAS) FRONT overlay for AMPS gauge. When done shopping, please proceed to Shipping at Bottom: CLICK HERE Shopping Cart or Check Out is found at the bottom of the page. |
|
 |
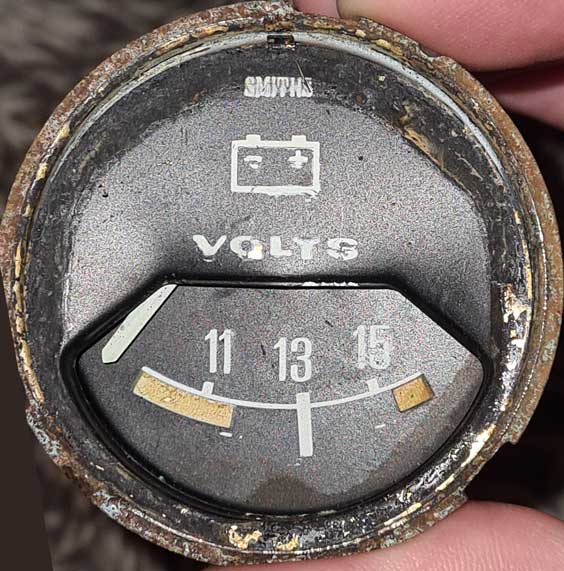
Smiths (LUCAS) FRONT overlay for VOLTS (custom). When done shopping, please proceed to Shipping at Bottom: CLICK HERE Shopping Cart or Check Out is found at the bottom of the page. |
|
|
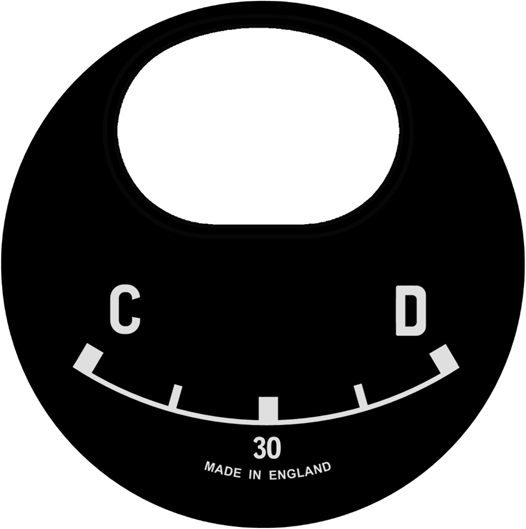
Smiths (LUCAS) REAR overlay for AMPS [30] gauge. When done shopping, please proceed to Shipping at Bottom: CLICK HERE Shopping Cart or Check Out is found at the bottom of the page. |
|
 |
Smiths FRONT overlay for BATTERY gauge. When done shopping, please proceed to Shipping at Bottom: CLICK HERE Shopping Cart or Check Out is found at the bottom of the page. |
|
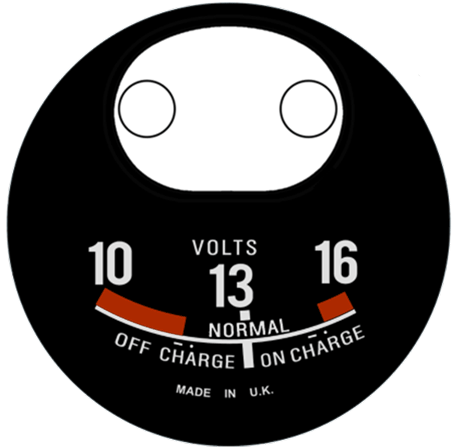 |
Smiths REAR overlay for BATTERY VOLTS CHARGE gauge. When done shopping, please proceed to Shipping at Bottom: CLICK HERE Shopping Cart or Check Out is found at the bottom of the page. |
|
| 1967 JAGUAR E-TYPE |
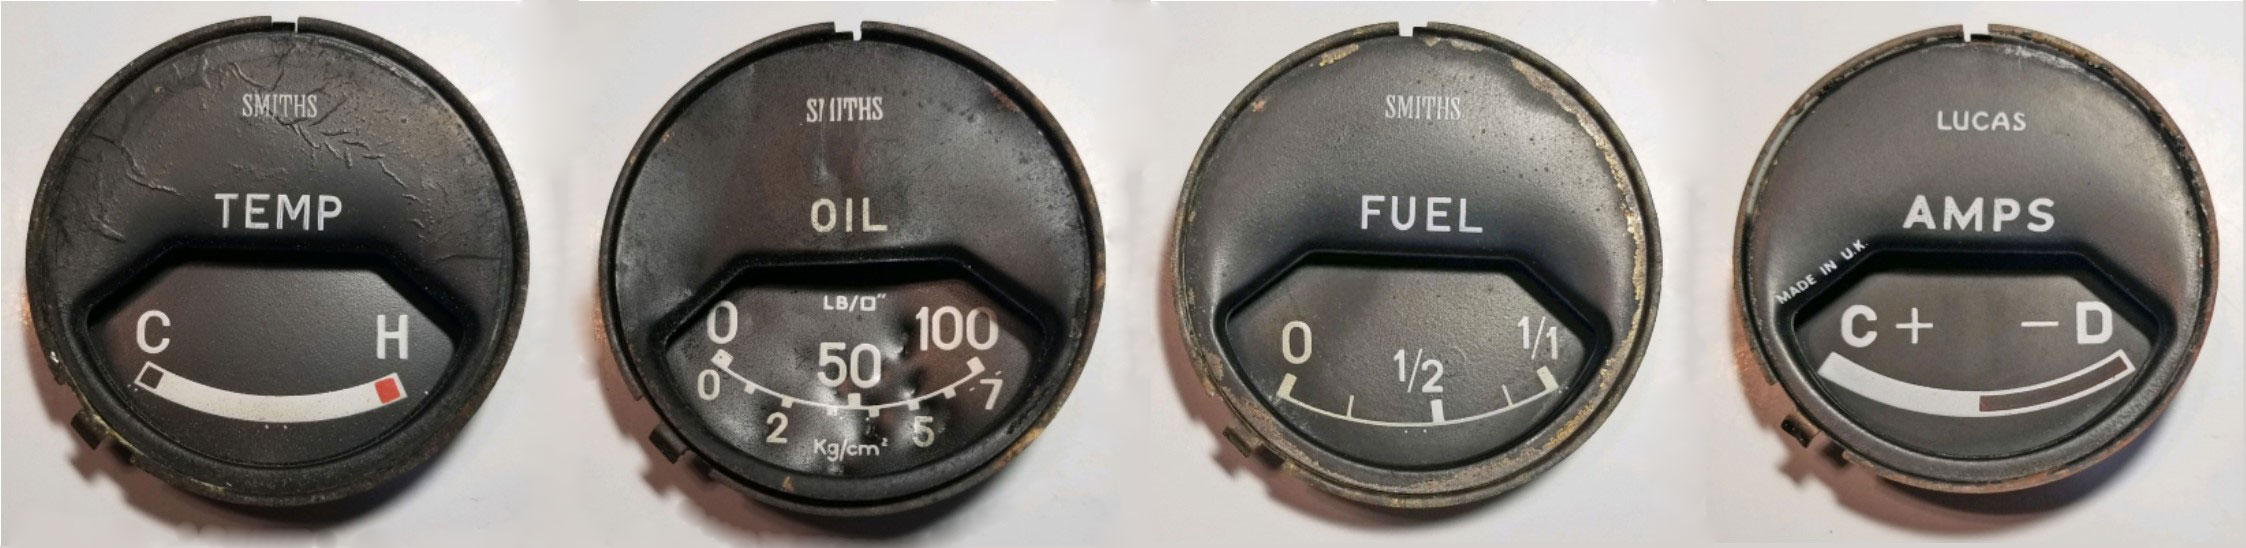
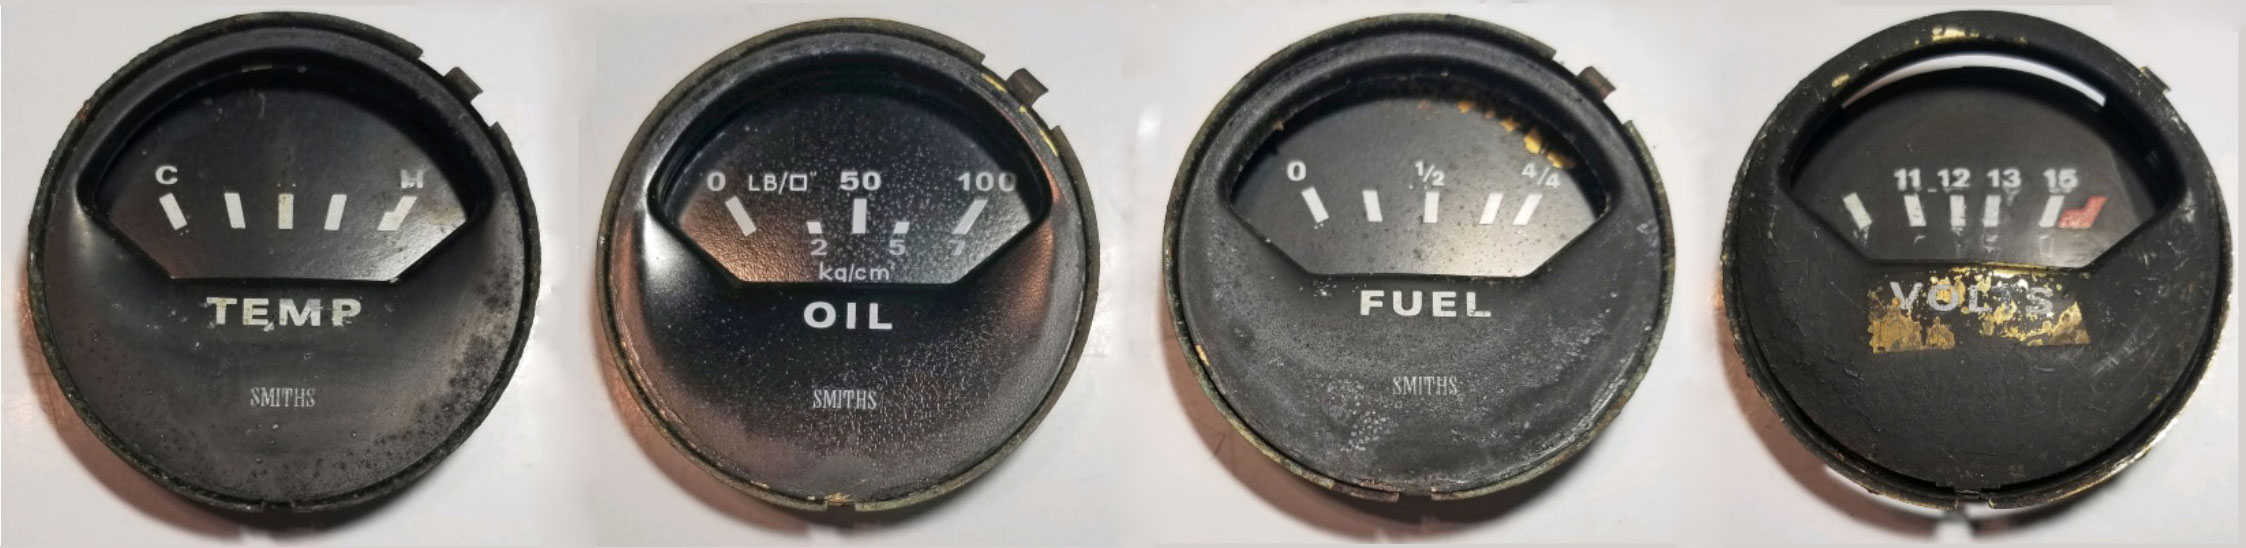
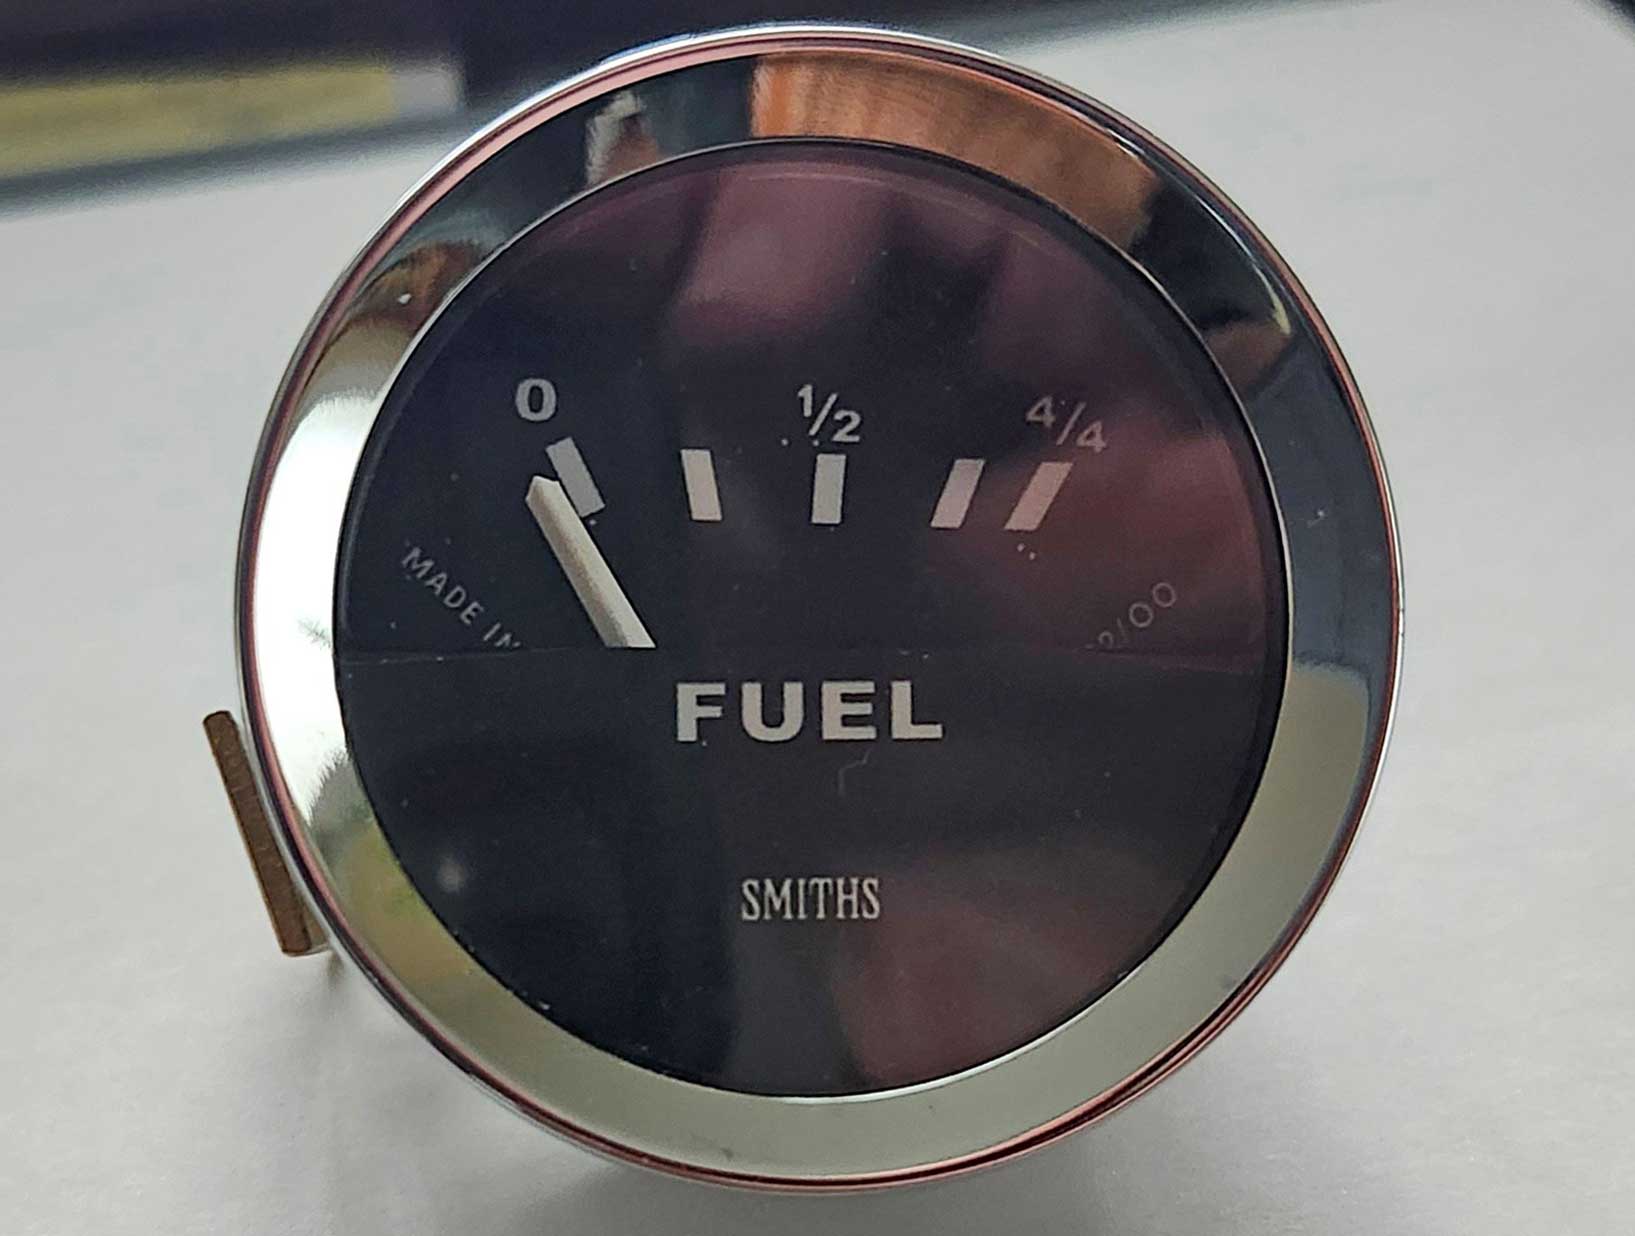
This customer supplied the below gauge face plates that he had already removed from gauge housings for his 1967 E-Type.
|
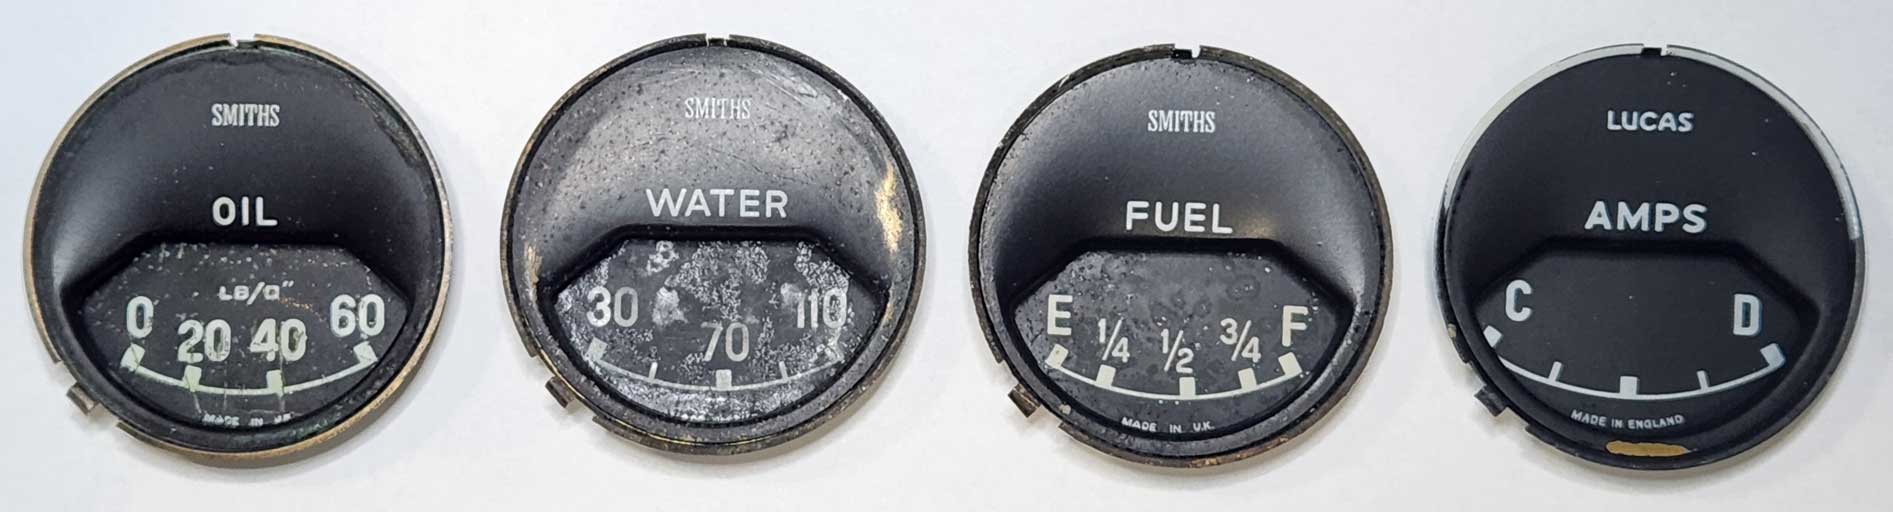
Overlays for Smiths Jaguar E-TYPE. |
|
||
|
Smiths FRONT overlay for OIL gauge. When done shopping, please proceed to Shipping at Bottom: CLICK HERE Shopping Cart or Check Out is found at the bottom of the page. |
|
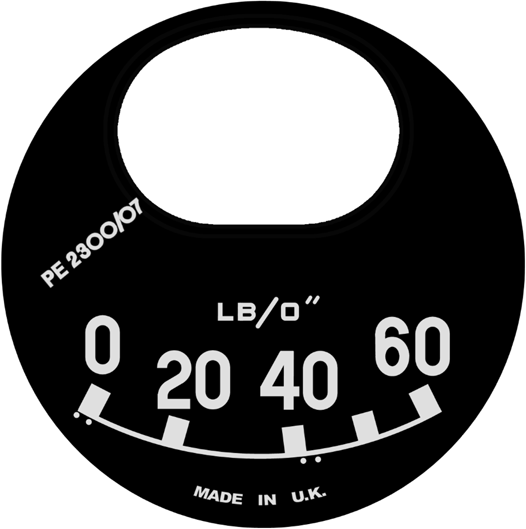 |
Smiths REAR overlay for OIL Pressure gauge PE2300/07. When done shopping, please proceed to Shipping at Bottom: CLICK HERE Shopping Cart or Check Out is found at the bottom of the page. |
|
|
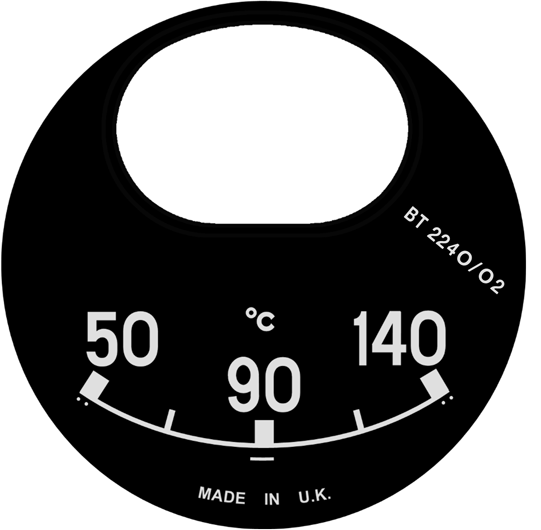
Smiths REAR custom overlay for OIL Temp gauge 140C BT2240/02. This overlay was made as a custom request and is made to be used on a Smiths BT2240/01C or BT2204/29 oil temp gauge, such as FOUND HERE. When done shopping, please proceed to Shipping at Bottom: CLICK HERE Shopping Cart or Check Out is found at the bottom of the page. |
|
|
|
Smiths FRONT overlay for WATER Temp gauge. When done shopping, please proceed to Shipping at Bottom: CLICK HERE Shopping Cart or Check Out is found at the bottom of the page. |
|
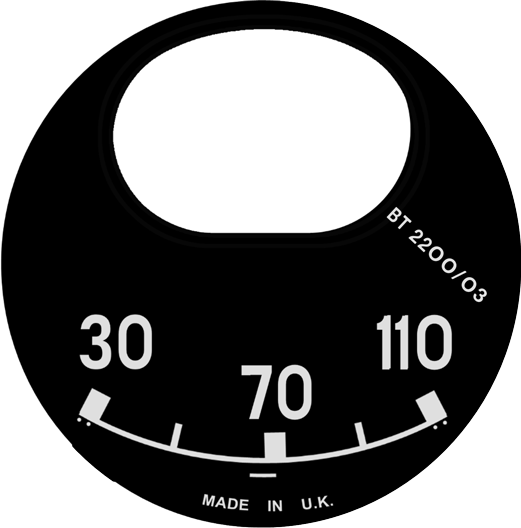 |
Smiths REAR overlay for WATER Temp gauge BT2200/03. When done shopping, please proceed to Shipping at Bottom: CLICK HERE Shopping Cart or Check Out is found at the bottom of the page. |
|
|
|
Smiths FRONT overlay for FUEL gauge. When done shopping, please proceed to Shipping at Bottom: CLICK HERE Shopping Cart or Check Out is found at the bottom of the page. |
|
 |
Smiths REAR overlay for FUEL gauge BF2200/09. When done shopping, please proceed to Shipping at Bottom: CLICK HERE Shopping Cart or Check Out is found at the bottom of the page. |
|
|
|
Smiths FRONT overlay for Lucas AMPS gauge. When done shopping, please proceed to Shipping at Bottom: CLICK HERE Shopping Cart or Check Out is found at the bottom of the page. |
|
 |
Smiths REAR overlay for Lucas AMPS gauge. When done shopping, please proceed to Shipping at Bottom: CLICK HERE Shopping Cart or Check Out is found at the bottom of the page. |
|
 |
Smiths CUSTOM Fuel Pressure overlay for PG1310/03CB. Limit pin hole not included, so it should be added during installation. When done shopping, please proceed to Shipping at Bottom: CLICK HERE Shopping Cart or Check Out is found at the bottom of the page. |
|
| OTHER JAG PROJECTS and Special Jaguar D-Type Project. |
| This
project began when a customer in the U.K. supplied some original small gauge face plates shown below for early cars. His hope and request was to develop some new overlay faces, including a special set of small faces for an early Jaguar D-Type. These are detailed in the D-Type Section below. Please understand that I am NOT a SMITHS gauge expert, however I have many years of experience making overlays for Volvo-VDO, Volvo-SMITHS and British SMITHS gauge faces.
|
| Special D-Type Project |
| This project began with a request to replicate two small gauges
which appeared in a Jaguar D-Type. Original gauges are simple not
available. It was a bit of a mystery at first, because very few good
close-up photos showing these two gauges in a D-Type dash could be found. There
are also a number of D-Type replicas and recreations,
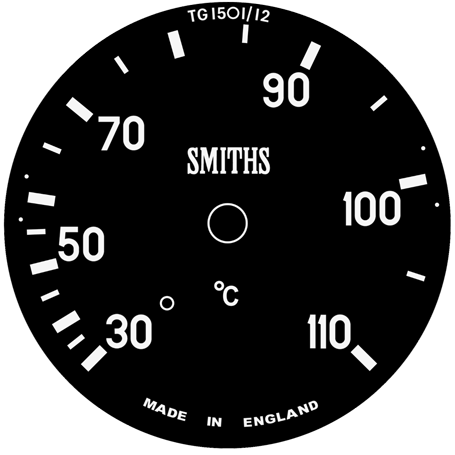
which mostly have different or later gauges fitted. I eventually located the below photo which was included in a Sotheby's auction for a genuine 1955 D-Type (chassis
number XKD 546). These gauges were identified as PG1501/15 and TG1501/12. Except for the mismatch in the sizes of the SMITHS
logos, this photo is presumed to depict an original dash with original
gauges (even though these gauges may have been restored by someone at
sometime). So these examples were used to make the overlays below,
with correctly sized SMITHS logos of course. It was decided that other currently available gauges would be used as donors to convert or replicate these PG1501/15 and TG1501/12 D-Type gauges below. Details below.  Please contact me if you have comments or questions: CONTACT |
||
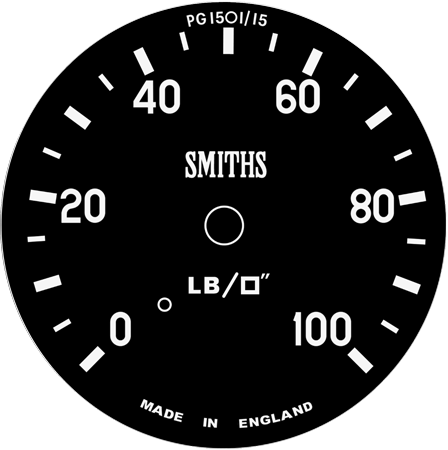  |
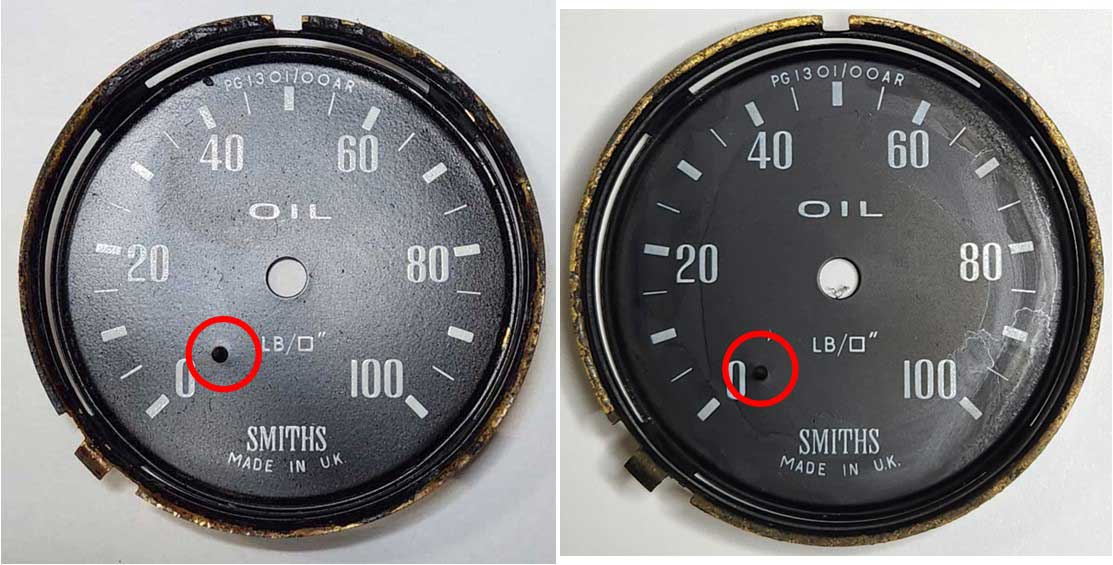
Smiths overlay for D-Type OIL PRESSURE PG1501/15 to convert an existing PG1301/00AR oil pressure gauge. This one is specially made for a LIMIT PIN that is closer to the center. When done shopping, please proceed to Shipping at Bottom: CLICK HERE Shopping Cart or Check Out is found at the bottom of the page.
|
|
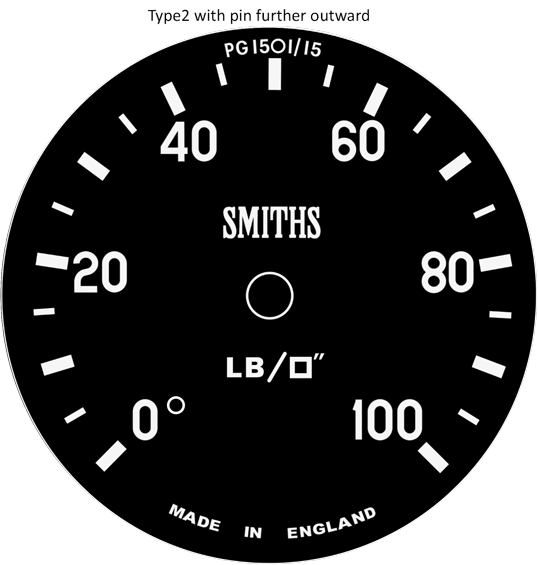  |
Smiths overlay for D-Type OIL PRESSURE PG1501/15 to convert an existing PG1301/00AR oil pressure gauge. This one is specially made for a LIMIT PIN that is further from the center. When done shopping, please proceed to Shipping at Bottom: CLICK HERE Shopping Cart or Check Out is found at the bottom of the page.
|
|
|
Smiths overlay for D-Type WATER TEMP TG1501/12 to convert your existing TG1301/00AR or TG1301/15 water temp gauge. When done shopping, please proceed to Shipping at Bottom: CLICK HERE Shopping Cart or Check Out is found at the bottom of the page. |
|
|
||
| OTHER Related PROJECTS. |
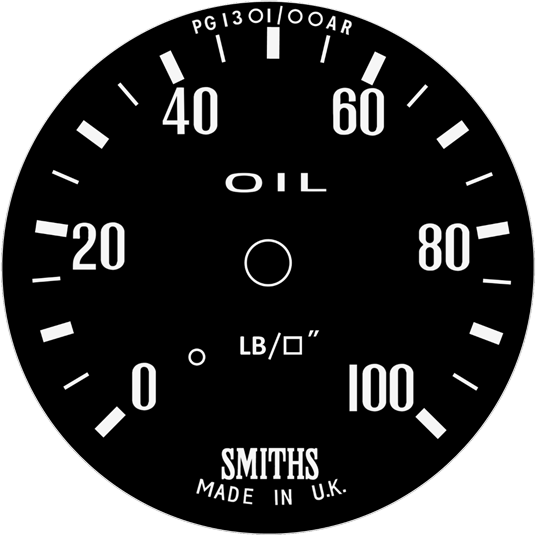 |
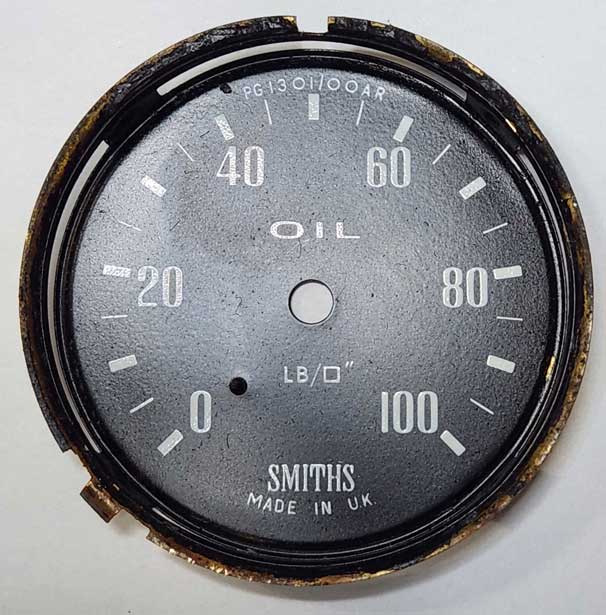
Smiths overlay for OIL PRESSURE PG1301/00AR. When done shopping, please proceed to Shipping at Bottom: CLICK HERE Shopping Cart or Check Out is found at the bottom of the page.
|
|
 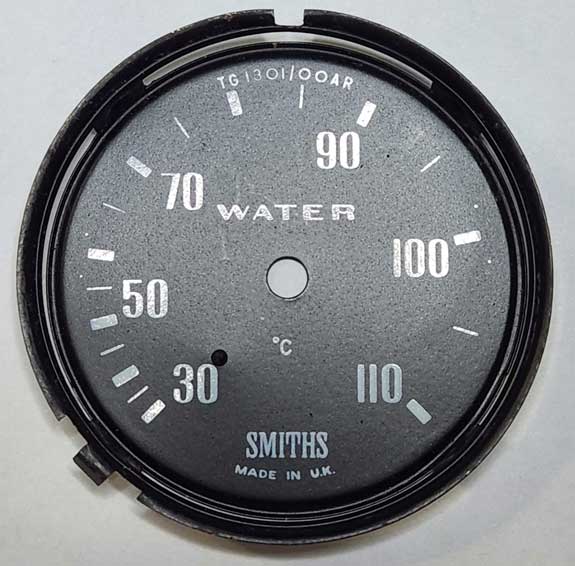 |
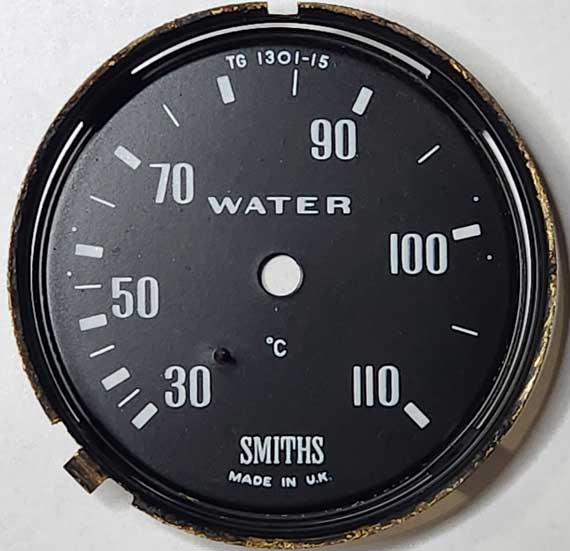
Smiths overlay for WATER TEMP TG1301/00AR. When done shopping, please proceed to Shipping at Bottom: CLICK HERE Shopping Cart or Check Out is found at the bottom of the page. |
|
 |
Smiths overlay for WATER TEMP TG1301/15. This gauge and face is identical to the above TG1301/00AR face, except for the part number change at the top. When done shopping, please proceed to Shipping at Bottom: CLICK HERE Shopping Cart or Check Out is found at the bottom of the page. |
|
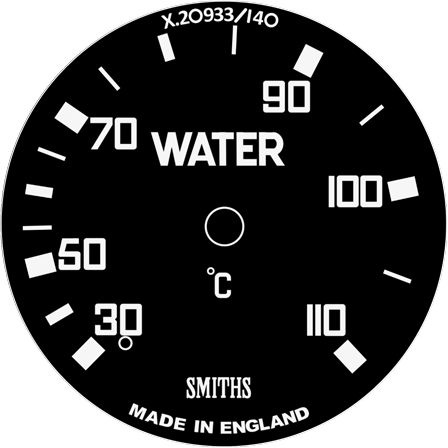 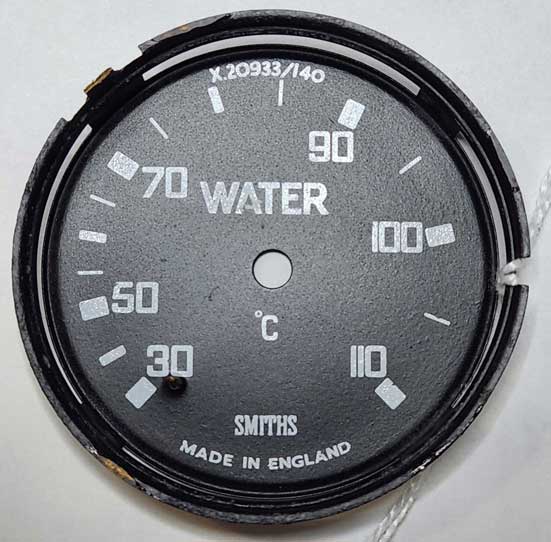 |
Smiths overlay for WATER TEMP X.20933/140. When done shopping, please proceed to Shipping at Bottom: CLICK HERE Shopping Cart or Check Out is found at the bottom of the page. |
|
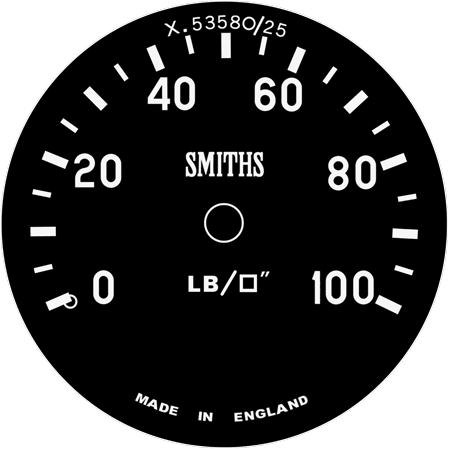  |
Smiths overlay for OIL PRESSURE X.53580/25. When done shopping, please proceed to Shipping at Bottom: CLICK HERE Shopping Cart or Check Out is found at the bottom of the page. |
|
|
||
| MORGAN PROJECT INFO |
| Please understand that I am NOT a
SMITHS gauge expert, however I have many years of experience making
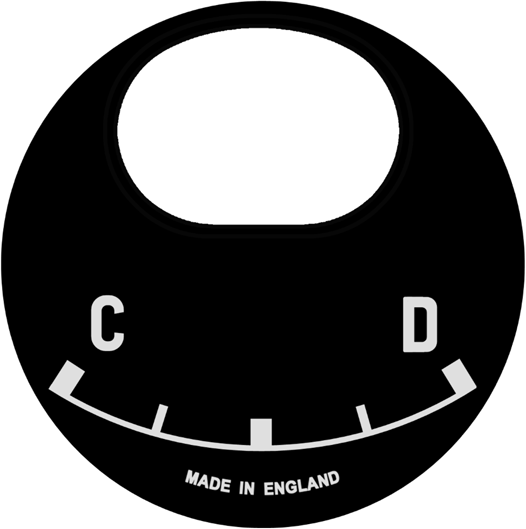
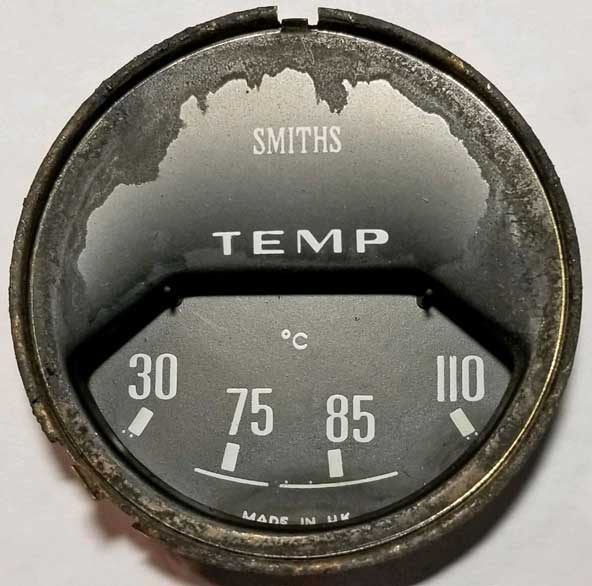
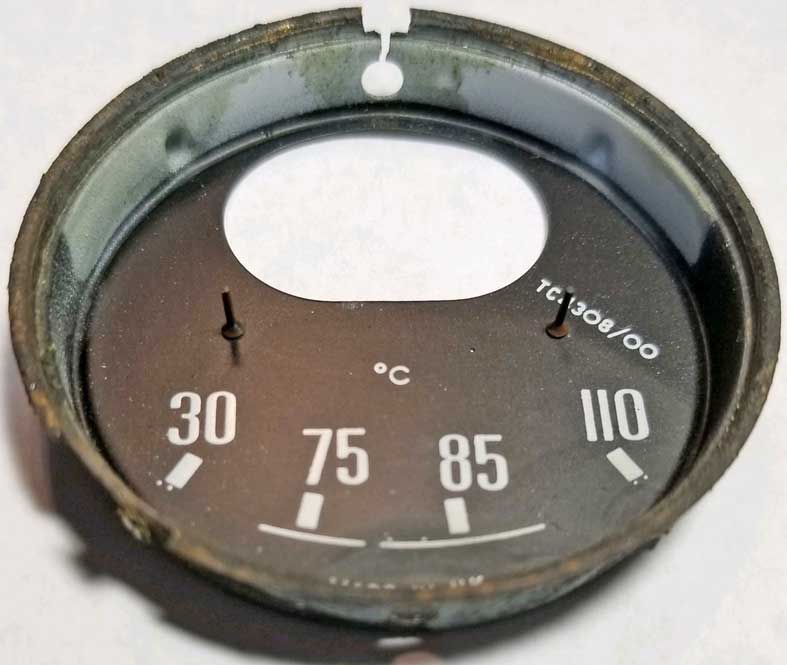
overlays for Volvo-VDO, Volvo-SMITHS and British SMITHS gauge faces. A customer with a 1966 Morgan 4/4 was in need of a new face for a temperature gauge. Since a temp sender for the Morgan gauge is NLA, his plan was to place the overlays on a Triumph or MG/B gauge using a sender that was still available. Most small gauges like these use TWO overlay pieces for each gauge. The front piece is made to cover the top portion of the gauge with text, but there is a thin curved lower front portion that will not be covered by the new overlay. That area of the front face plate will be exposed, so you will probably need to paint it. More faces can be added. If you need a Smiths face not shown, have questions or if you can help contribute, please email. 1966 MORGAN 4/4 The font style that was used on this gauge for Morgan is different from other Smiths gauges on this page. Also this temp gauge below has two limiting pins, which can be seen better in the third photo below. The restoration overlays below are available with the holes for these pins or without the holes. Limiting pins do NOT need to be removed prior to installing an overlay. The overlay without pin holes is offered in case you want to install it on a temp gauge without the limiting pins or if you plan to remove them permanently.
|

| Overlays for Smiths Morgan. |
|
||

|
Smiths FRONT overlay for TEMP gauge. When done shopping, please proceed to Shipping at Bottom: CLICK HERE Shopping Cart or Check Out is found at the bottom of the page. |
|
 |
Smiths FRONT overlay for OIL TEMP gauge (custom). When done shopping, please proceed to Shipping at Bottom: CLICK HERE Shopping Cart or Check Out is found at the bottom of the page. |
|

|
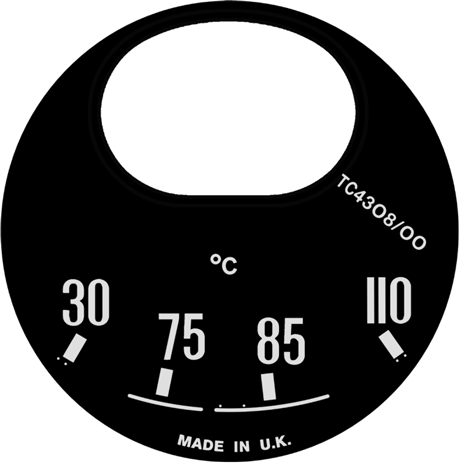
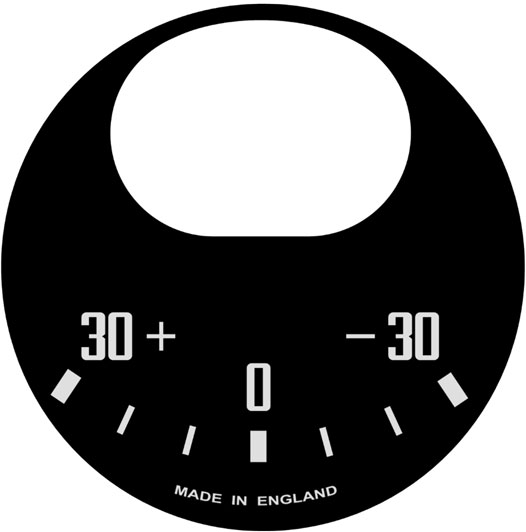
Smiths REAR overlay for TEMP gauge CELCIUS TC4308/00 (with limit pin holes). When done shopping, please proceed to Shipping at Bottom: CLICK HERE Shopping Cart or Check Out is found at the bottom of the page. |
|
|
Smiths REAR overlay for TEMP gauge CELCIUS TC4308/00 (WITHOUT limit pin holes). When done shopping, please proceed to Shipping at Bottom: CLICK HERE Shopping Cart or Check Out is found at the bottom of the page. There are small limit pins in the original face plate above the 30 and 110. No holes will be added for this overlay. The best method for installation will be to remove the limit pin, then install the overlay, then create a hole for the pin in the overlay, then re-install the pin. |
|
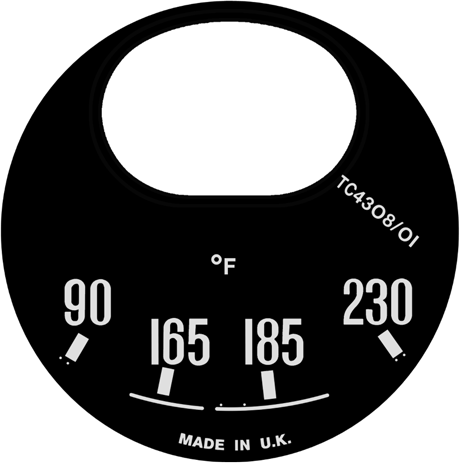 |
Smiths REAR overlay for TEMP gauge FAHRENHEIT TC4308/01 (WITHOUT limit pin holes). When done shopping, please proceed to Shipping at Bottom: CLICK HERE Shopping Cart or Check Out is found at the bottom of the page. There are small limit pins in the original face plate above the 90 and 230. No holes will be added for this overlay. The best method for installation will be to remove the limit pin, then install the overlay, then create a hole for the pin in the overlay, then re-install the pin. |
|
| TRIUMPH PROJECT INFO |
| Please understand that I am NOT a
SMITHS gauge expert, however I have many years of experience making
overlays for Volvo-VDO, Volvo-SMITHS and British SMITHS gauge faces. In response to requests I have begun developing some new overlays for restoring Smiths or Jaeger Triumph gauges. These overlays are made in the same manner as other overlays in my other Volvo gauge overlay pages. All overlays are printed on vinyl with a self-adhesive back and a matte (non-glare) UV resistant finish. Applying a vinyl overlay can be an inexpensive way of restoring a gauge that otherwise might never be restored. Most small gauges like these use TWO overlay pieces for each gauge. The front piece is made to cover the top portion of the gauge with text, but there is a thin curved lower front portion that will not be covered by the new overlay. That area of the front face plate will be exposed, so you will probably need to paint it. More faces can be added. If you need a Smiths or Jaeger face not shown, have questions or if you can help contribute, please email.
|
|||||||||||

| Overlays for Triumph JAEGER 1962. |
|
||
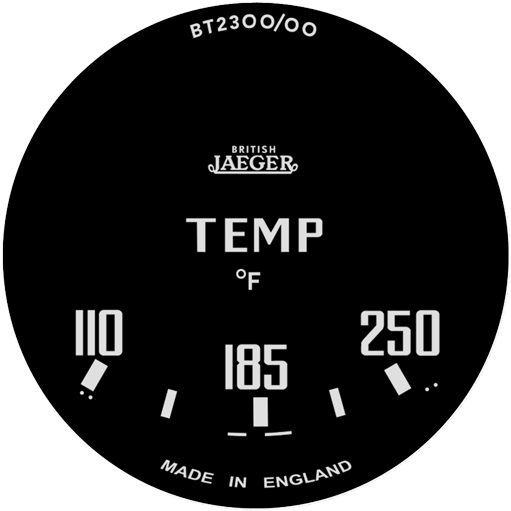 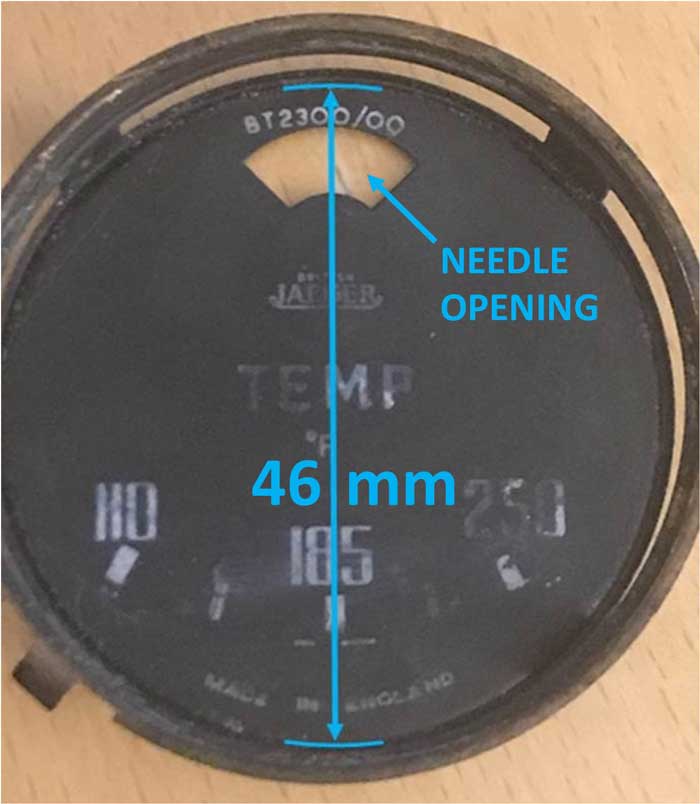 |
Jaeger overlay for TEMP 250ºF 1962 Triumph TR4 BT2300/00. Created to fit gauge face shown with a flat space diameter dimension of 46 mm. The needle shaft opening at the top will need to be trimmed after installation using a sharp hobby knife. When done shopping, please proceed to Shipping at Bottom: CLICK HERE Shopping Cart or Check Out is found at the bottom of the page. |
|
| Overlays for TACH and SPEEDO faces Triumph JAEGER. |
|
|
||
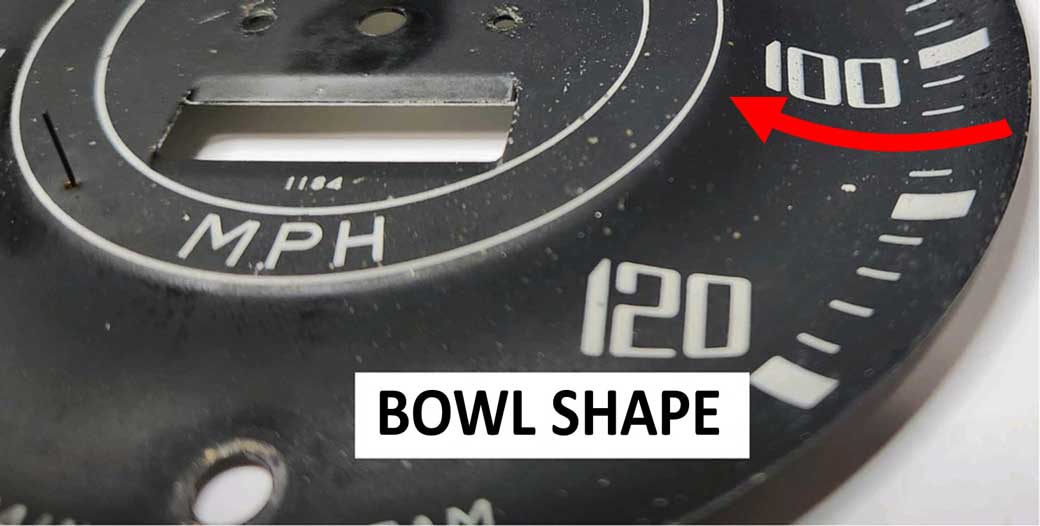
This customer supplied these original face plates for a TR4. These plates are flat in the center, but they have a BOWL SHAPE on the outer area. See the instruction guide near the bottom of this page for installation tips. This
shaped face has a higher degree of difficulty for an installer than a flat face plate.
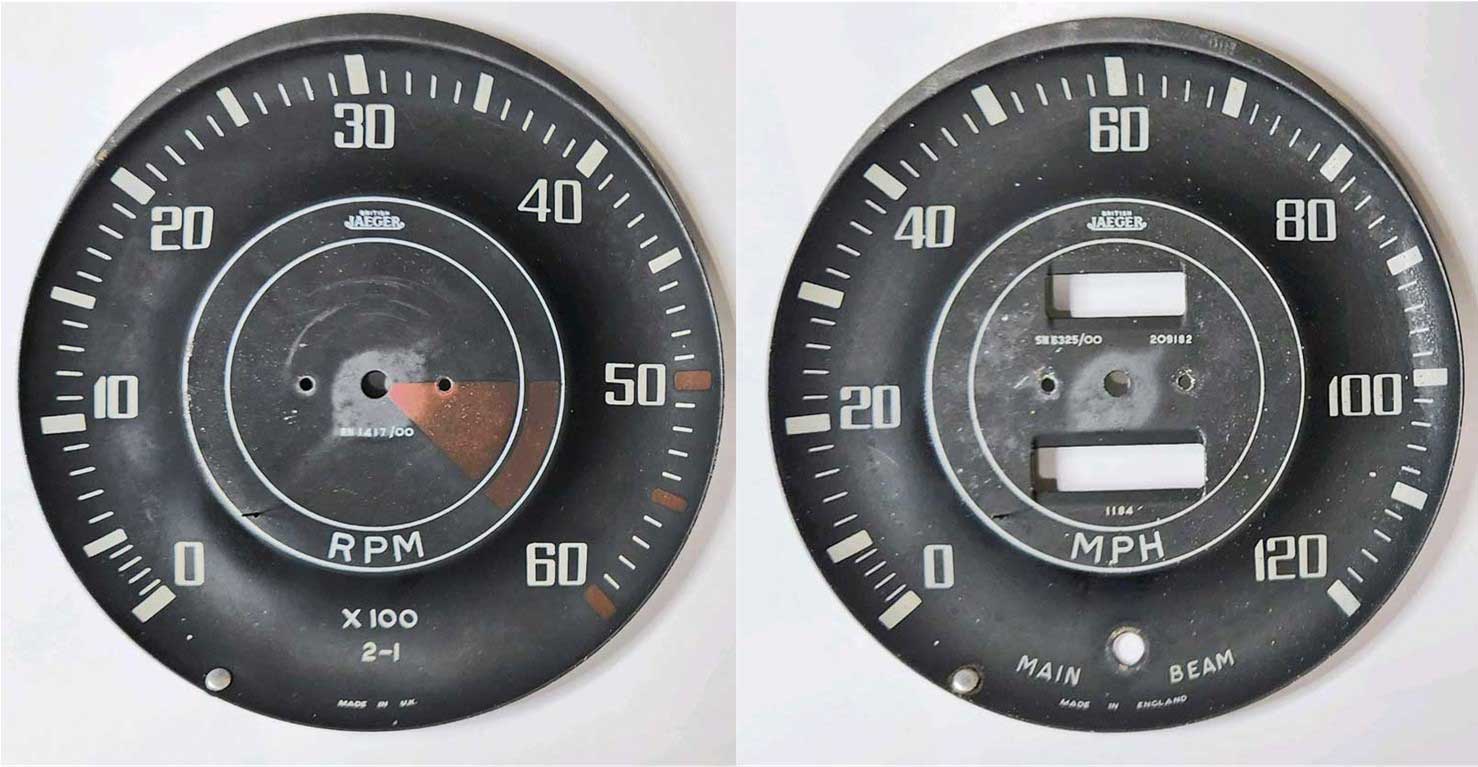  The final result is this photo below showing the overlays installed. 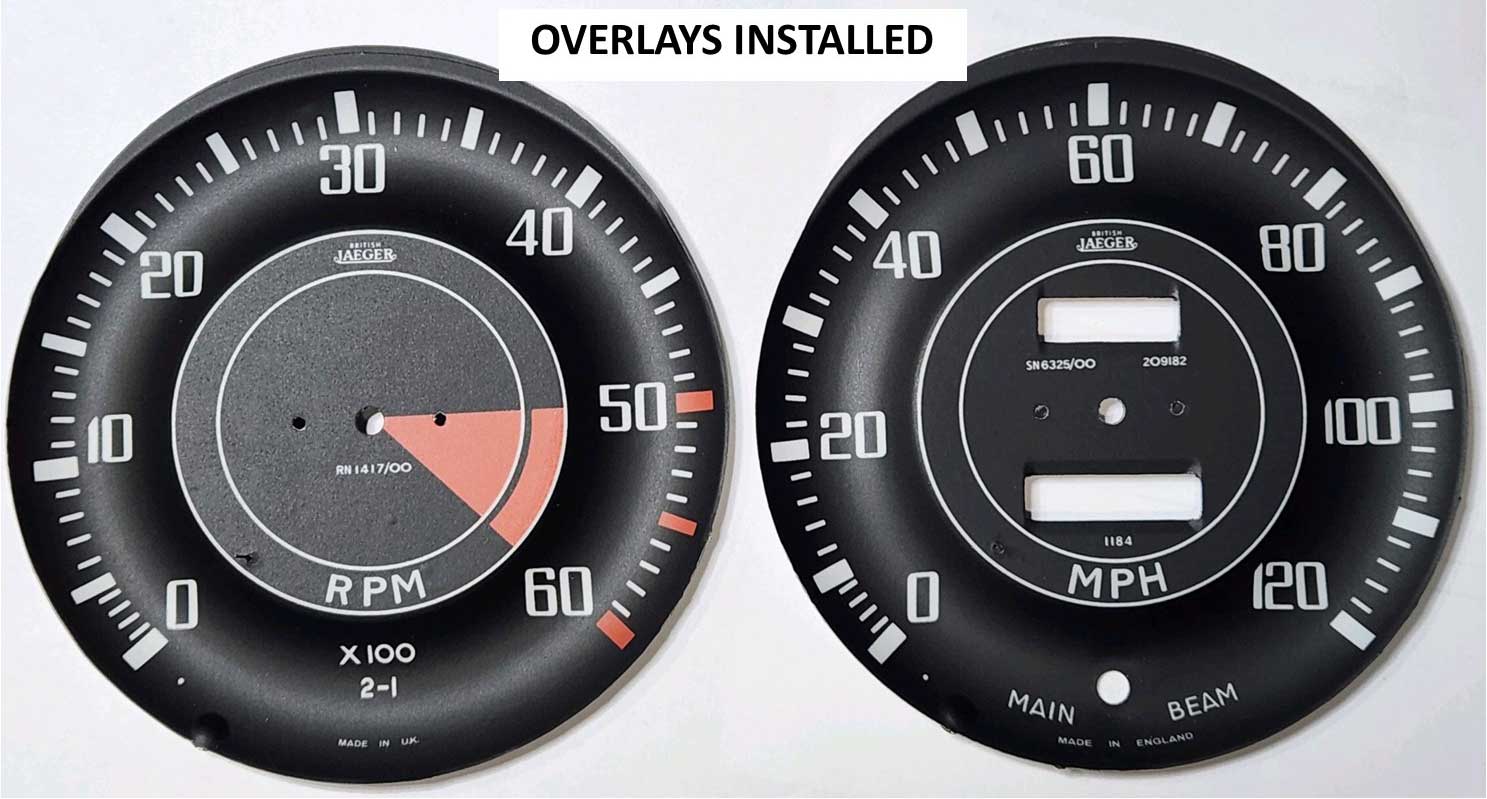 |
||
|
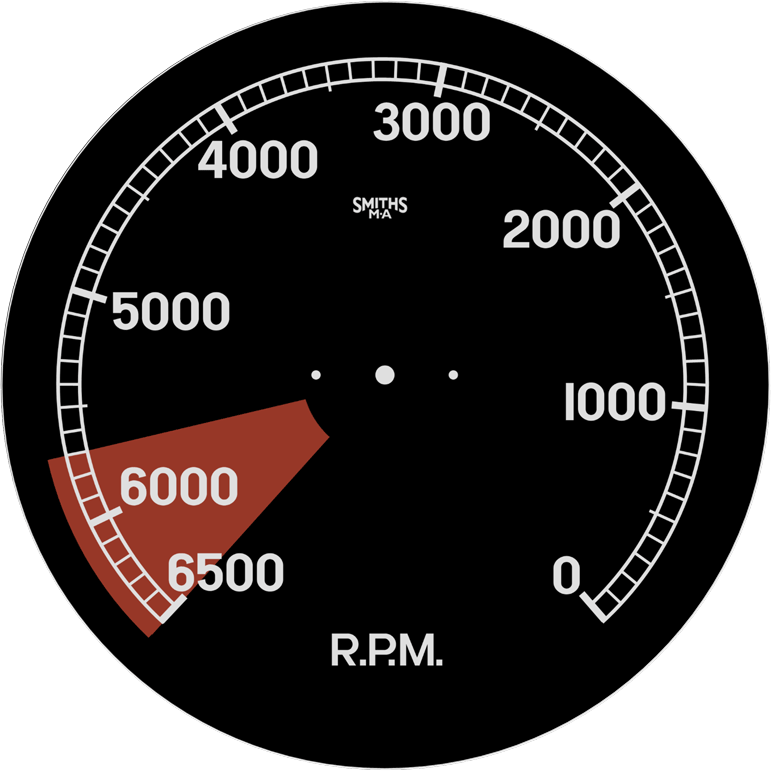
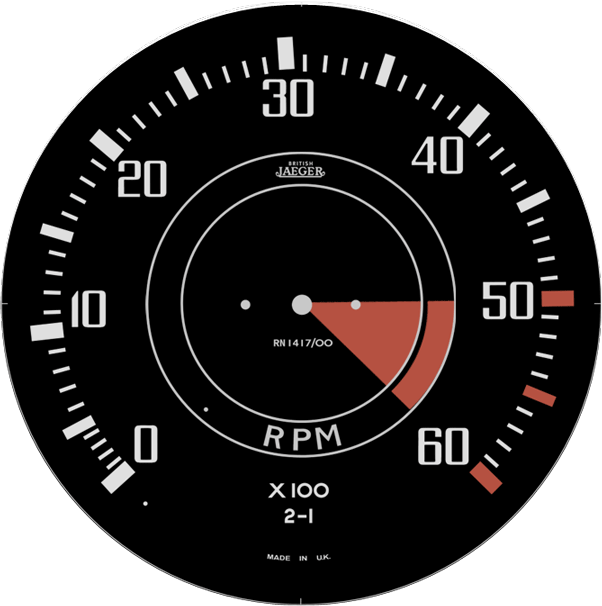
Jaeger Tach overlay 6k RPM. RN1417/00. When done shopping, please proceed to Shipping at Bottom: CLICK HERE Shopping Cart or Check Out is found at the bottom of the page. |
|
|
|
||
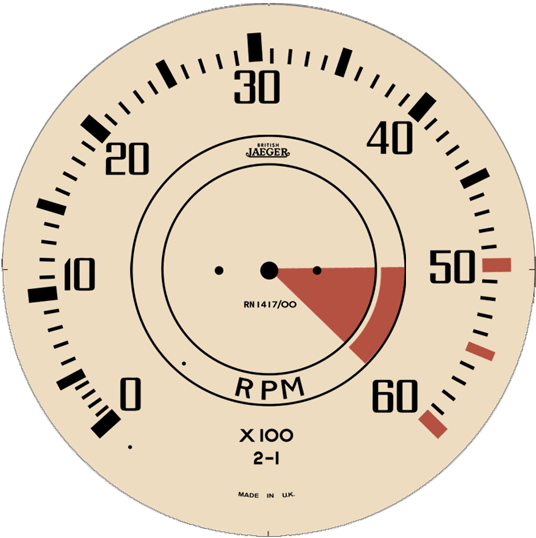 |
SPECIAL MAGNOLIA Jaeger Tach overlay 6k RPM. RN1417/00. When done shopping, please proceed to Shipping at Bottom: CLICK HERE Shopping Cart or Check Out is found at the bottom of the page. NOTE about Magnolia Color: This color is possible for almost any overlay, but in some gauges it will make things harder. For some gauges, there will be portions of a face or bezel that are BLACK, which may still be visible as BLACK after assembly. Planning ahead is important for a color change and it may require that some BLACK areas be painted to match the Magnolia color. Feel free to contact me if you have questions |
|
|
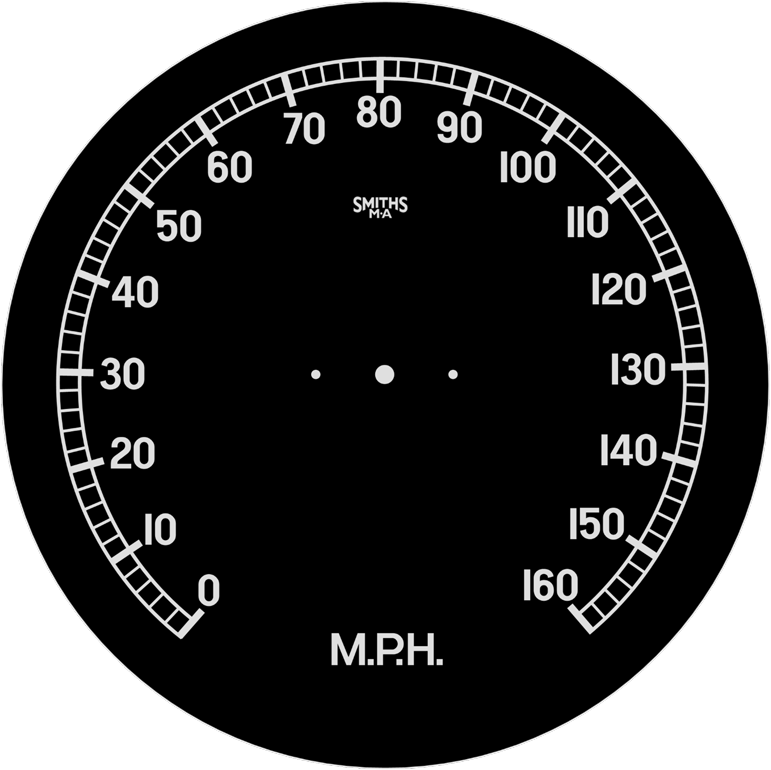
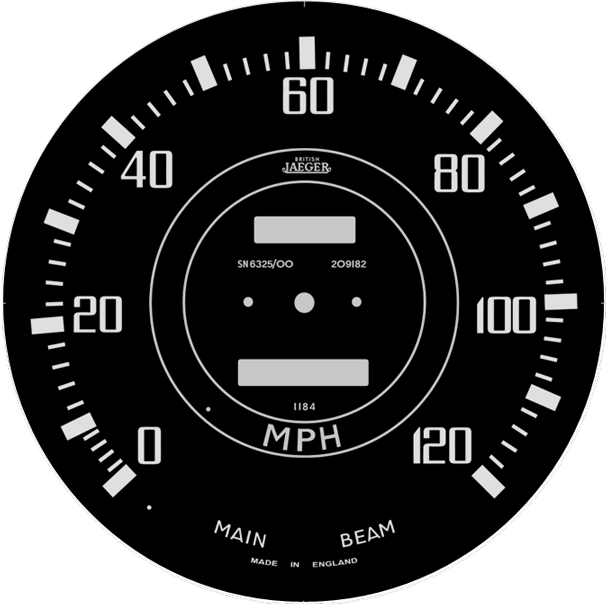
Jaeger Speedo overlay MPH. SN6325/00 209182, 1184. When done shopping, please proceed to Shipping at Bottom: CLICK HERE Shopping Cart or Check Out is found at the bottom of the page. |
|
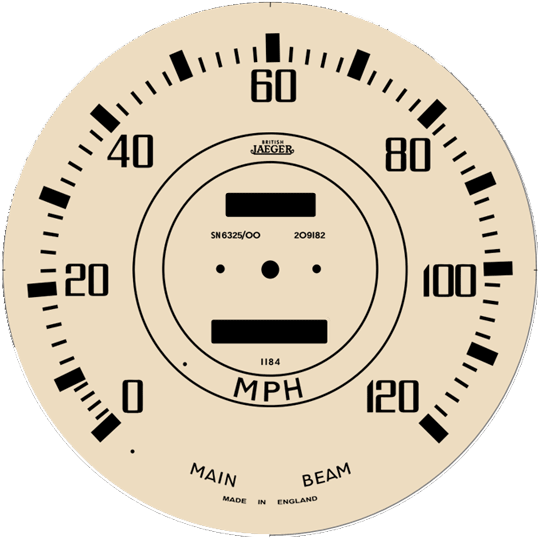 |
SPECIAL MAGNOLIA Jaeger Speedo overlay MPH. SN6325/00 209182, 1184. When done shopping, please proceed to Shipping at Bottom: CLICK HERE Shopping Cart or Check Out is found at the bottom of the page. NOTE about Magnolia Color: This color is possible for almost any overlay, but in some gauges it will make things harder. For some gauges, there will be portions of a face or bezel that are BLACK, which may still be visible as BLACK after assembly. Planning ahead is important for a color change and it may require that some BLACK areas be painted to match the Magnolia color. Feel free to contact me if you have questions |
|
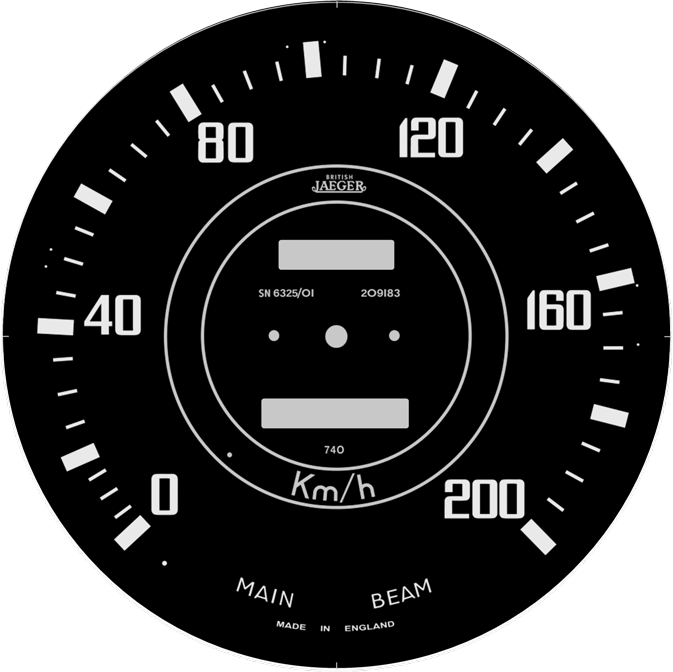 |
Jaeger Speedo overlay KMH. SN6325/01 209183, 740. When done shopping, please proceed to Shipping at Bottom: CLICK HERE Shopping Cart or Check Out is found at the bottom of the page. |
|
 |
Jaeger Speedo overlay KMH. SN6325/03 209189, 720. When done shopping, please proceed to Shipping at Bottom: CLICK HERE Shopping Cart or Check Out is found at the bottom of the page. |
|
| Overlays for small faces Triumph JAEGER 1964-66. Most small gauges like these use TWO overlay pieces for each gauge. The front piece is made to cover the top portion of the gauge with text, but there is a thin curved lower front portion that will not be covered by the new overlay. That area of the front face plate will be exposed, so you will probably need to paint it. |
|
||
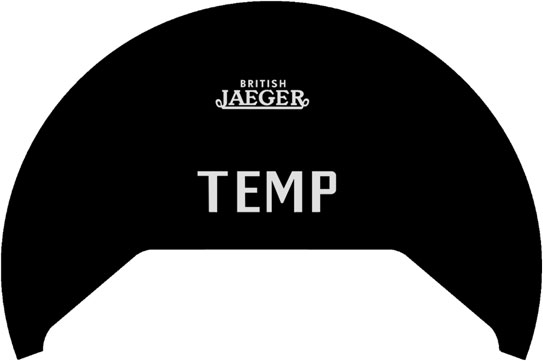 |
Jaeger FRONT overlay for TEMP 1966 Triumph. When done shopping, please proceed to Shipping at Bottom: CLICK HERE Shopping Cart or Check Out is found at the bottom of the page. |
|
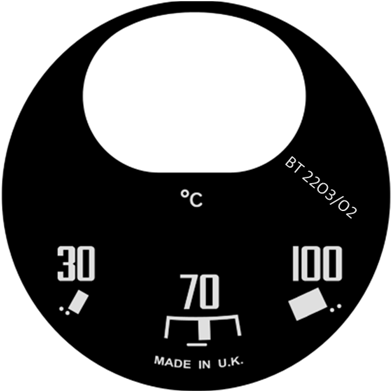 |
Jaeger REAR overlay for TEMP 1964 Triumph BT2203/02. When done shopping, please proceed to Shipping at Bottom: CLICK HERE Shopping Cart or Check Out is found at the bottom of the page. |
|
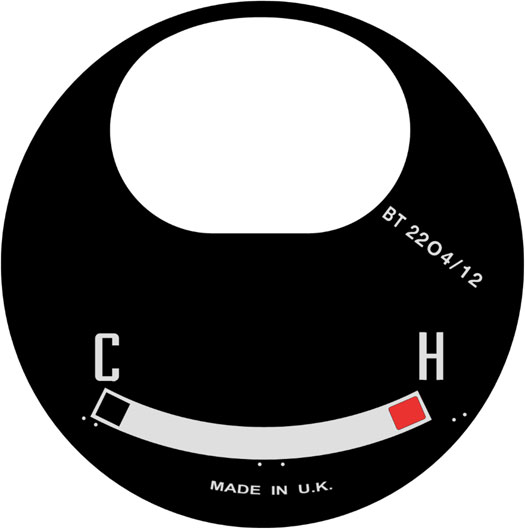 |
Jaeger REAR overlay for TEMP 1966 Triumph BT2204/12. When done shopping, please proceed to Shipping at Bottom: CLICK HERE Shopping Cart or Check Out is found at the bottom of the page. |
|
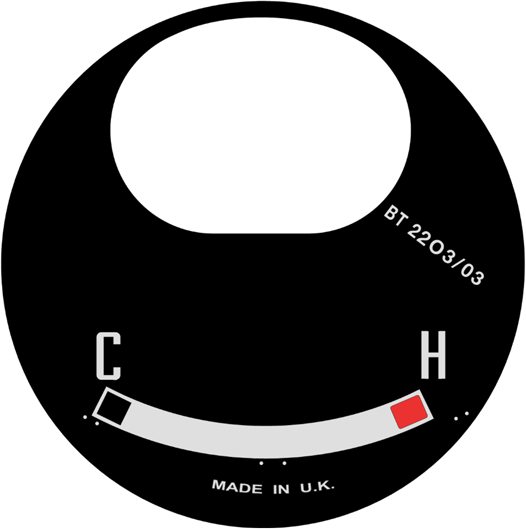 |
Jaeger REAR overlay for TEMP 1966 Triumph BT2203/03. When done shopping, please proceed to Shipping at Bottom: CLICK HERE Shopping Cart or Check Out is found at the bottom of the page. |
|
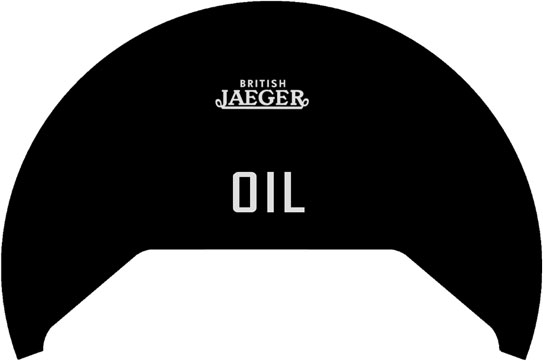 |
Jaeger FRONT overlay for OIL 1966 Triumph. When done shopping, please proceed to Shipping at Bottom: CLICK HERE Shopping Cart or Check Out is found at the bottom of the page. |
|
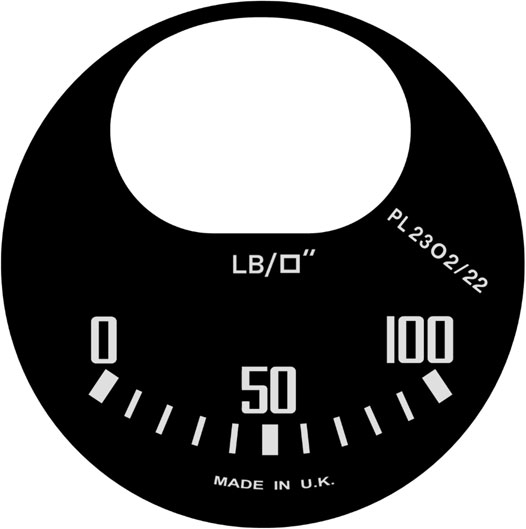 |
Jaeger REAR overlay for OIL PRESSURE PSI 1966 Triumph PL2302/22. Without limit pin hole. When done shopping, please proceed to Shipping at Bottom: CLICK HERE Shopping Cart or Check Out is found at the bottom of the page. There is a small limit pin in the original face plate above the ZERO. No hole will be added for this overlay. The best method for installation will be to remove the limit pin, then install the overlay, then create a hole for the pin in the overlay, then re-install the pin. |
|
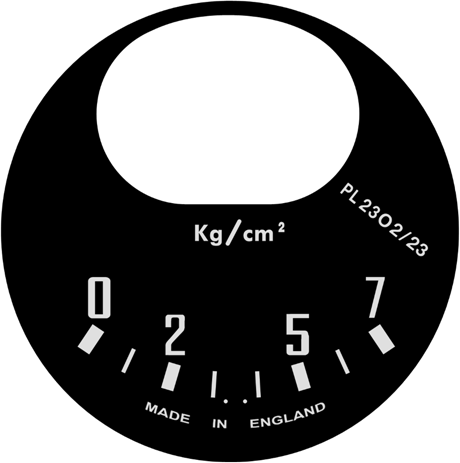 |
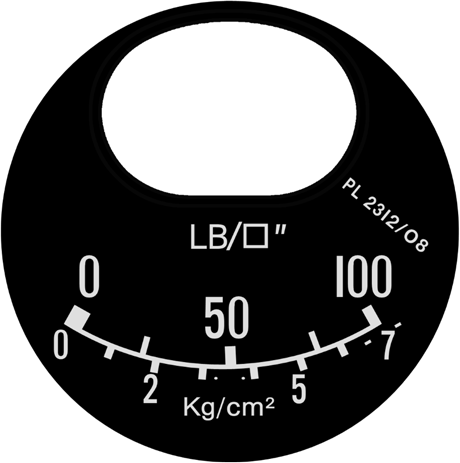
Jaeger REAR overlay for OIL PRESSURE Kg/cm² Triumph PL2302/23. Without limit pin hole.
When done shopping, please proceed to Shipping at Bottom: CLICK HERE Shopping Cart or Check Out is found at the bottom of the page. There is a small limit pin in the original face plate above the ZERO. No hole will be added for this overlay. The best method for installation will be to remove the limit pin, then install the overlay, then create a hole for the pin in the overlay, then re-install the pin. |
|
 |
Jaeger FRONT overlay for FUEL 1966 Triumph. When done shopping, please proceed to Shipping at Bottom: CLICK HERE Shopping Cart or Check Out is found at the bottom of the page. |
|
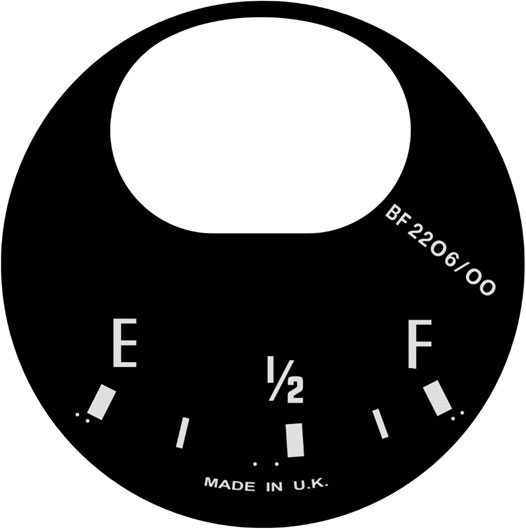 |
Jaeger REAR overlay for FUEL 1966 Triumph BF2206/00. When done shopping, please proceed to Shipping at Bottom: CLICK HERE Shopping Cart or Check Out is found at the bottom of the page. |
|
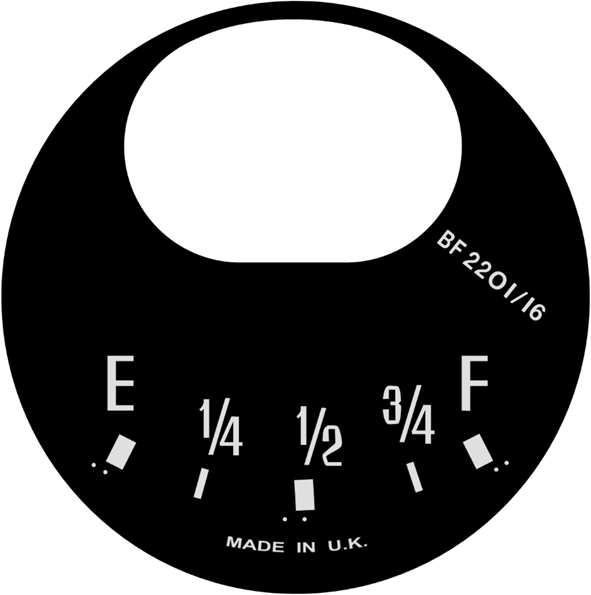 |
Jaeger alternate REAR overlay for FUEL BF2201/16. When done shopping, please proceed to Shipping at Bottom: CLICK HERE Shopping Cart or Check Out is found at the bottom of the page. |
|
 |
Lucas FRONT overlay for AMPS 1966 Triumph. When done shopping, please proceed to Shipping at Bottom: CLICK HERE Shopping Cart or Check Out is found at the bottom of the page. |
|
 |
Lucas REAR overlay for AMPS 1966 Triumph. When done shopping, please proceed to Shipping at Bottom: CLICK HERE Shopping Cart or Check Out is found at the bottom of the page. |
|
Overlays for Smiths Triumph 1968-72.
|
||
|
Overlay set (2 pieces)
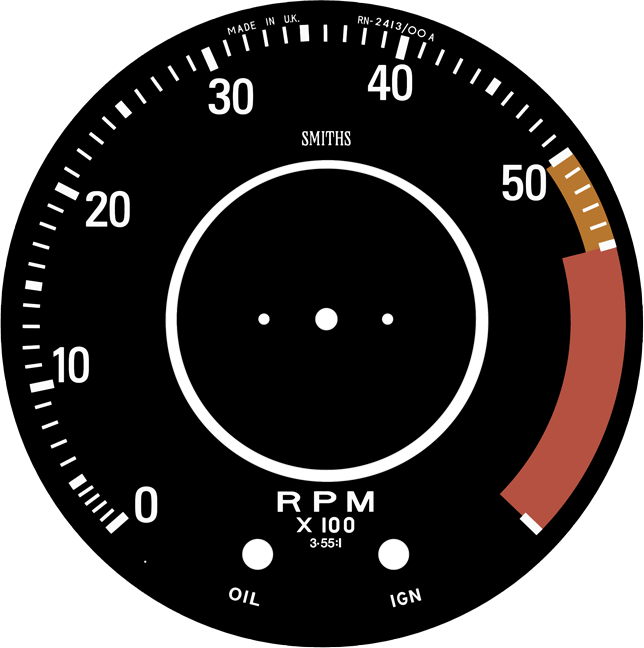 |
Smiths Tachometer overlay 1968-72 Triumph. Two piece tach set. RN-2413/00A. When done shopping, please proceed to Shipping at Bottom: CLICK HERE Shopping Cart or Check Out is found at the bottom of the page. 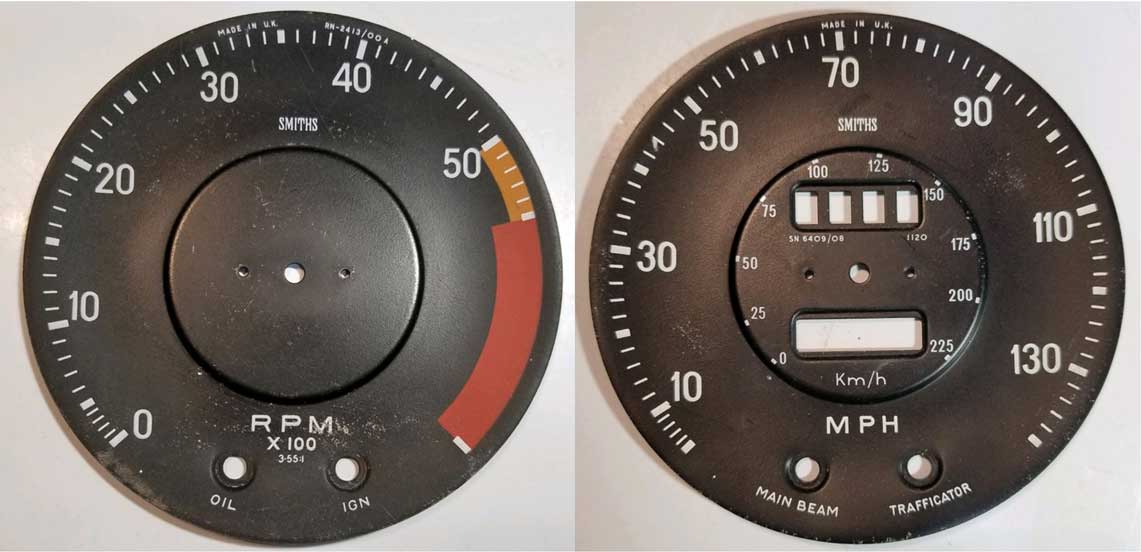 <<<
This customer supplied these original speedo and tach faces for a
1968-72 Triumph. These face plates have a pronounced step between the outer
area and the center odometer, so it was found that a one-piece overlay would not be possible. So these two-piece overlay sets were developed. <<<
This customer supplied these original speedo and tach faces for a
1968-72 Triumph. These face plates have a pronounced step between the outer
area and the center odometer, so it was found that a one-piece overlay would not be possible. So these two-piece overlay sets were developed.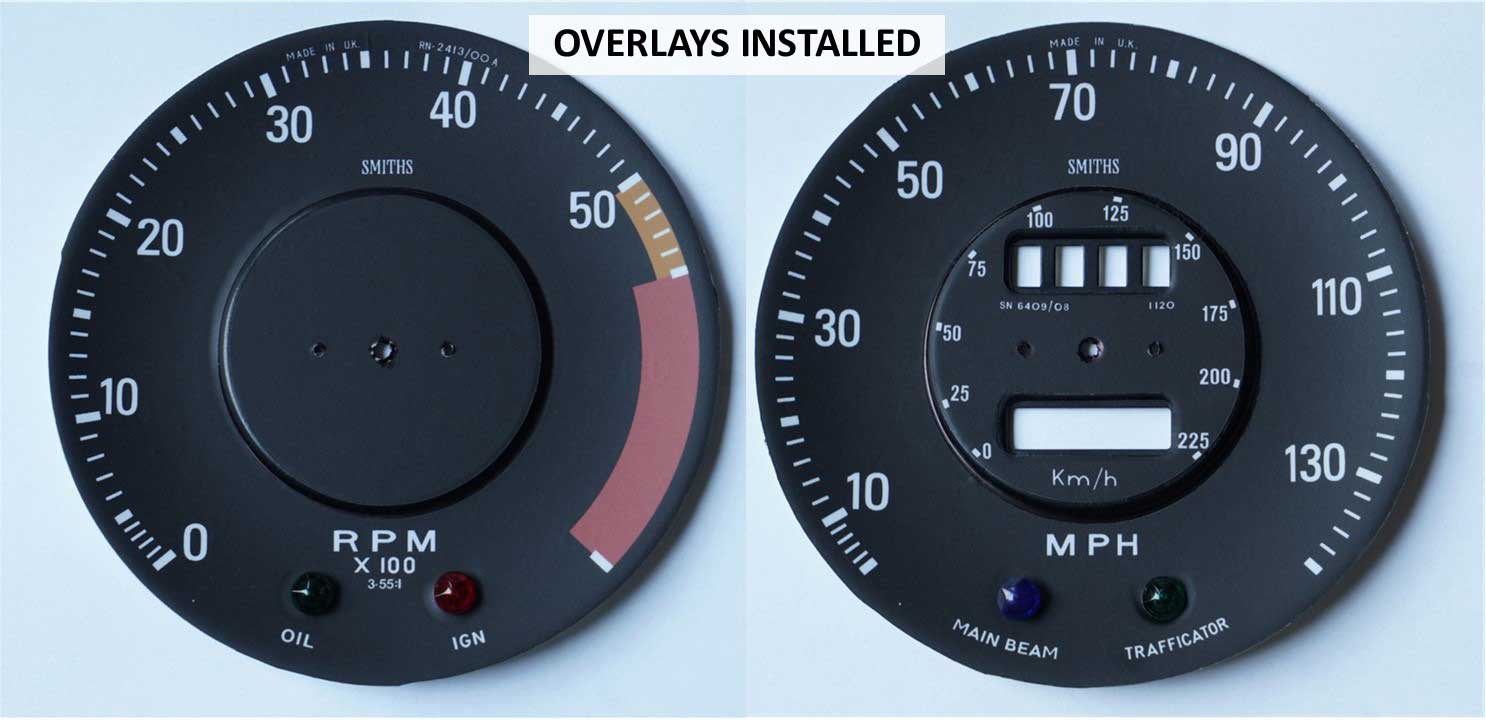
The final result is this photo above showing two-piece overlays installed. The outer and inner areas are covered by the overlay. A small portion of the center step up edge is not covered by an overlay. |
|
| MODIFIED Overlay set (2 pieces) 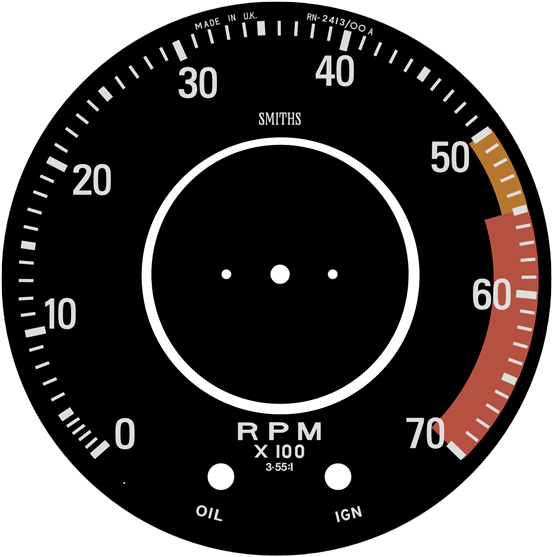 |
Smiths Tachometer overlay 1968-72 Triumph. MODIFIED Style 1. Two piece tach set. RN-2413/00A. There has been some interest in modified examples for these overlays. The only change was to add continuing lines and numbers after '50.' When done shopping, please proceed to Shipping at Bottom: CLICK HERE Shopping Cart or Check Out is found at the bottom of the page. |
|
| MODIFIED Overlay set (2 pieces)  |
Smiths Tachometer overlay 1968-72 Triumph. MODIFIED Style 2. Two piece tach set. RN-2413/00A. There has been some interest in modified examples for these overlays. The change was to add continuing lines and numbers after '50' and to modify the YELLOW and RED line. When done shopping, please proceed to Shipping at Bottom: CLICK HERE Shopping Cart or Check Out is found at the bottom of the page. |
|
Overlay set (2 pieces)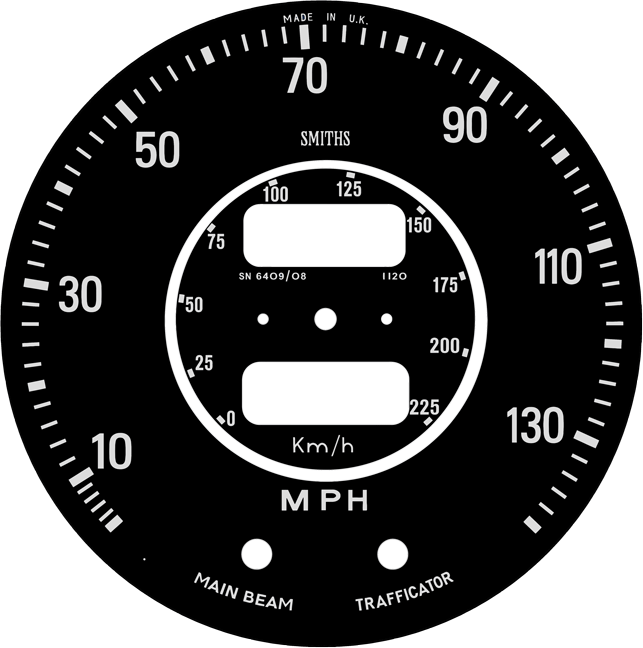 |
Smiths 130 MPH Speedometer overlay 1968-72 Triumph. Two piece speedo set. (see images above) When done shopping, please proceed to Shipping at Bottom: CLICK HERE Shopping Cart or Check Out is found at the bottom of the page. |
|
| Most small gauges like these use TWO overlay pieces for each gauge. The front piece is made to cover the top portion of the gauge with text, but there is a thin curved lower front portion that will not be covered by the new overlay. That area of the front face plate will be exposed, so you will probably need to paint it. | ||

|
Smiths FRONT overlay for TEMP 1968-72 Triumph. When done shopping, please proceed to Shipping at Bottom: CLICK HERE Shopping Cart or Check Out is found at the bottom of the page. |
|
|
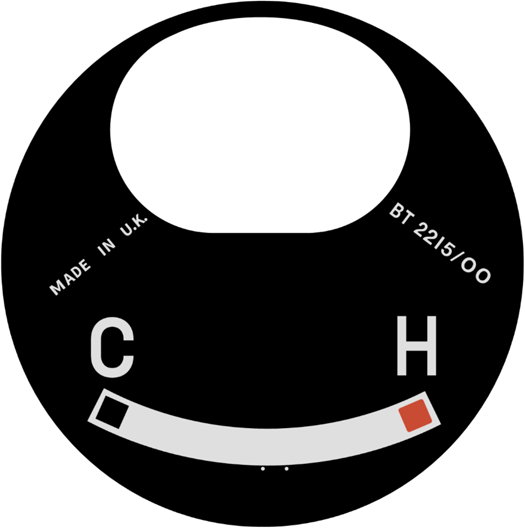
Smiths REAR overlay for TEMP 1968-72 Triumph BT2215/00. When done shopping, please proceed to Shipping at Bottom: CLICK HERE Shopping Cart or Check Out is found at the bottom of the page. |
|
|
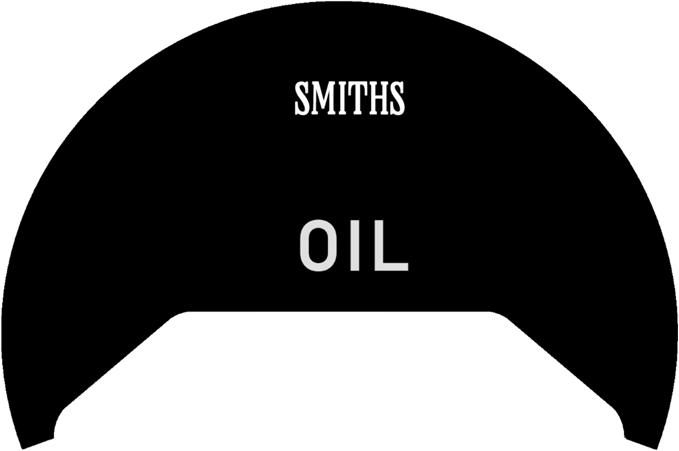
Smiths FRONT overlay for OIL 1968-72 Triumph. When done shopping, please proceed to Shipping at Bottom: CLICK HERE Shopping Cart or Check Out is found at the bottom of the page. |
|
|
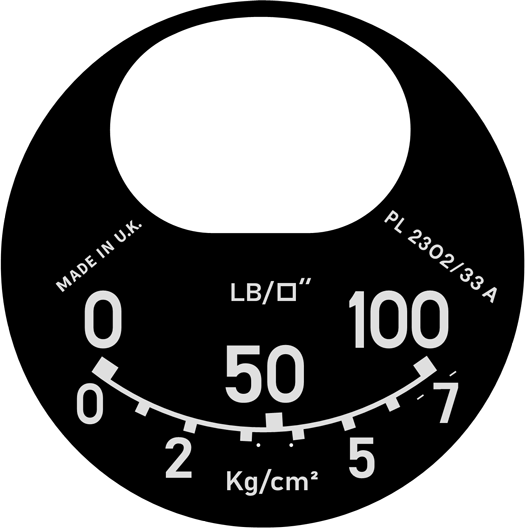
Smiths REAR overlay for OIL 1968-72 Triumph PL2302/33A. When done shopping, please proceed to Shipping at Bottom: CLICK HERE Shopping Cart or Check Out is found at the bottom of the page. |
|

|
Smiths FRONT overlay for FUEL 1968-72 Triumph. When done shopping, please proceed to Shipping at Bottom: CLICK HERE Shopping Cart or Check Out is found at the bottom of the page. |
|
|
Smiths FRONT overlay for TANK 1968-72 Triumph. When done shopping, please proceed to Shipping at Bottom: CLICK HERE Shopping Cart or Check Out is found at the bottom of the page. |
|
|
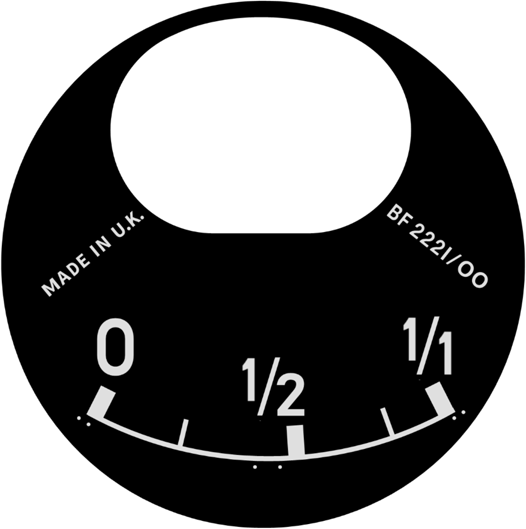
Smiths REAR overlay for FUEL 1968-72 Triumph BF2221/00. When done shopping, please proceed to Shipping at Bottom: CLICK HERE Shopping Cart or Check Out is found at the bottom of the page. |
|

|
Smiths (Lucas) FRONT overlay for AMPS 1968-72 Triumph. When done shopping, please proceed to Shipping at Bottom: CLICK HERE Shopping Cart or Check Out is found at the bottom of the page. |
|
 |
Smiths (Lucas) FRONT overlay VOLTS custom for 1968-72 Triumph. When done shopping, please proceed to Shipping at Bottom: CLICK HERE Shopping Cart or Check Out is found at the bottom of the page. |
|

|
Smiths (Lucas) REAR overlay for AMPS 1968-72 Triumph. When done shopping, please proceed to Shipping at Bottom: CLICK HERE Shopping Cart or Check Out is found at the bottom of the page. |
|
| Overlays for Smiths Triumph 1973-76. More faces can be added. If you need face not shown, please email. |
||
|
|
||
|
Overlay set (2 pieces)
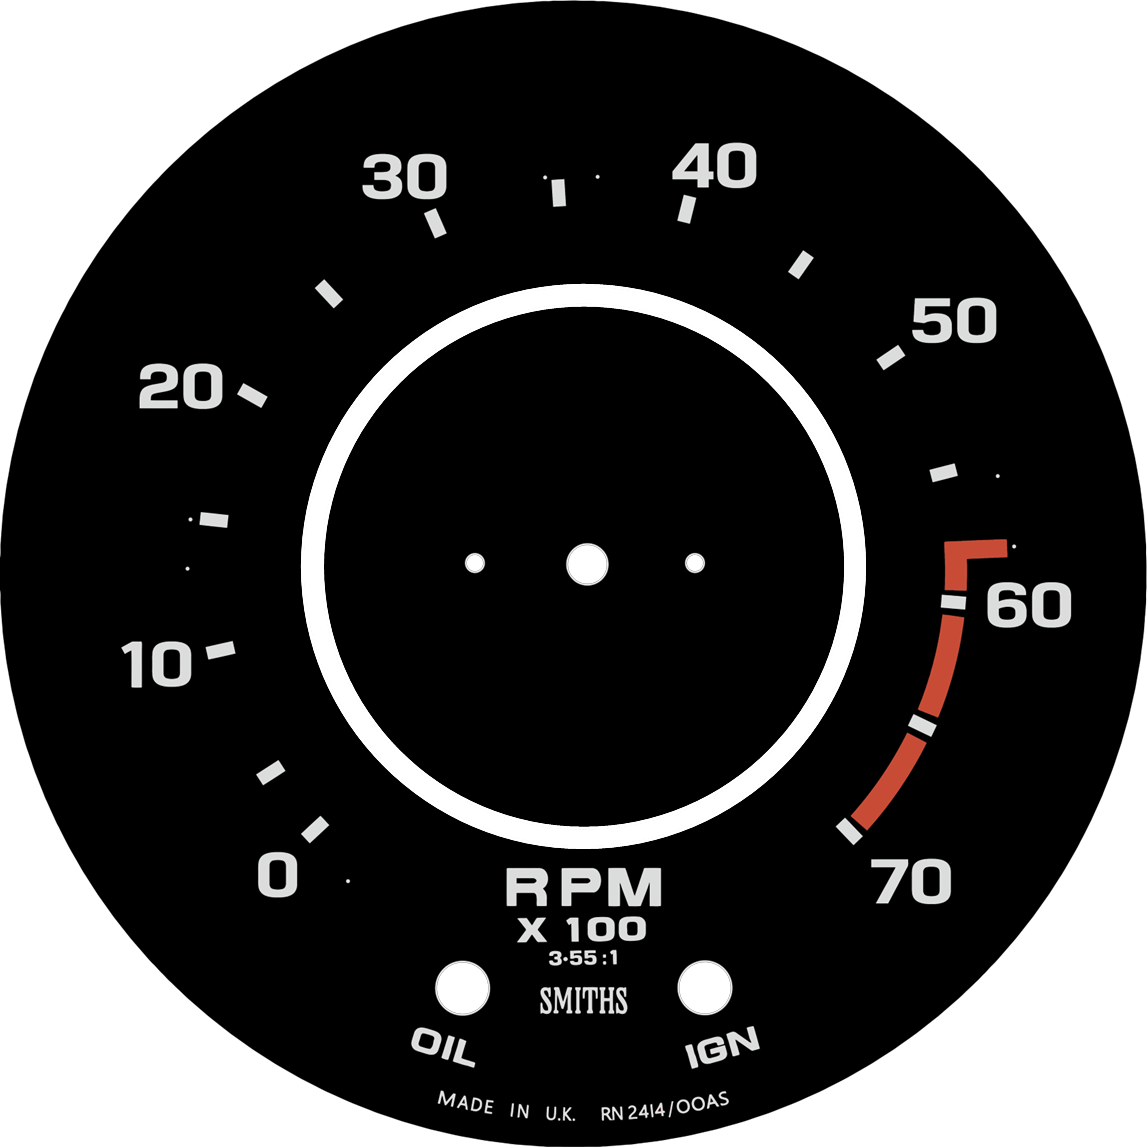 |
Smiths Tachometer overlay 1973-76 Triumph. Two-piece set per face. RN-2414/00AS. When done shopping, please proceed to Shipping at Bottom: CLICK HERE Shopping Cart or Check Out is found at the bottom of the page. 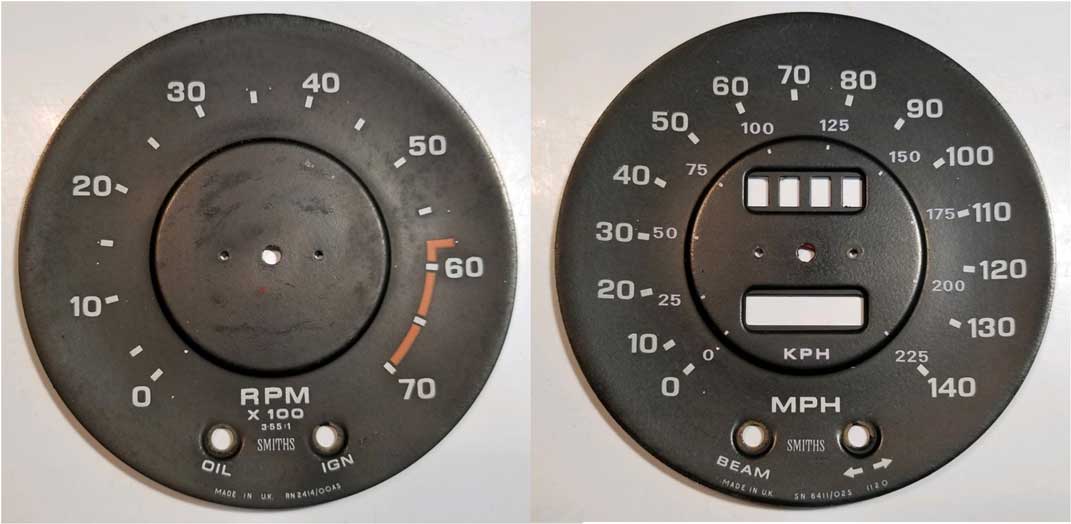 <<<
This customer supplied these original speedo and tach faces for a
1973-76 Triumph. These plates have a pronounced step between the outer
area and the center odometer, so it was found that a one-piece overlay would not be possible. <<<
This customer supplied these original speedo and tach faces for a
1973-76 Triumph. These plates have a pronounced step between the outer
area and the center odometer, so it was found that a one-piece overlay would not be possible. 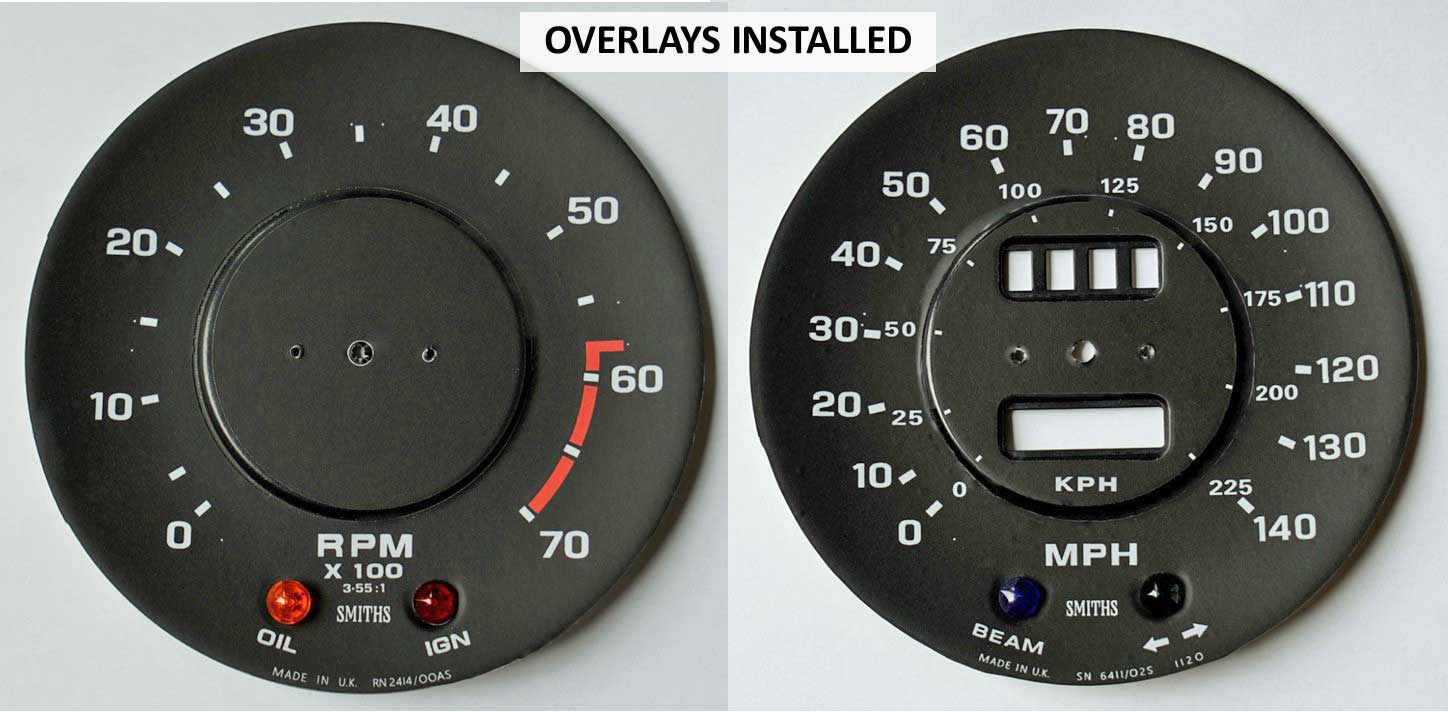 The final result is this photo above showing the two-piece overlays installed. The outer and inner areas are covered by the overlay. A small portion of the step up edge is not covered by an overlay. |
|
|
Overlay set (2 pieces)
 |
Smiths 130 MPH Speedometer overlay 1973-76 Triumph. Two piece set. SN-6411/02S 1120 (see images above). When done shopping, please proceed to Shipping at Bottom: CLICK HERE Shopping Cart or Check Out is found at the bottom of the page. |
|
| Most small gauges like these use TWO overlay pieces for each gauge. The front piece is made to cover the top portion of the gauge with text, but there is a thin curved lower front portion that will not be covered by the new overlay. That area of the front face plate will be exposed, so you will probably need to paint it. | ||

|
Smiths FRONT overlay for TEMP 1973-76 Triumph. When done shopping, please proceed to Shipping at Bottom: CLICK HERE Shopping Cart or Check Out is found at the bottom of the page. |
|
|
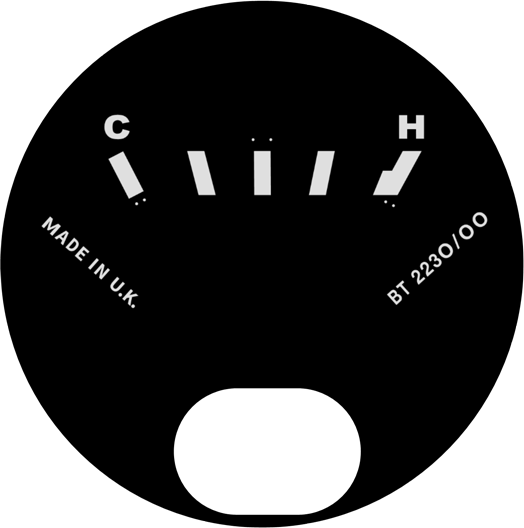
Smiths REAR overlay for TEMP 1973-76 Triumph BT2230/00. When done shopping, please proceed to Shipping at Bottom: CLICK HERE Shopping Cart or Check Out is found at the bottom of the page. |
|
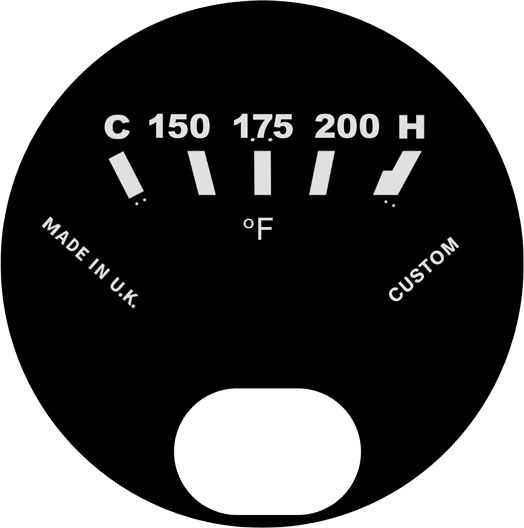 |
CUSTOM Smiths REAR overlay for TEMP 1973-76 Triumph. Fahrenheit temps added. When done shopping, please proceed to Shipping at Bottom: CLICK HERE Shopping Cart or Check Out is found at the bottom of the page. CUSTOM NOTE: This customer fitted a new Beck-Arnley 2011110 sender, which yielded these temps with a new wiring harness and OEM mechanical voltage stabilizer. The old sender gave somewhat lower temps and would have shown closer to 150 with these gauge markings. Users may need to check their gauge temps and consider replacing the sender before considering this gauge face. |
|
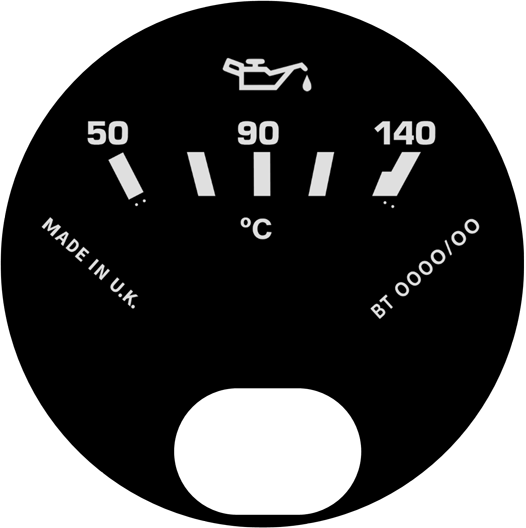 |
CUSTOM Smiths REAR overlay for TEMP 1973-76 Triumph. Celcius temps added. When done shopping, please proceed to Shipping at Bottom: CLICK HERE Shopping Cart or Check Out is found at the bottom of the page. CUSTOM NOTE: This customer is using a water temp gauge with this custom face overlat to create an oil temp gauge. |
|

|
Smiths FRONT overlay for OIL 1973-76 Triumph. When done shopping, please proceed to Shipping at Bottom: CLICK HERE Shopping Cart or Check Out is found at the bottom of the page. |
|
|
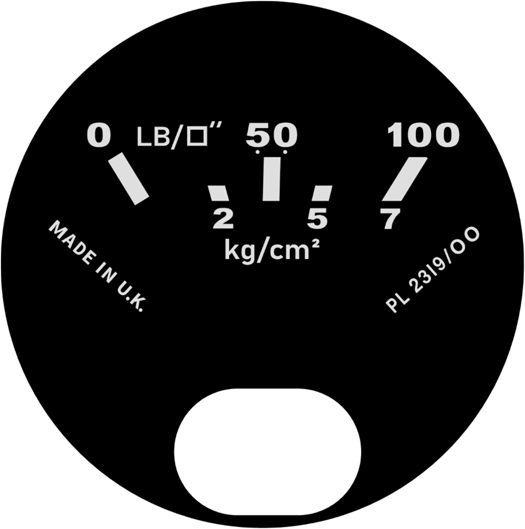
Smiths REAR overlay for OIL 1973-76 Triumph PL2319/00. When done shopping, please proceed to Shipping at Bottom: CLICK HERE Shopping Cart or Check Out is found at the bottom of the page. |
|

|
Smiths FRONT overlay for FUEL 1973-76 Triumph. When done shopping, please proceed to Shipping at Bottom: CLICK HERE Shopping Cart or Check Out is found at the bottom of the page. |
|
|
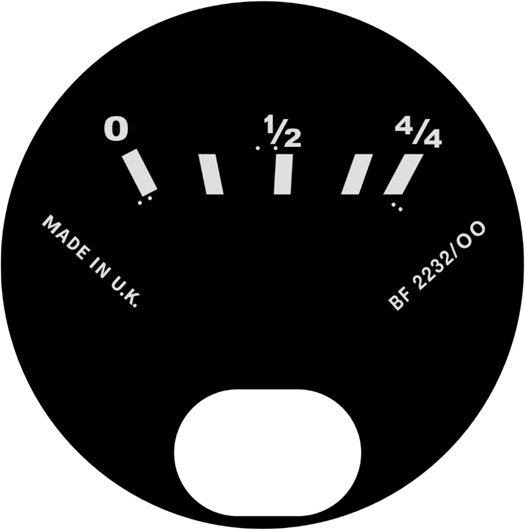
Smiths REAR overlay for FUEL 1973-76 Triumph BF2232/00. When done shopping, please proceed to Shipping at Bottom: CLICK HERE Shopping Cart or Check Out is found at the bottom of the page.  |
|

|
Smiths FRONT overlay for VOLTS 1973-76 Triumph. When done shopping, please proceed to Shipping at Bottom: CLICK HERE Shopping Cart or Check Out is found at the bottom of the page. |
|
|
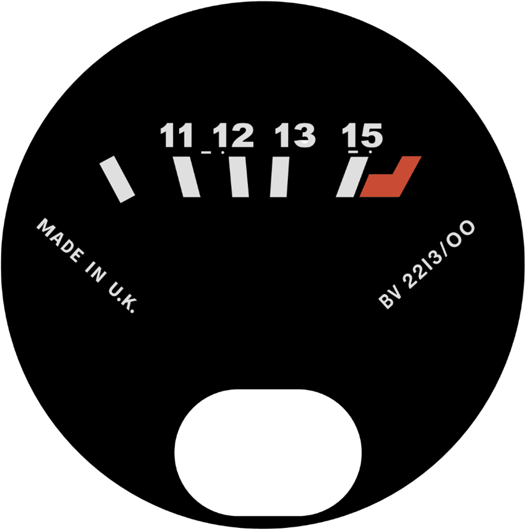
Smiths REAR overlay for VOLTS 1973-76 Triumph BV2213/00. When done shopping, please proceed to Shipping at Bottom: CLICK HERE Shopping Cart or Check Out is found at the bottom of the page. |
|
| TVR PROJECT INFO |
| Please understand that I am NOT a
SMITHS gauge expert, however I have many years of experience making
overlays for Volvo-VDO, Volvo-SMITHS and British SMITHS gauge faces. In response to requests I have begun developing some new overlays for restoring Smiths TVR gauges. These overlays are made in the same manner as other overlays in my other gauge overlays in these pages. All overlays are printed on vinyl with a self-adhesive back and a matte (non-glare) UV resistant finish. Applying a vinyl overlay can be an inexpensive way of restoring a gauge that otherwise might never be restored. Most small gauges use TWO overlay pieces for each gauge. The front piece is made to cover the top portion of the gauge with text, but there is a thin curved lower front portion that will not be covered. That area will be exposed, so you will probably need to paint it. Many of these were made with the help of a TVR 2500M owner. Not all of them might be relevant for a TVR, but all are patterned after original Smiths gauges. More faces can be added. If you need a Smiths face not shown, have questions or if you can help contribute, please email. 
|
| TVR OVERLAYS |
 |
Smiths FRONT overlay for WATER TEMP gauge. When done shopping, please proceed to Shipping at Bottom: CLICK HERE Shopping Cart or Check Out is found at the bottom of the page. |
|
 |
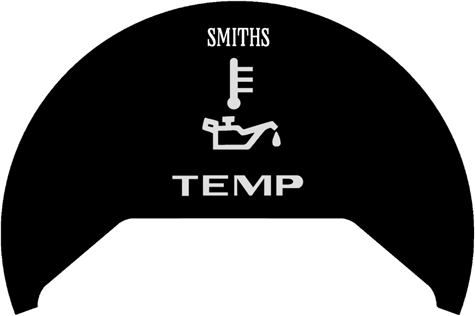
Smiths FRONT overlay for TEMP. When done shopping, please proceed to Shipping at Bottom: CLICK HERE Shopping Cart or Check Out is found at the bottom of the page. |
|

|
Smiths FRONT overlay for Coolant TEMP with symbol. When done shopping, please proceed to Shipping at Bottom: CLICK HERE Shopping Cart or Check Out is found at the bottom of the page. |
|
 |
Smiths FRONT overlay for OIL TEMP with symbols. When done shopping, please proceed to Shipping at Bottom: CLICK HERE Shopping Cart or Check Out is found at the bottom of the page. |
|
|
Smiths FRONT overlay for OIL TEMP (custom). When done shopping, please proceed to Shipping at Bottom: CLICK HERE Shopping Cart or Check Out is found at the bottom of the page. |
|
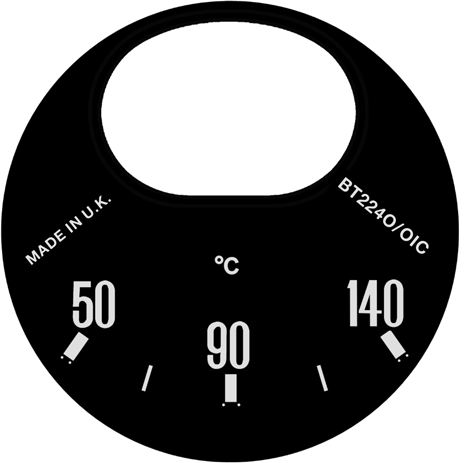 |
Smiths REAR overlay for OIL or WATER TEMP gauge CELCIUS BT2240/01C (or possibly also BT2204/29, which can be added by request) When done shopping, please proceed to Shipping at Bottom: CLICK HERE Shopping Cart or Check Out is found at the bottom of the page. |
|
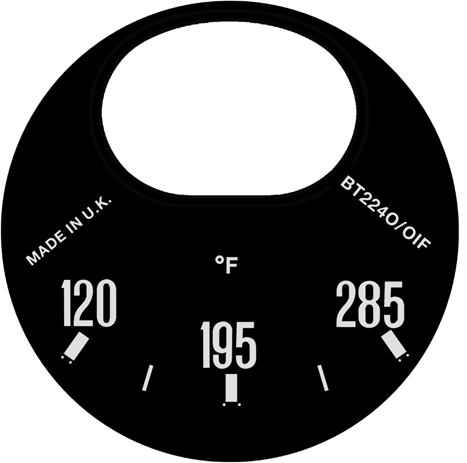 |
Smiths REAR overlay for OIL or WATER TEMP gauge FAHRENHEIT BT2240/01F Same face as above, except this one has been converted to Fahrenheit. When done shopping, please proceed to Shipping at Bottom: CLICK HERE Shopping Cart or Check Out is found at the bottom of the page. |
|
 |
Smiths FRONT overlay for FUEL gauge. When done shopping, please proceed to Shipping at Bottom: CLICK HERE Shopping Cart or Check Out is found at the bottom of the page. |
|
 |
Smiths FRONT overlay for FUEL gauge (with PUMP symbol). When done shopping, please proceed to Shipping at Bottom: CLICK HERE Shopping Cart or Check Out is found at the bottom of the page. |
|
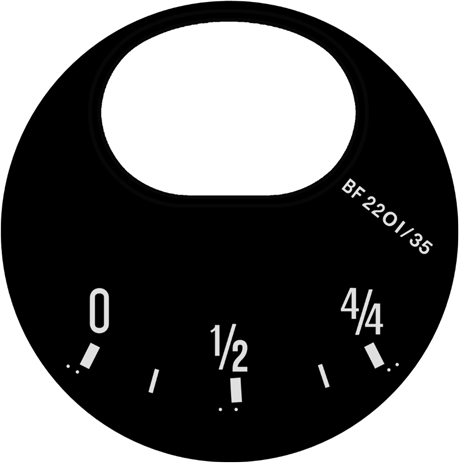 |
Smiths REAR overlay for FUEL gauge BF2201/35 When done shopping, please proceed to Shipping at Bottom: CLICK HERE Shopping Cart or Check Out is found at the bottom of the page. |
|
|
Smiths REAR overlay for FUEL gauge BF2206/00 When done shopping, please proceed to Shipping at Bottom: CLICK HERE Shopping Cart or Check Out is found at the bottom of the page. |
|
 |
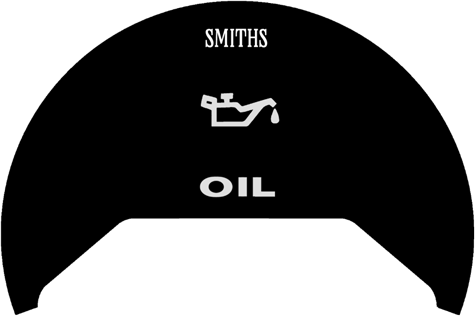
Smiths FRONT overlay for OIL PRESSURE gauge. When done shopping, please proceed to Shipping at Bottom: CLICK HERE Shopping Cart or Check Out is found at the bottom of the page. |
|
 |
Smiths FRONT overlay for OIL PRESSURE with symbol. When done shopping, please proceed to Shipping at Bottom: CLICK HERE Shopping Cart or Check Out is found at the bottom of the page. |
|
 |
Smiths REAR overlay for OIL PRESSURE gauge PL2312/08 (A) Note that there are two slightly different versions of this one. The difference is in the small indicator marks (missing on this one). When done shopping, please proceed to Shipping at Bottom: CLICK HERE Shopping Cart or Check Out is found at the bottom of the page. |
|
|
Smiths REAR overlay for OIL PRESSURE gauge PL2312/08 (B) Note that there are two slightly different versions of this one. The difference is in the small indicator marks (added to this one). When done shopping, please proceed to Shipping at Bottom: CLICK HERE Shopping Cart or Check Out is found at the bottom of the page. |
|
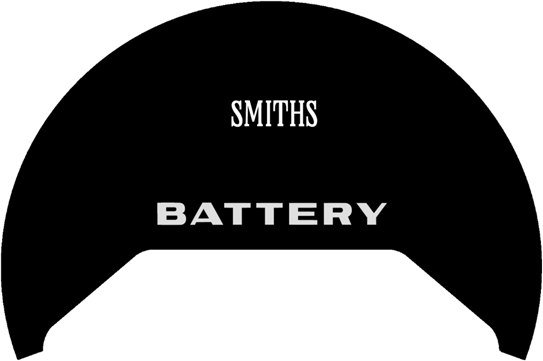 |
Smiths FRONT overlay for BATTERY gauge. When done shopping, please proceed to Shipping at Bottom: CLICK HERE Shopping Cart or Check Out is found at the bottom of the page. |
|
 |
Smiths REAR overlay for VOLTS gauge BV2204/03 When done shopping, please proceed to Shipping at Bottom: CLICK HERE Shopping Cart or Check Out is found at the bottom of the page. |
|
 |
Smiths FRONT overlay for VOLTS gauge. When done shopping, please proceed to Shipping at Bottom: CLICK HERE Shopping Cart or Check Out is found at the bottom of the page. |
|
 |
Smiths FRONT overlay for VOLTS with BATTERY symbol. When done shopping, please proceed to Shipping at Bottom: CLICK HERE Shopping Cart or Check Out is found at the bottom of the page. |
|
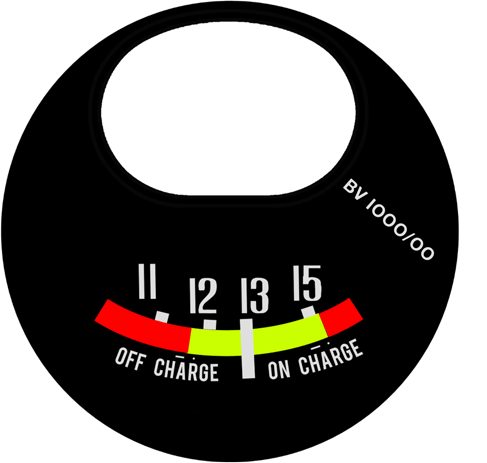 |
Smiths REAR overlay for volts gauge BV1000/00 When done shopping, please proceed to Shipping at Bottom: CLICK HERE Shopping Cart or Check Out is found at the bottom of the page. |
|
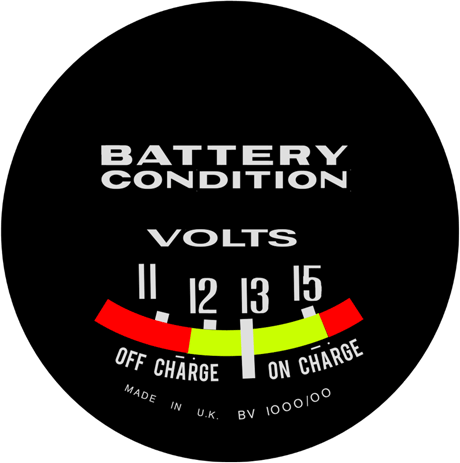  |
Smiths REAR overlay for BATTERY CONDITION VOLTS BV1000/00 Made for special gauge shown at left. Small needle shaft opening at the top will need to be cut after installation. When done shopping, please proceed to Shipping at Bottom: CLICK HERE Shopping Cart or Check Out is found at the bottom of the page. |
|
|
||
| LOTUS PROJECTS |
| This
project began when a customer requested a unique small gauge overlay for a gauge going into a Lotus Eclat. Please understand that I am NOT a SMITHS gauge expert, however I have many years of experience making overlays for Volvo-VDO, Volvo-SMITHS and British SMITHS gauge faces. Overlay installation information may be found below: CLICK HERE.
|
| LOTUS OVERLAYS Most small gauges like these use TWO overlay pieces for each gauge. The front piece is made to cover the top portion of the gauge with text, but there is a thin curved lower front portion that will not be covered by the new overlay. That area of the front face plate will be exposed, so you will probably need to paint it. |
 |
Smiths FRONT overlay for VOLTS with BATTERY symbol. Note: This is the same front overlay as the VOLTS with BATTERY symbol found in the TVR section. When done shopping, please proceed to Shipping at Bottom: CLICK HERE Shopping Cart or Check Out is found at the bottom of the page. |
|
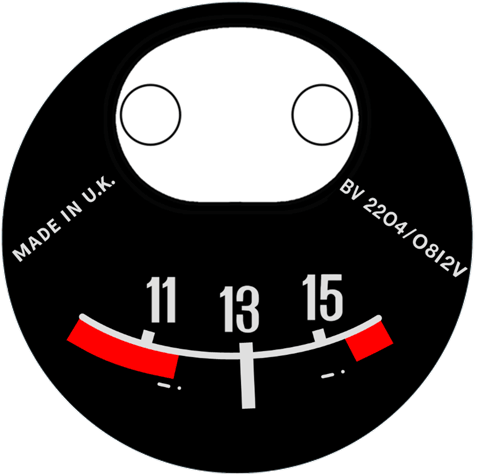 |
Smiths REAR overlay for volts gauge BV2204/0812V When done shopping, please proceed to Shipping at Bottom: CLICK HERE Shopping Cart or Check Out is found at the bottom of the page. |
|
 |
Smiths FRONT overlay for FUEL, Lotus Seven or Elan. When done shopping, please proceed to Shipping at Bottom: CLICK HERE Shopping Cart or Check Out is found at the bottom of the page. These face overlays were developed to restore the below DAMAGED gauge face plates found in a Lotus Seven. 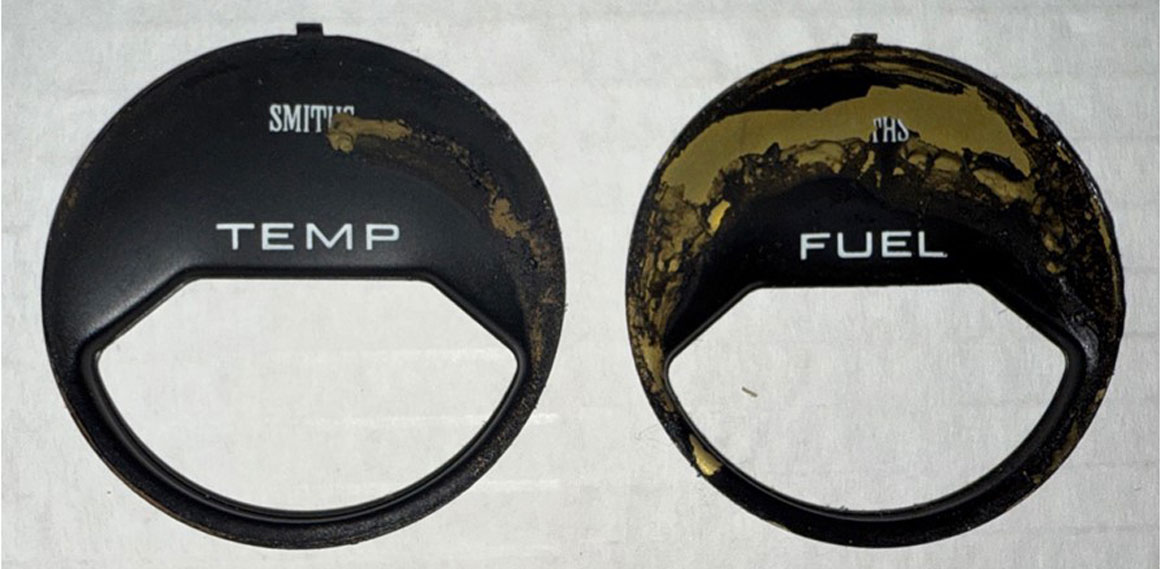 |
|
 |
Smiths FRONT overlay for TEMP, Lotus Seven or Elan. When done shopping, please proceed to Shipping at Bottom: CLICK HERE Shopping Cart or Check Out is found at the bottom of the page. |
|
|
||
| MGB PROJECTS |
This
project began when a customer supplied an original speedo and tach face
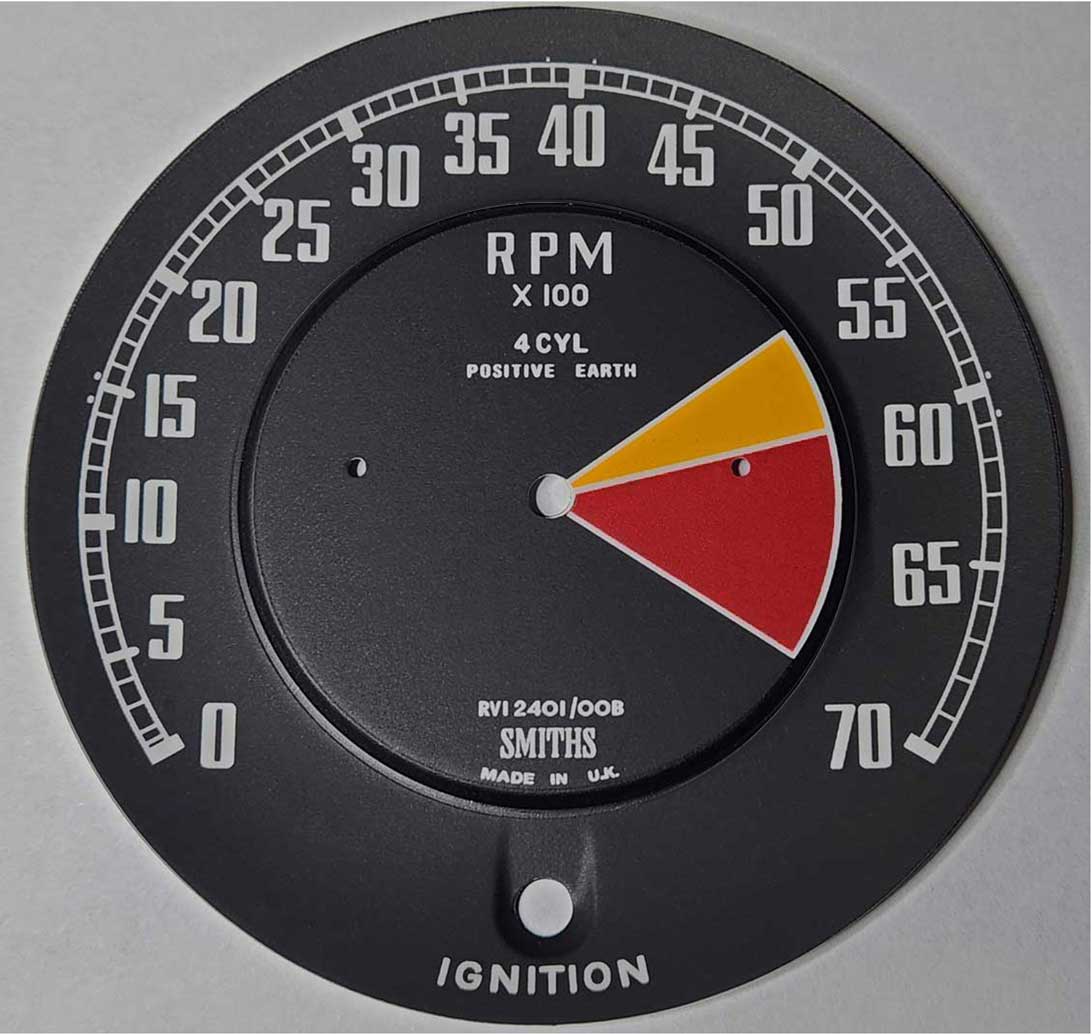
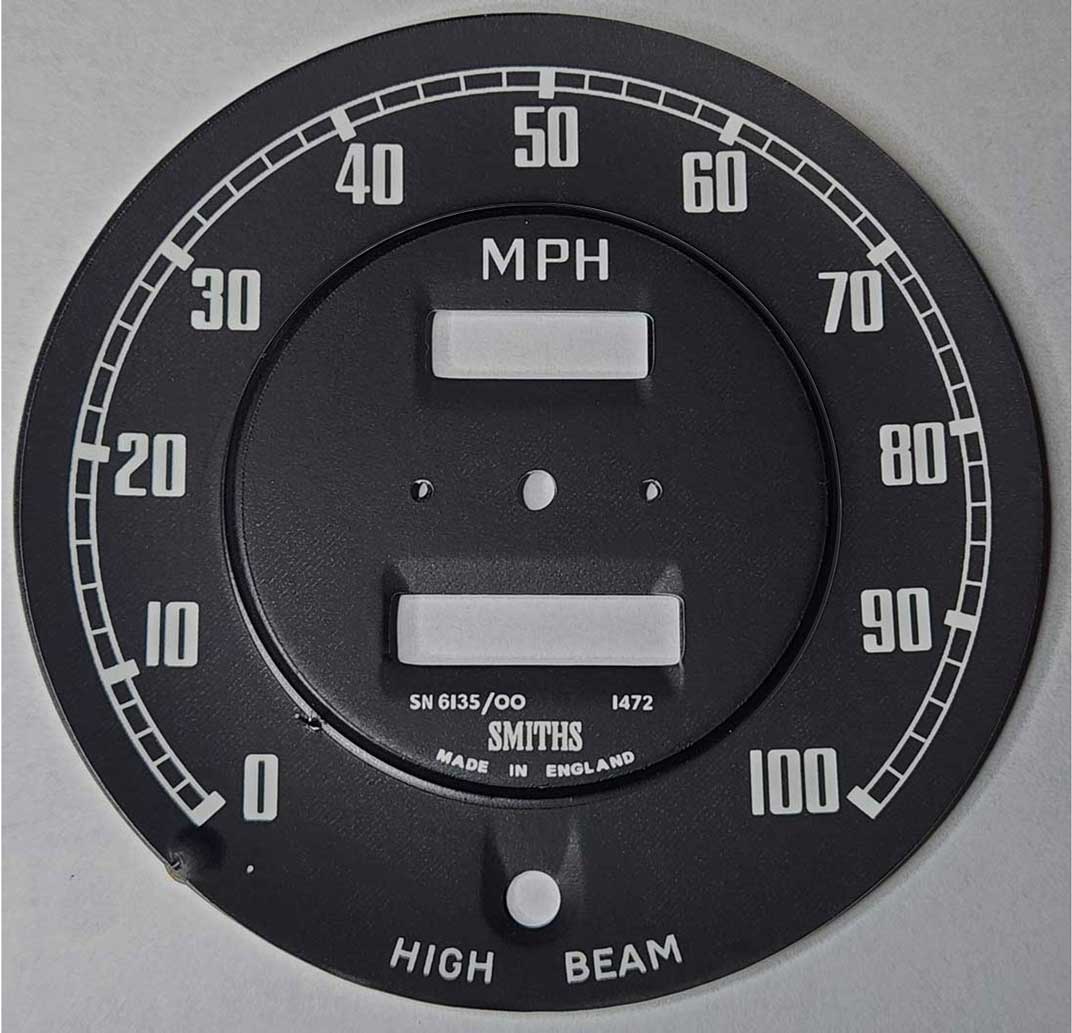
for an MGB, with a request to develop some overlay faces.  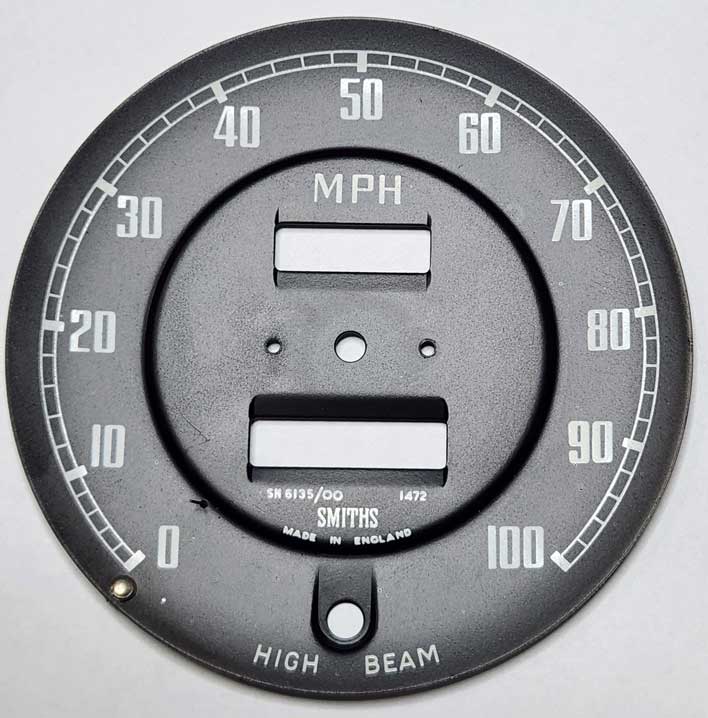 7k tach RV12401/008 and 100 MPH speedo SN 6135/00 1472. Both face plates are about 92 mm in diameter. I've been told these gauges fit early MGB, including MG Midget and Austin Healey Sprite from about 1960-1967 (US cars). The UK kept this size of gauge for a bit longer. Overlay installation information may be found below: CLICK HERE.
|
| Overlays for MGB. |
|
||
| Smiths 7k Tach for MGB (RVI 12401/008). Two Piece Set. When done shopping, please proceed to Shipping at Bottom: CLICK HERE Shopping Cart or Check Out is found at the bottom of the page. |
||
| Two Piece TACH Overlay Set | Two piece TACH Overlays Installed | |
 |
|
|
| POSITIVE EARTH TEXT INFO: Many owners have converted Positive Earth cars to Negative Earth, so if needed, this face can be custom made with "NEGATIVE EARTH" or this text can be REMOVED by request. This request can be added to the comment box or you can email. Modified example shown below. |
||
| Smiths 100 MPH Speedo for MBG (SN 6135/00 1472). Two Piece Set.
When done shopping, please proceed to Shipping at Bottom: CLICK HERE Shopping Cart or Check Out is found at the bottom of the page. |
||
| Two Piece SPEEDO Overlay Set | Two piece SPEEDO Overlays Installed | |
 |
 |
|
| MODIFIED MGB TACH OVERLAYS |
If you're curious about special custom work, it's possible. This tach was changed to an 8,000 RPM range
with less numbers (less crowded), and the "Positive Earth" was changed
to "Negative Earth." This was to be used for a tach which could have the signal re-programmed for the longer 8k RPM range.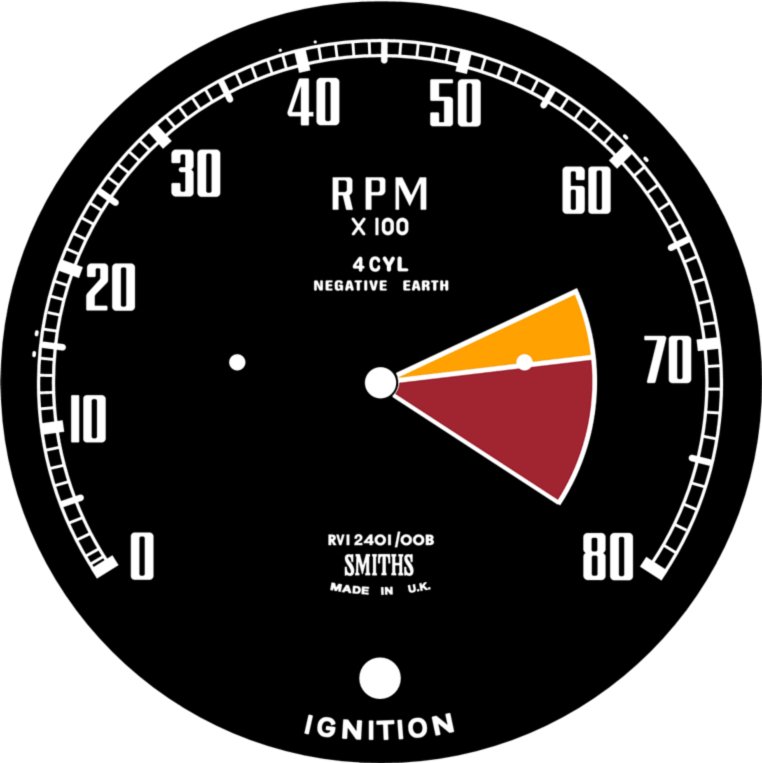 |
| NOTE about Colors: |
Old original faces can fade and change colors. Here's a good example below. The red here looks more like brown in places, but luckily there's a part of the red color that was protected under the needle center hub. This shows us that this red color is actually a deep red and not brown. I have tried to match these colors on the above designs as closely as possible. Feel free to ask if you have questions..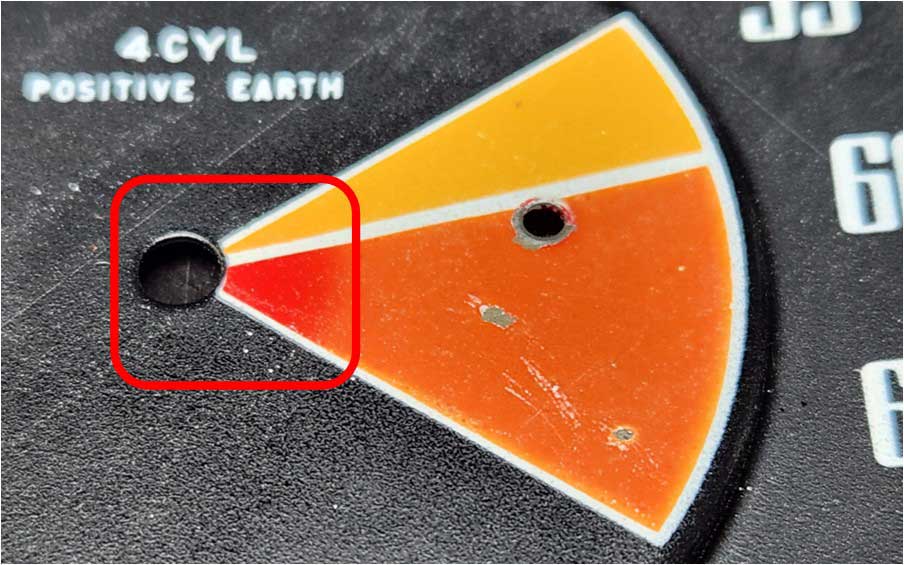 |
| Installation Tips for MGB Tach and Speedo. |
The Ignition and High Beam jewel shown below needs to be
removed from the tach and speedo face plate first. It's usually held in with a thin washer,
which can be carefully pried up and off from the back.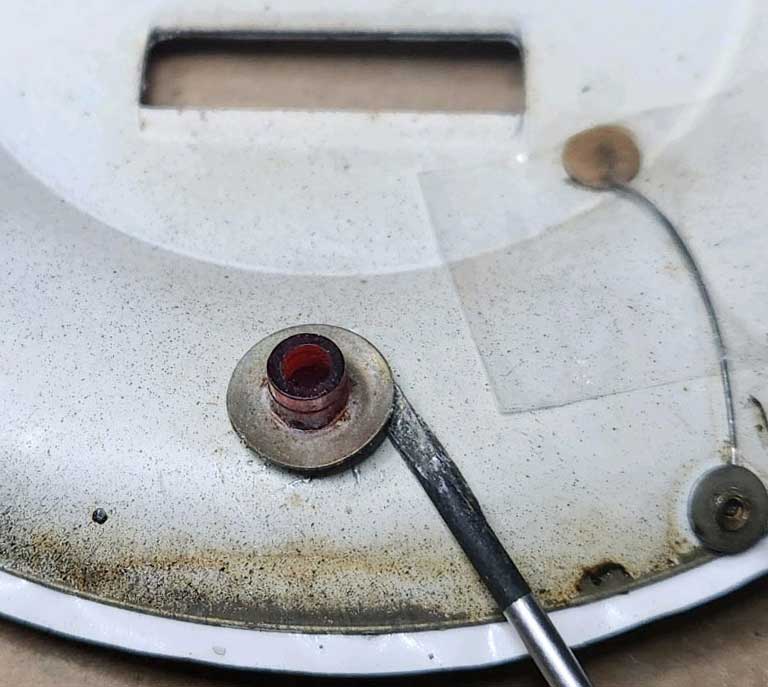 The speedo limit pin may get in the way. It's made using flexible wire, so if needed it can be carefully lifted out from the back while you're working. 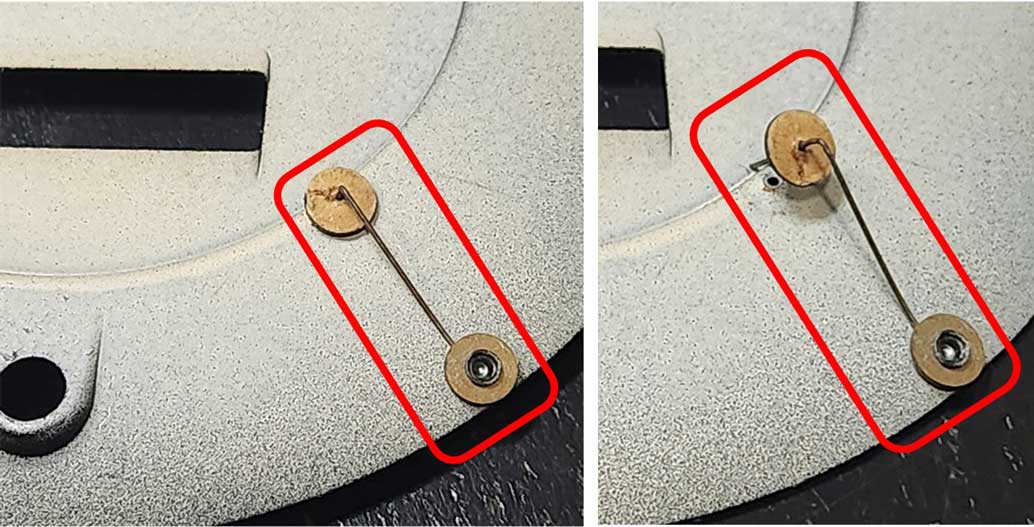 Adhesive-backed vinyl overlays require a clean surface to stick well and to stay stuck for a long time. I have found that using an Adhesion Promoter or Primer on the gauge face surface will greatly improve this. Adhesion Promoters like this are commonly used to get custom wrap vinyl to stick in difficult places on cars. You can search for "Adhesion Promoter Primer." https://www.amazon.com/VViViD-Primer-Adhesive-Promoter-Wipes/dp/B0D3VM58B7 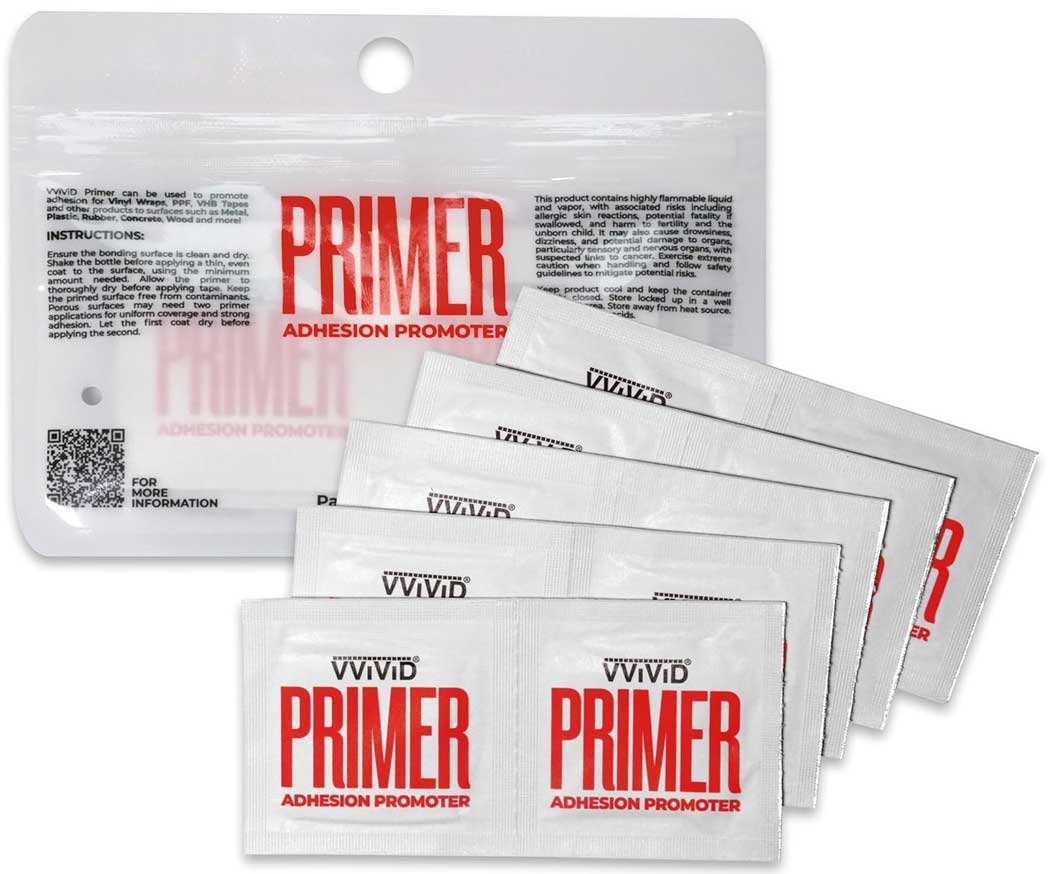 The cut edges of the overlays will have a very thin white edge which can be hidden better by carefully and slowly running a felt marker along it. It should be done before installation. 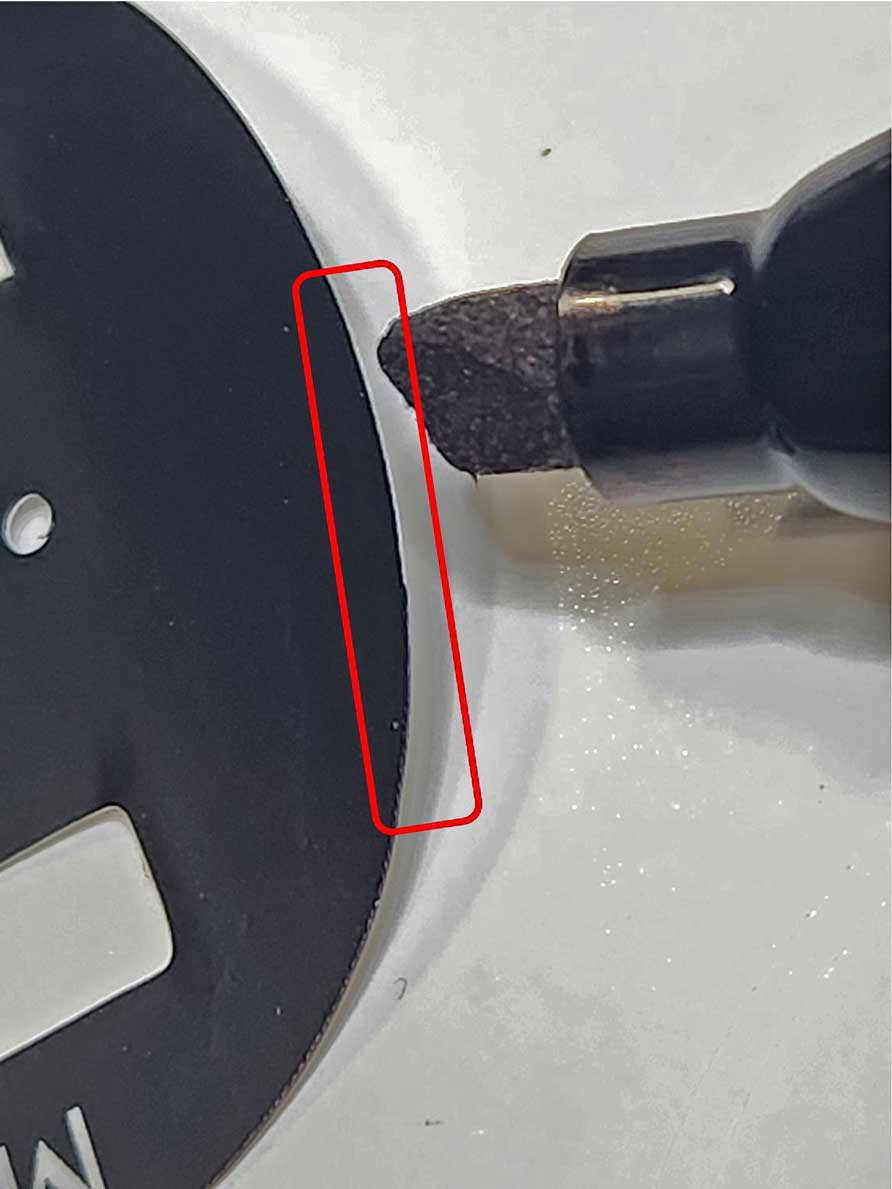 The outer ring overlay for the tach or speedo needs to be installed with a couple tricks in mind. This is because the face plate has a slight dish shape. You can begin by aligning the ignition or high beam jewel hole at the bottom. Then the overlay should FIRST be lightly set down, allowing the very outer edge to tack onto the outer edge of the face plate. When doing this it's best if the inner edge of this overlay stays ABOVE the face plate and is NOT YET tacked down. After you're happy with the positioning of the outer edge, then you should slowly rub the overlay down with your thumb on the OUTER EDGE FIRST, all the way around. And then as you go around the circle, slowing rub a little more toward the center. This allows the vinyl overlay to be slowly stretched to fit the bowl shape.  CENTER OVERLAY When positioning the center overlay, one important thing to do is make sure the MADE IN ENGLAND on the original face is covered by the overlay. The next thing to watch is to carefully line up the odometer windows for the speedo.The three center holes will line up pretty well on their own if you have the odometer windows lined up well. 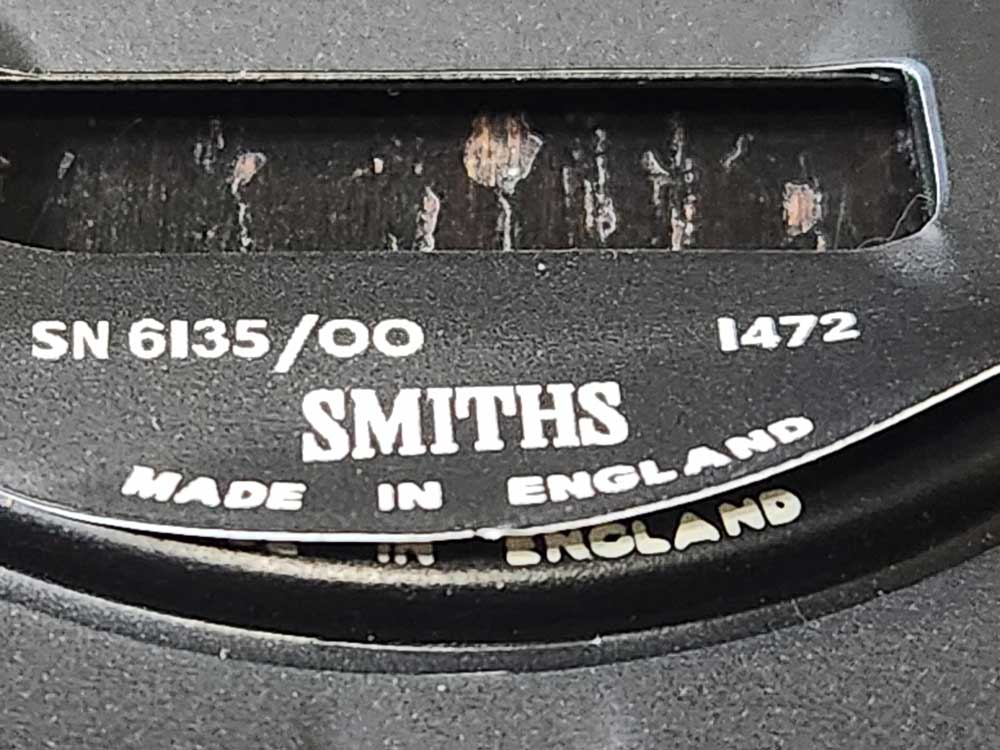 For the TACHOMETER CENTER OVERLAY, the bottom MADE IN U.K. text is also a good place to watch, in ADDITION TO the right edge of the RED LINE. On the speedo, get the odometer windows lined up as close as you can. Perfection is nice, but not always necessary. A slight mis-alignment like this will usually not be noticeable after installation. 
|
The below buttons are for use with my Shopping Cart system. This can be used to add any extra charge to any Shopping Cart order. This can help if you need to add an extra amount for an unusual order or for an item that is not normally available in my page. Just enter quantity, then the cost amount and then some details in the text box.. When done shopping, please proceed to Shipping at Bottom at Bottom:  |
| INSTALLATION INFORMATION |
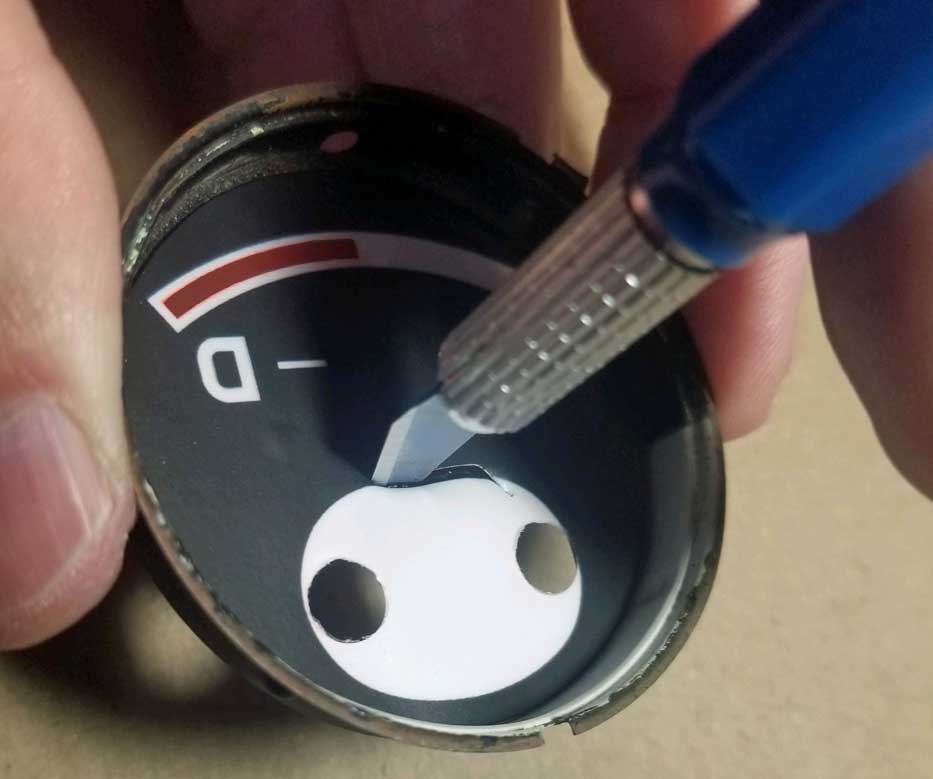
The headlamp jewel shown below needs to be removed from the speedo face plate first. It's held in with a thin washer, which can be carefully pried up and off from the back. Be careful of the limit pin when placing the face plate down on a surface to work on it. That pin can be bent easily. CLEAN the faceplate well. A CLEAN face plate surface is important. If any raised debris or specks of dirt remain, they will be seen as a bump in the surface of the vinyl. Try test-fitting the overlay first so you can become more familiar with the holes and how it's centered. When lining up the overlay, the limit pin is inserted first, then the three center holes are lined up. Try to center the pin and holes as best you can. Lifting the overlay back up and off is OK, Just be careful. It will want to stick pretty strongly. Once it's centered, rub the center flat area down with your fingers. Then rub the furthest outer edges down. DO NOT PUSH THE OVERLAY DOWN INTO THE BOWL YET. 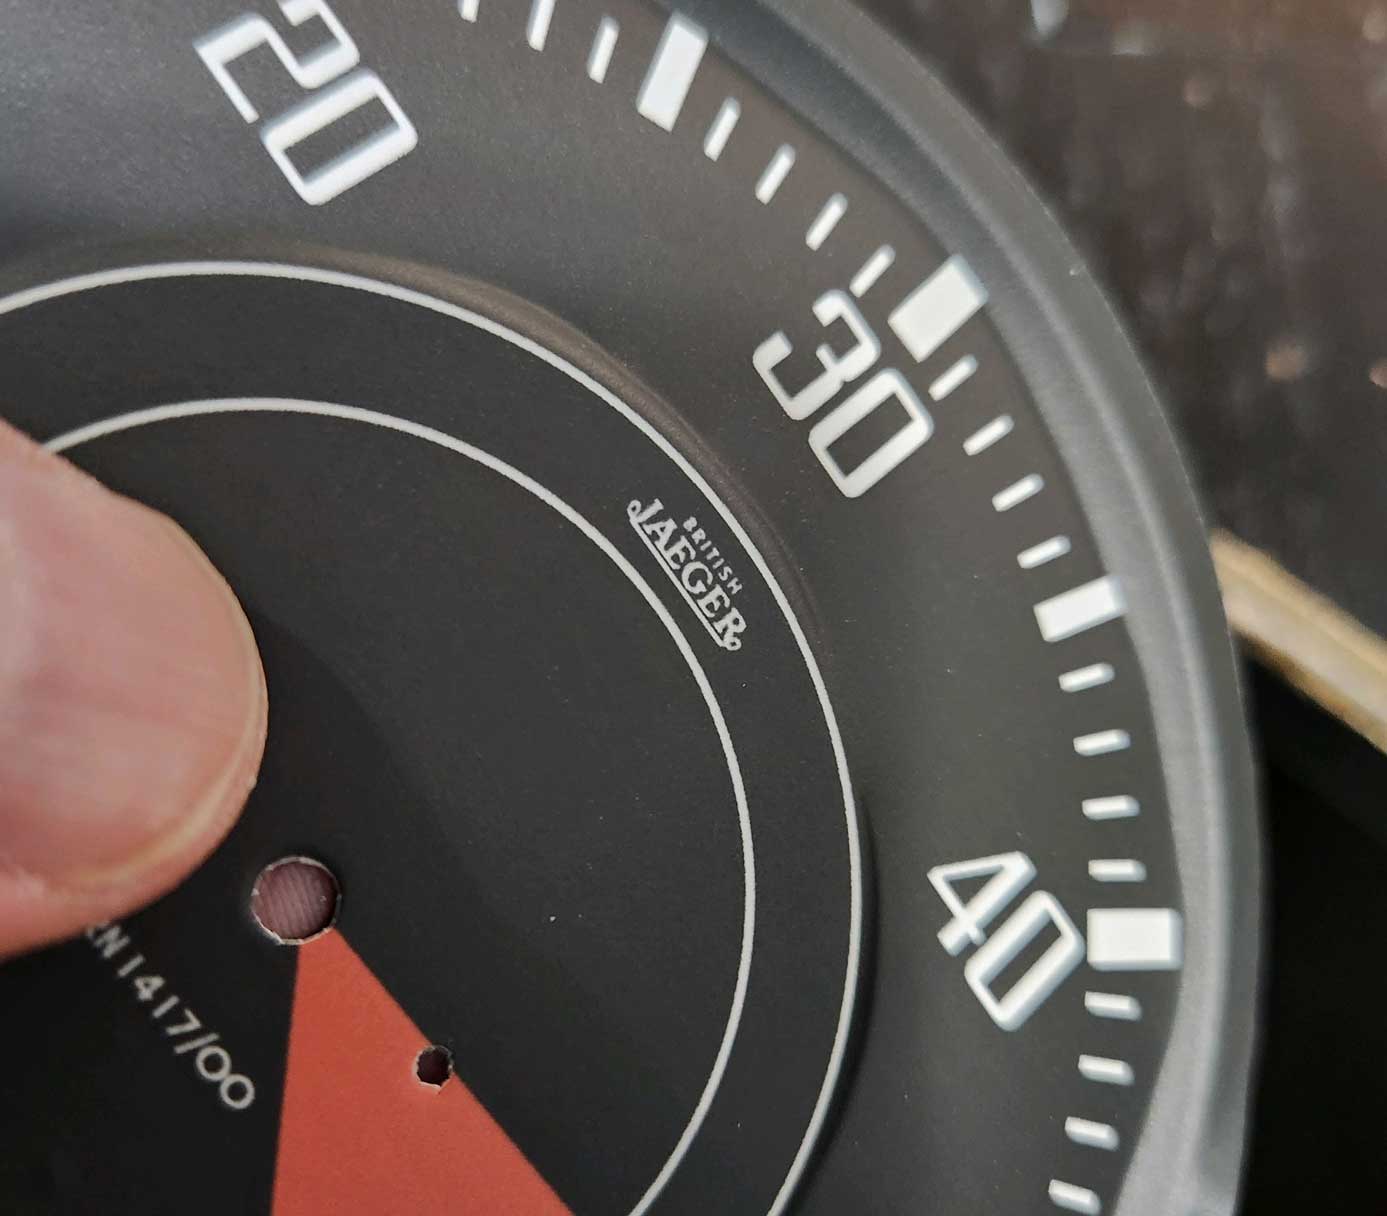 The next step requires a hair drier or heat gun. A hair drier is preferred. A heat gun can be used, but a heat gun can get too hot, so caution is needed. It needs to be on low heat. Use a hair drier to warm the furthest outer edges of the overlay, slowly rub your thumb along the outer edge and then slowly and gently fold the outer area of the overlay down into the bowl. Do this for a small portion at a time as you rub with your thumb around the outer perimeter SLOWLY over and over and over and around and around. DO NOT PUSH THE OVERLAY DOWN INTO THE CENTER YET, near the center flat area of the plate. Work only on the OUTER AREA first and then move slowly toward the center. Take your time and go slowly. The vinyl will stretch pretty easily when warmed up. You should be progressing about two or three millimeters toward the center for each revolution. You can warm up a small section, then rub, then warm up another small section, then rub. 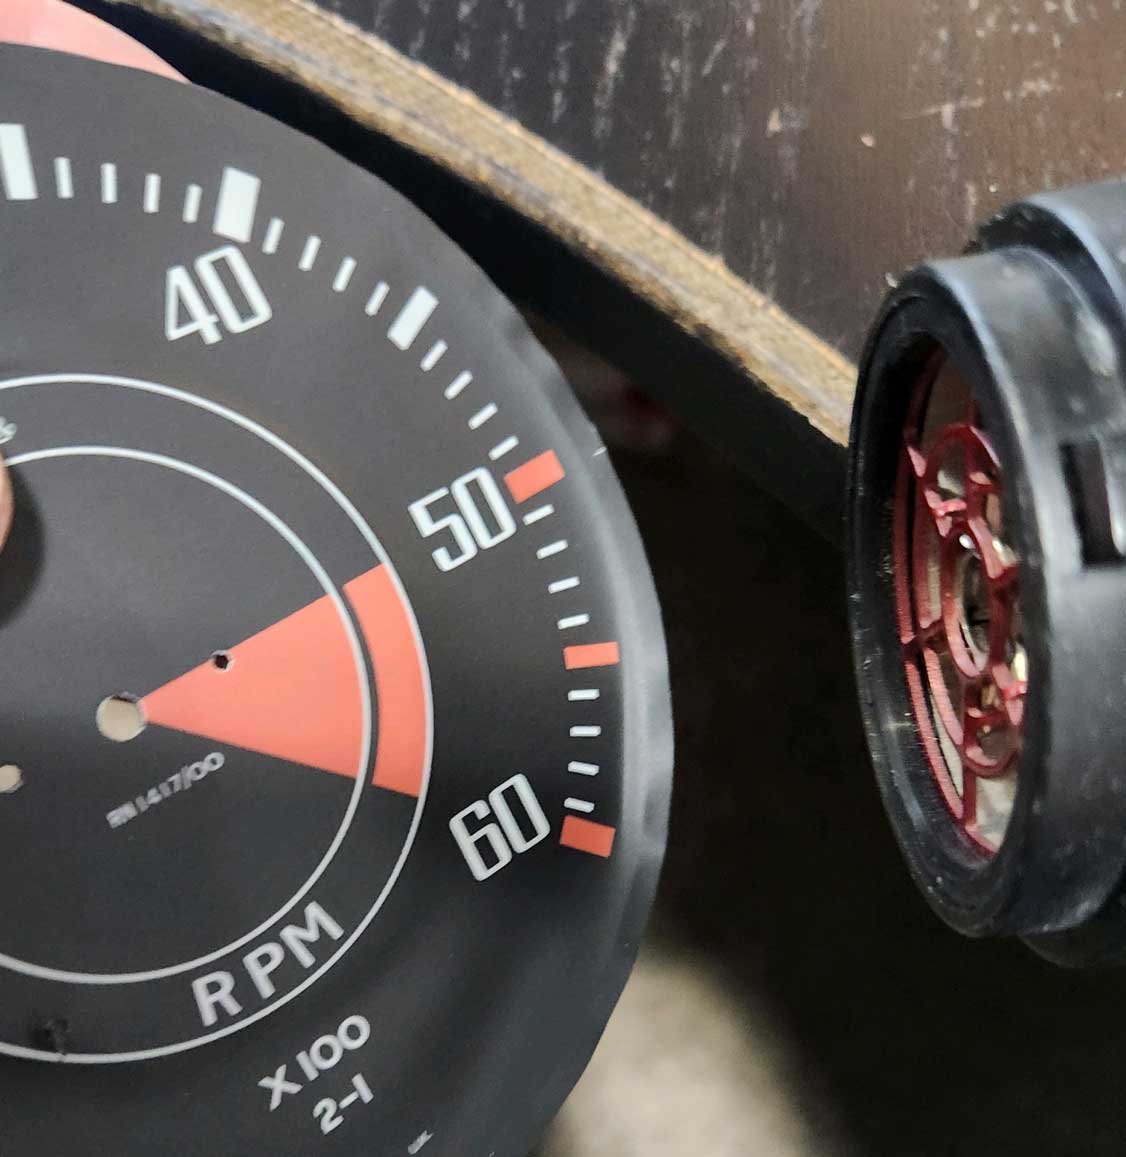 When you reach the raised rivet holding the limit pin wire, warm up this area and press down with your thumb so the vinyl forms over it. 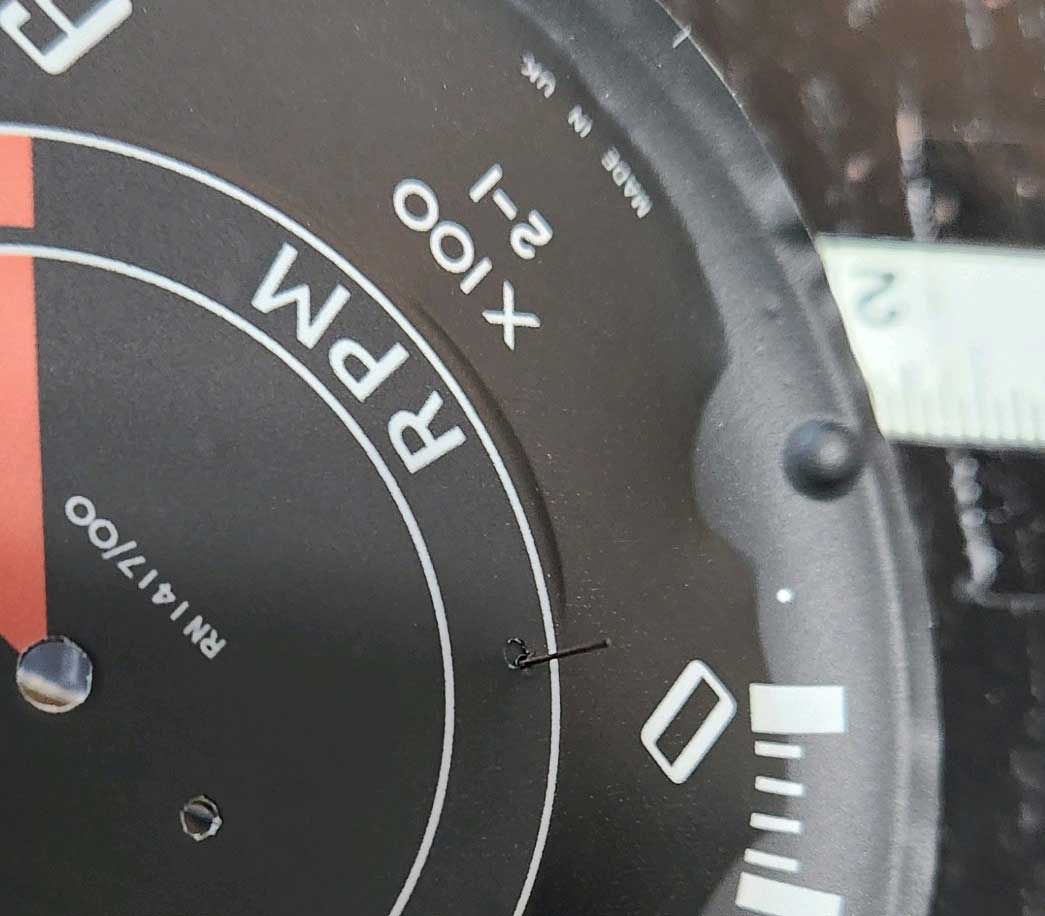 This is the tach face BELOW. Before you reach the bottom of the bowl on THIS face, you'll notice that air will tend to get trapped under the overlay. There needs to be a place for the air to escape, so in this image BELOW I have used my sharp hobby knife to poke a very small hole in the "1" to help the air escape. 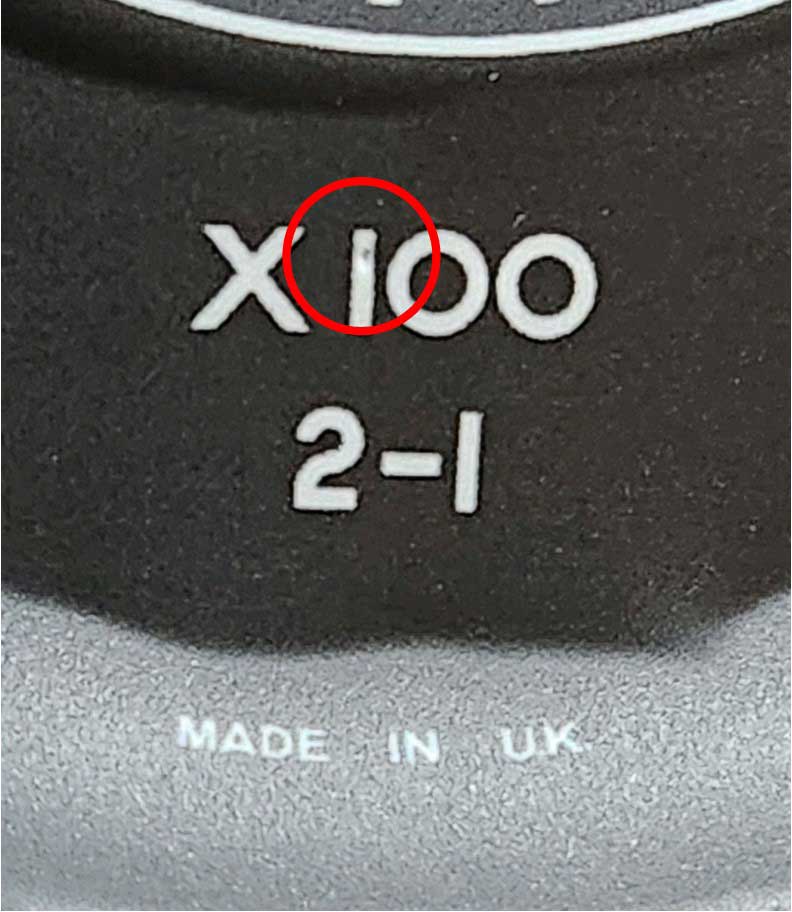 Here's another example below of poking some small holes to relieve trapped air in the tach face. Using a slow and careful technique, you can often avoid getting air trapped under the overlay, but it still might happen. If it does, you can poke a very tiny holes, then apply some heat and rub it down. 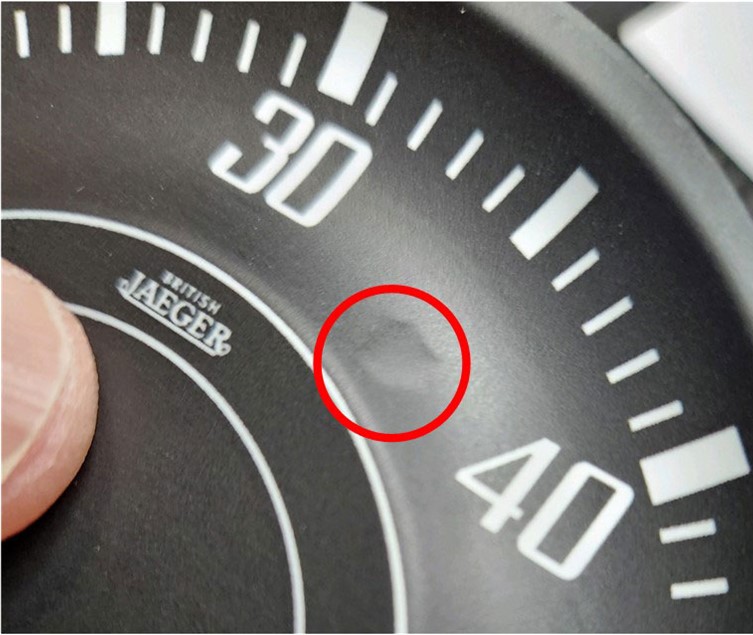 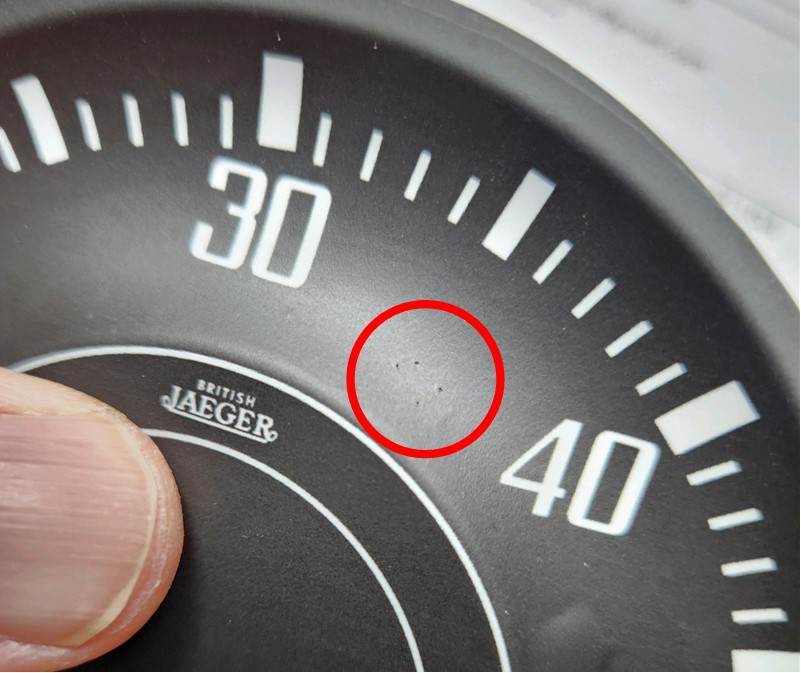 The speedo shown BELOW will usually NOT have a problem of trapping air, because the hole for the headlamp jewel can be used to allow air to escape. So don't fully cover up that jewel hole with vinyl until the very end. After the overlay is installed, use a sharp hobby knife (not a dull one) to slowly cut out the hole for the headlamp jewel on the speedo. 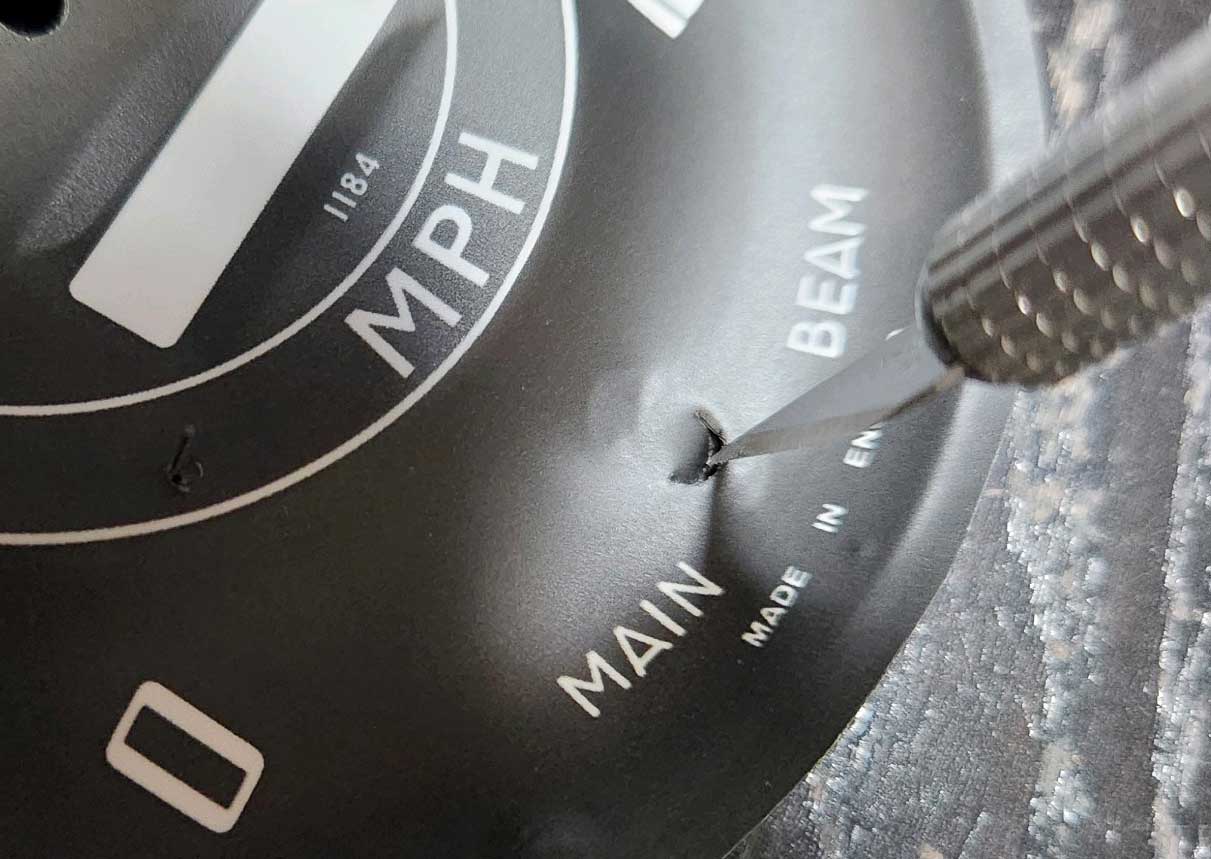 On the speedo center area BELOW, you should warm up the overlay covering the odometer windows and then press the vinyl down to help it form to the window shape. Then use a sharp hobby knife (not a dull one) to slowly trim the windows along the edges. 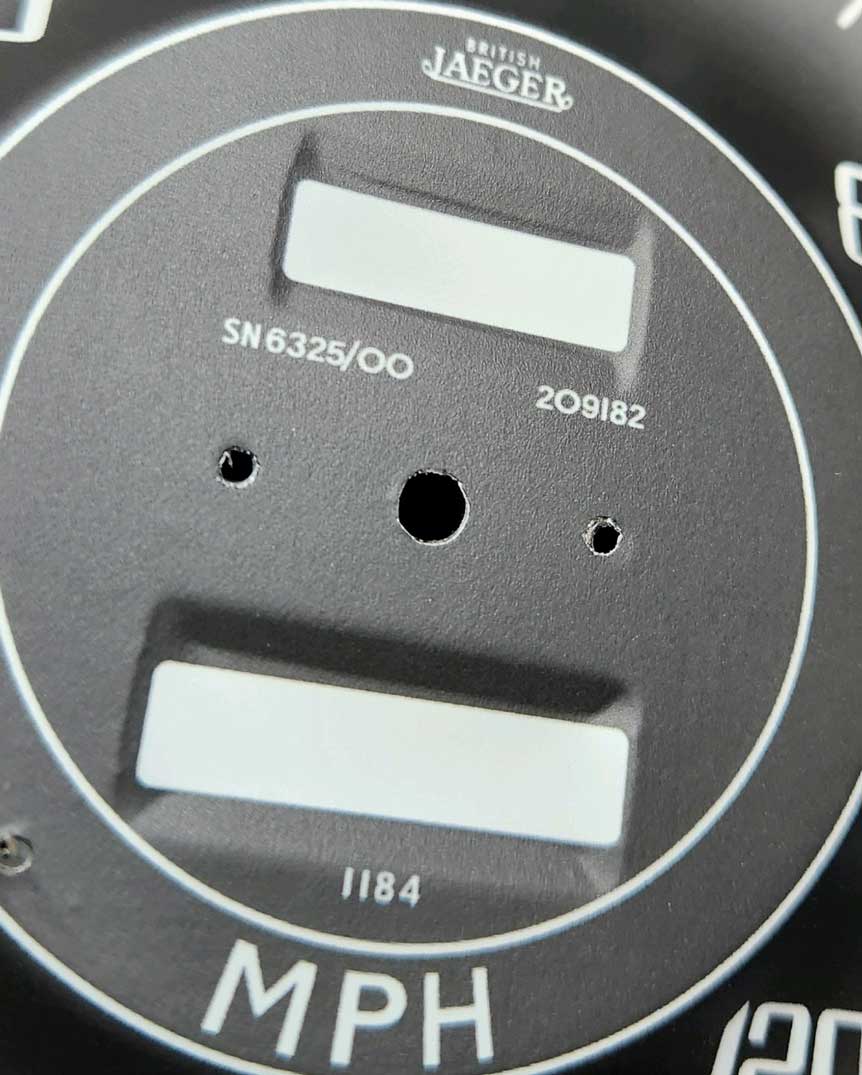 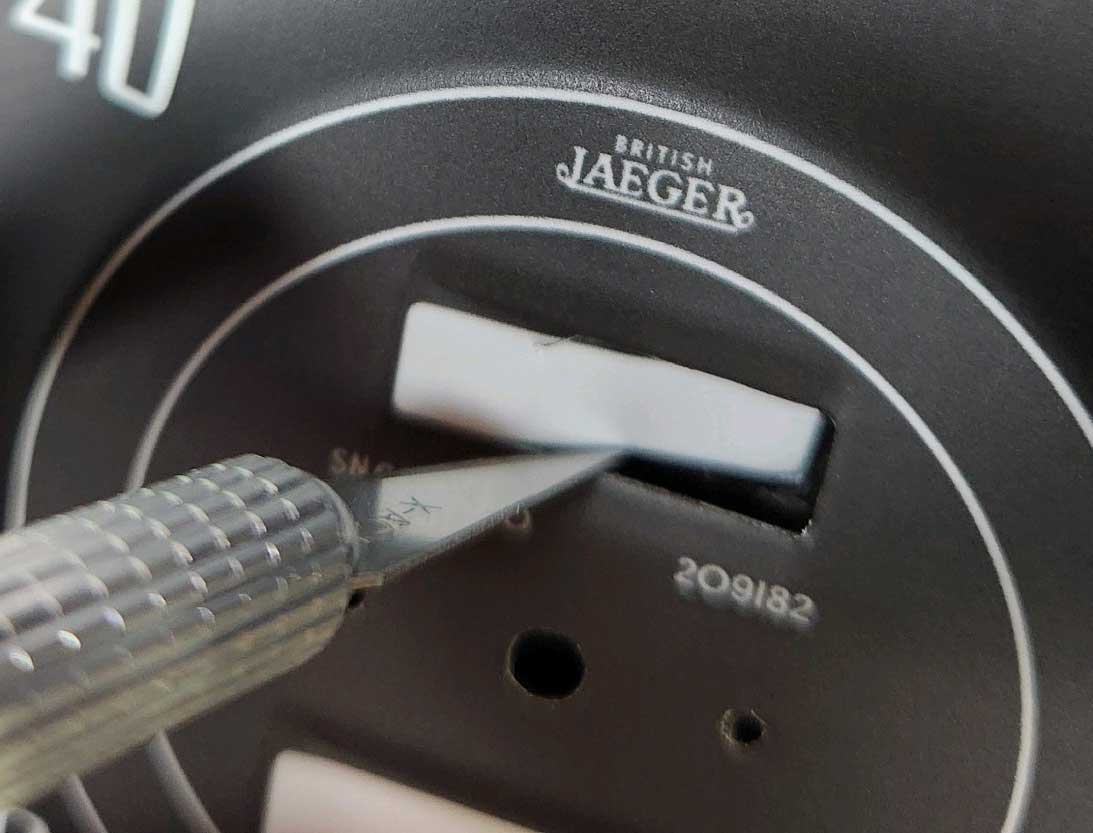 That's it. If you have questions, please let me know. CONTACT INFO |
| SHIPPING MENUS |
